• Skip to primary navigation
  • Skip to content
  • Skip to primary sidebar
  • Skip to footer

Ren Behan - Author Wild Honey and Rye

Food Writer

Main navigation

  • Buy the Book (USA)
  • Media
  • Recipes
  • Lockdown
  • Buy the Book (UK)
  • About Ren
  • Blog
  • Widget Area for Top Menu

Family Food

April 11, 2020

One-Pot Lamb with Orzo (Yiouvetsi)

One-Pot Lamb with Orzo (Yiouvetsi)

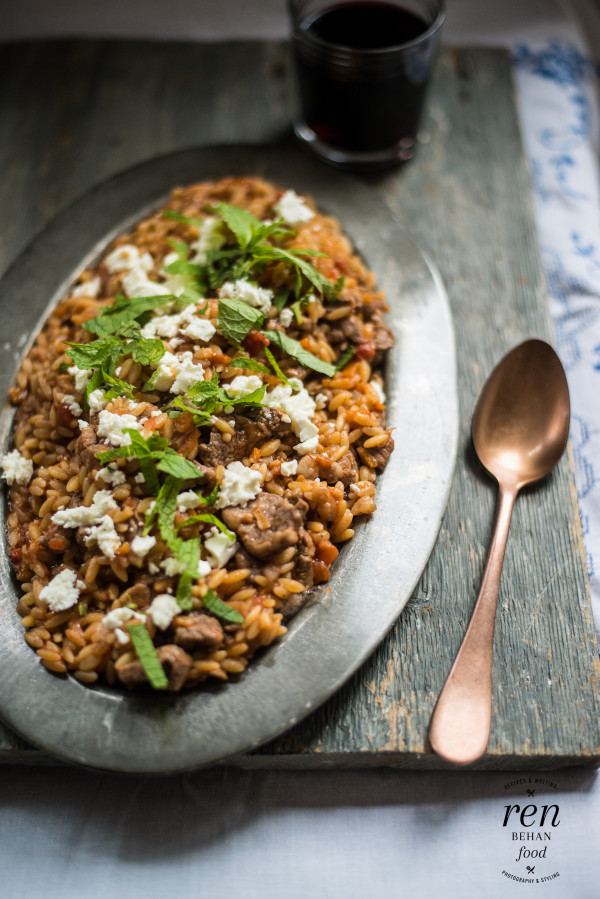
A Cypriot-inspired dish known as Yiouvetsi or lamb with orzo casserole. Perfect for feeding a big family, or a crowd. One of our favourites.

Cypriot Lamb with Orzo

8 votes

Print

One-Pot Cypriot Lamb

Author Ren Behan

Delicious and comforting and very easy to make. Orzo is a type of pasta, shaped like slightly larger grains of rice. If you can't find orzo, try macaroni, or any very small pasta shapes. 

Ingredients

  • 2 tbsp olive oil
  • 500g lamb, chopped into very small cubes (leg steaks or neck works well)
  • 2 white onions, finely chopped
  • 2 cloves garlic, peeled, grated
  • 2 tsp tomato puree
  • 400g tin plum tomatoes
  • 1 cinnamon stick
  • 1 tbsp. fresh or dried oregano
  • 1 litre lamb or chicken stock
  • 250g orzo pasta
  • Large handful fresh mint, roughly chopped
  • 100g feta cheese, crumbled

Instructions

  1. Heat 1 tablespoon olive oil in a large casserole pot and brown the lamb pieces, ideally in batches, making sure the first lot is brown before moving on and browning the next amount. Lift each batch out of the pan and set to one side until all of it has browned. Keep the browned lamb covered with a plate. 
  2. Add a second tablespoon of oil to the pan add the onions, scraping the bottom of the pan where the lamb has been browning. 
  3. Cook the onions very gently for 10 minutes until softened. Add a few tablespoons of water to help the onions along and keep the pan from drying out. 
  4. Add the garlic and tomato puree, stir and cook for a further five minutes.
  5. Tip the browned lamb back in, add the tin of tomatoes and then half fill the can with water and tip that in. Add the cinnamon and dried or fresh oregano. Cook on a low, gentle heat for ten minutes, stirring occasionally. Bread up the tomatoes with a spoon if they were whole and not chopped. 
  6. Stir the orzo into the casserole pan, stir well and pour over the stock. Cook, uncovered, for a further 10-11min or until the orzo is tender. It should not be too soft, but rather al dente. Season with lots of salt and pepper.
  7. Once cooked, carefully spoon onto a large serving dish, sprinkle over the fresh mint and the crumbled feta. Serve immediately. 

Courses Main

Cuisine Cypriot

You may also like:

Lamb with wild mushroom sauce and dill mash 

Polish meatballs with mushroom sauce 

Turkey and leek meatballs with tomato tagliatelle  

July 30, 2018

Risotto Caprese with Tomato, Mozarella and Basil (Gennaro Contaldo)

Risotto Caprese with Tomato, Mozarella and Basil (Gennaro Contaldo)

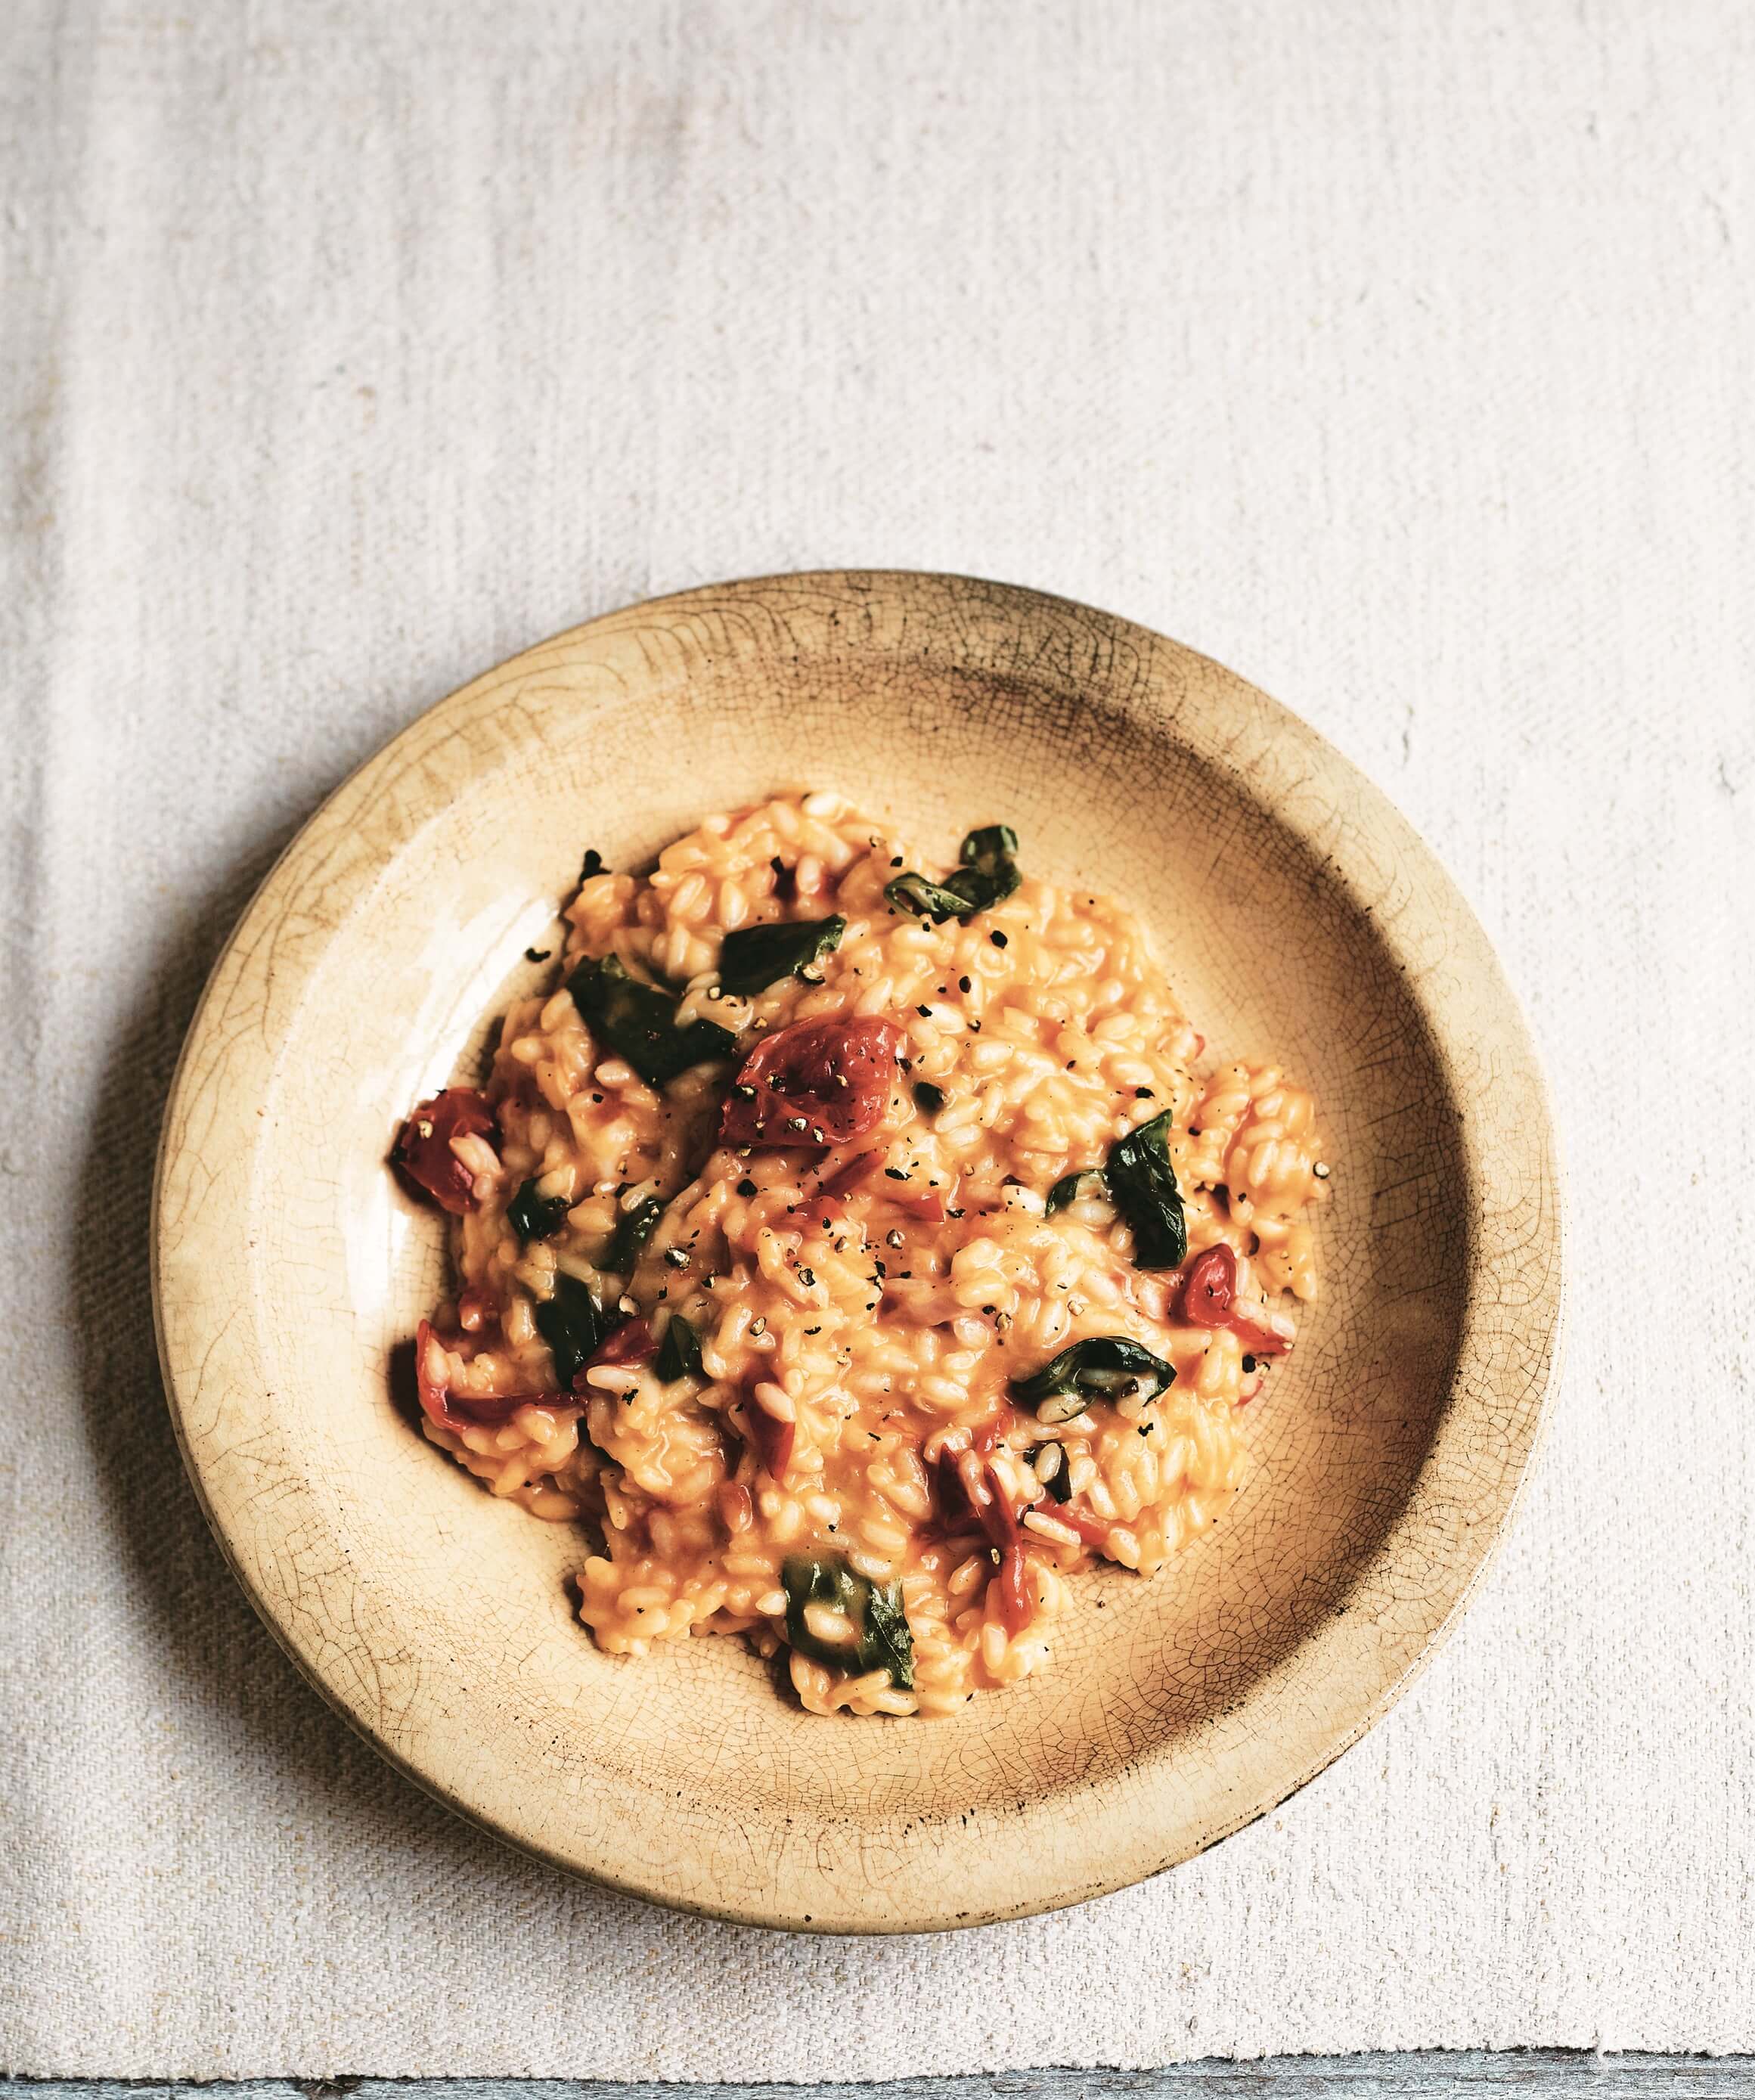
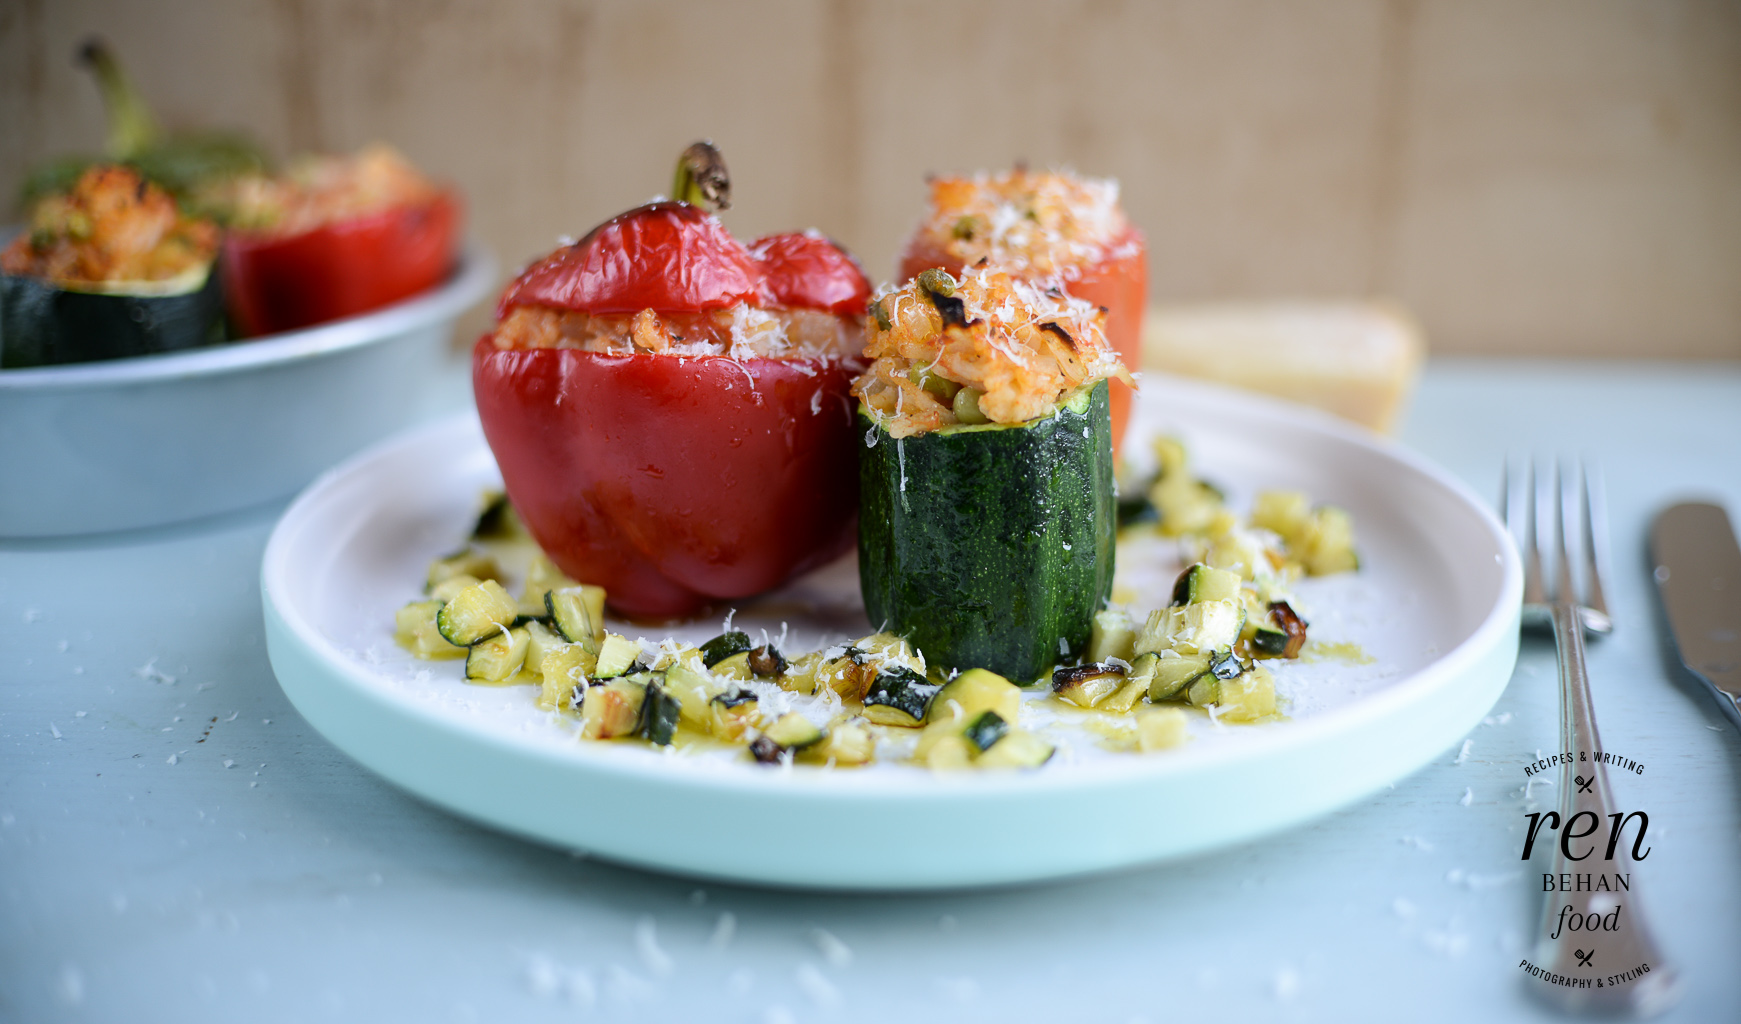
Ever since my trip to the Po Valley with Riso Gallo to understand more about how rice and other grains are produced in Italy, I have been obsessed with perfecting my risotto-making technique. During our visit, we ate in some truly memorable restaurants, sampling different grains and flavours of risotto, a particular highlight being a very simple aged-risotto grain, cooked with olive oil, butter and Parmesan cheese and adored with spring truffles.

Since then, making a risotto has become a weekly activity – in part prompted by the fact that all three of our children unanimously love risotto and so it’s one of the few meals that doesn’t have to be messed around with. It’s also a great, store-cupboard staple recipe. There are plenty of recipes here that you can make at home.

Of all the risotto recipe I have tried, this one, found in Gennaro Contaldo’s Fast Cook Italian is our winner – it is a Risotto Caprese – based on the flavours of the classic Caprese Salad of Tomato, Mozarella and Basil.

Contrary to the popular belief that making a risotto is time-consuming and labour intensive, you can have dinner on the table in around 25 minutes with this recipe.

I love the fact that Gennaro’s recipes are always easy to throw together and very family friendly.

Published with the permission of Pavilion Books.

Risotto Caprese - Risotto with Tomato, Mozarella and Basil

5 votes

Print

Risotto Caprese - Risotto with Tomato, Mozarella and Basil

Cook 30 mins

Total 30 mins

Author Gennaro Contaldo

Yield 4

The ingredients for this risotto are taken from the classic Caprese salad – tomatoes, mozzarella and basil. Simple to make and extremely tasty, it’s often my go-to midweek meal for the family - Gennaro Contaldo 


Ingredients

  • 40 g/1½ oz/2 generous tbsp butter
  • 2 tbsp extra-virgin olive oil
  • 1 small onion, finely chopped
  • 2 handfuls of basil leaves
  • 260 g/9¼ oz cherry tomatoes, quartered
  • 320 g/11¼ oz/1¾ cups risotto (Arborio) rice
  • 100 ml/3½ fl oz/7 tbsp white wine
  • 1.5 litres/52 fl oz/6½ cups hot vegetable stock (bouillon)
  • 200 g/7 oz mozzarella, cut into small cubes
  • 30 g/1 oz/1/3 cup grated Parmesan

Instructions

  1. Heat 20 g/¾ oz/1 generous tablespoon of butter and the olive oil in a large, heavy-based saucepan set over a medium heat. Add the onion and a couple of the basil leaves and sweat for 2 minutes.
  2. Stir in the tomatoes and continue to sweat for 1 minute. Stir in the rice, making sure each grain is coated in oil. Add the wine and cook until the rice has absorbed it.
  3. Then add a couple of ladles of hot stock, stirring with a wooden spoon until the rice has absorbed it all. Add a couple more ladles of stock and continue to cook in this way, stirring and adding more stock, for 17–20 minutes, until the risotto is cooked al dente.
  4. Remove from the heat and add the remaining butter and mozzarella, stirring well until it has nicely melted into the risotto.
  5. Stir in the grated Parmesan and remaining basil leaves and serve immediately.

Courses Main

Cuisine Italian

Photography Kim Lightbody. 

Gennaro’s Fast Cook Italian 

From Fridge to fork in 40 minutes or less

ISBN: 9781911595113

Price: £20.00

Publication date: 5 April 2018

Fast Cook Italian Gennaro COntaldo

Other risotto posts you may like:

Quick Risotto-Stuffed Vegetables 

3 Grains: Rice, Spelt and Barley Risotto with Chicken and Dill 

Sausage and Courgette Risotto  

February 1, 2018

Polish Meatballs with Mushroom Sauce

Polish Meatballs with Mushroom Sauce

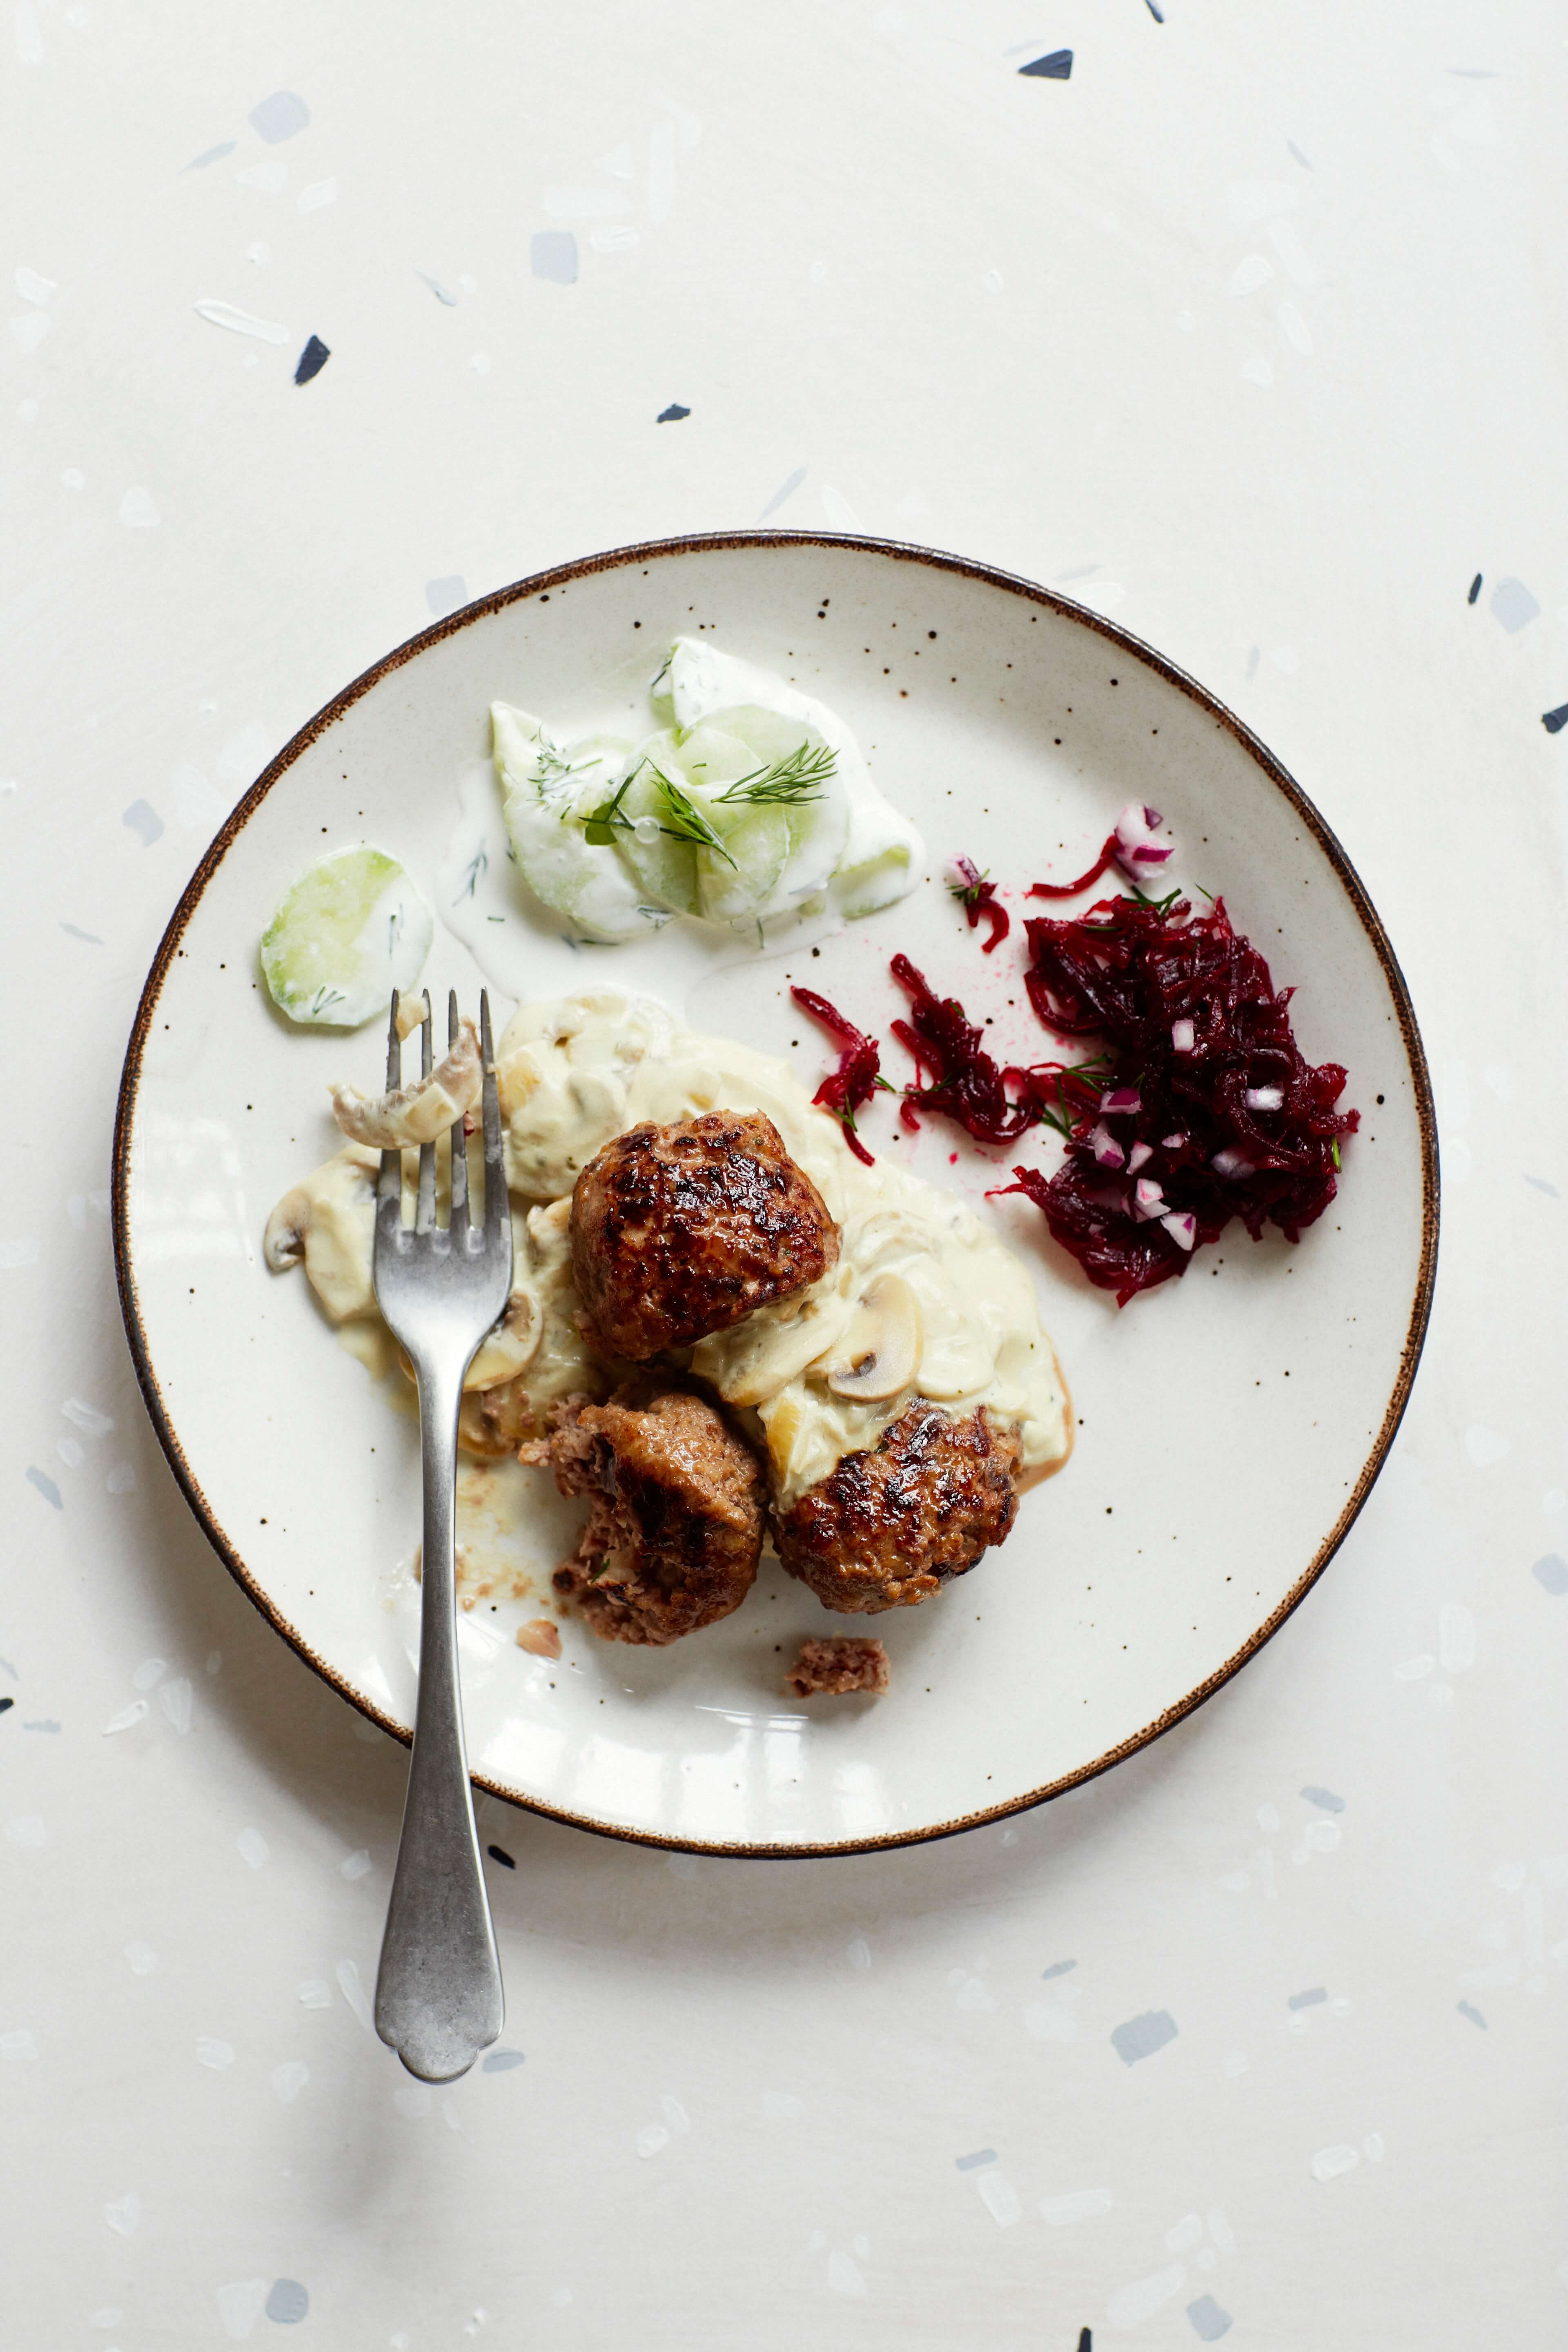
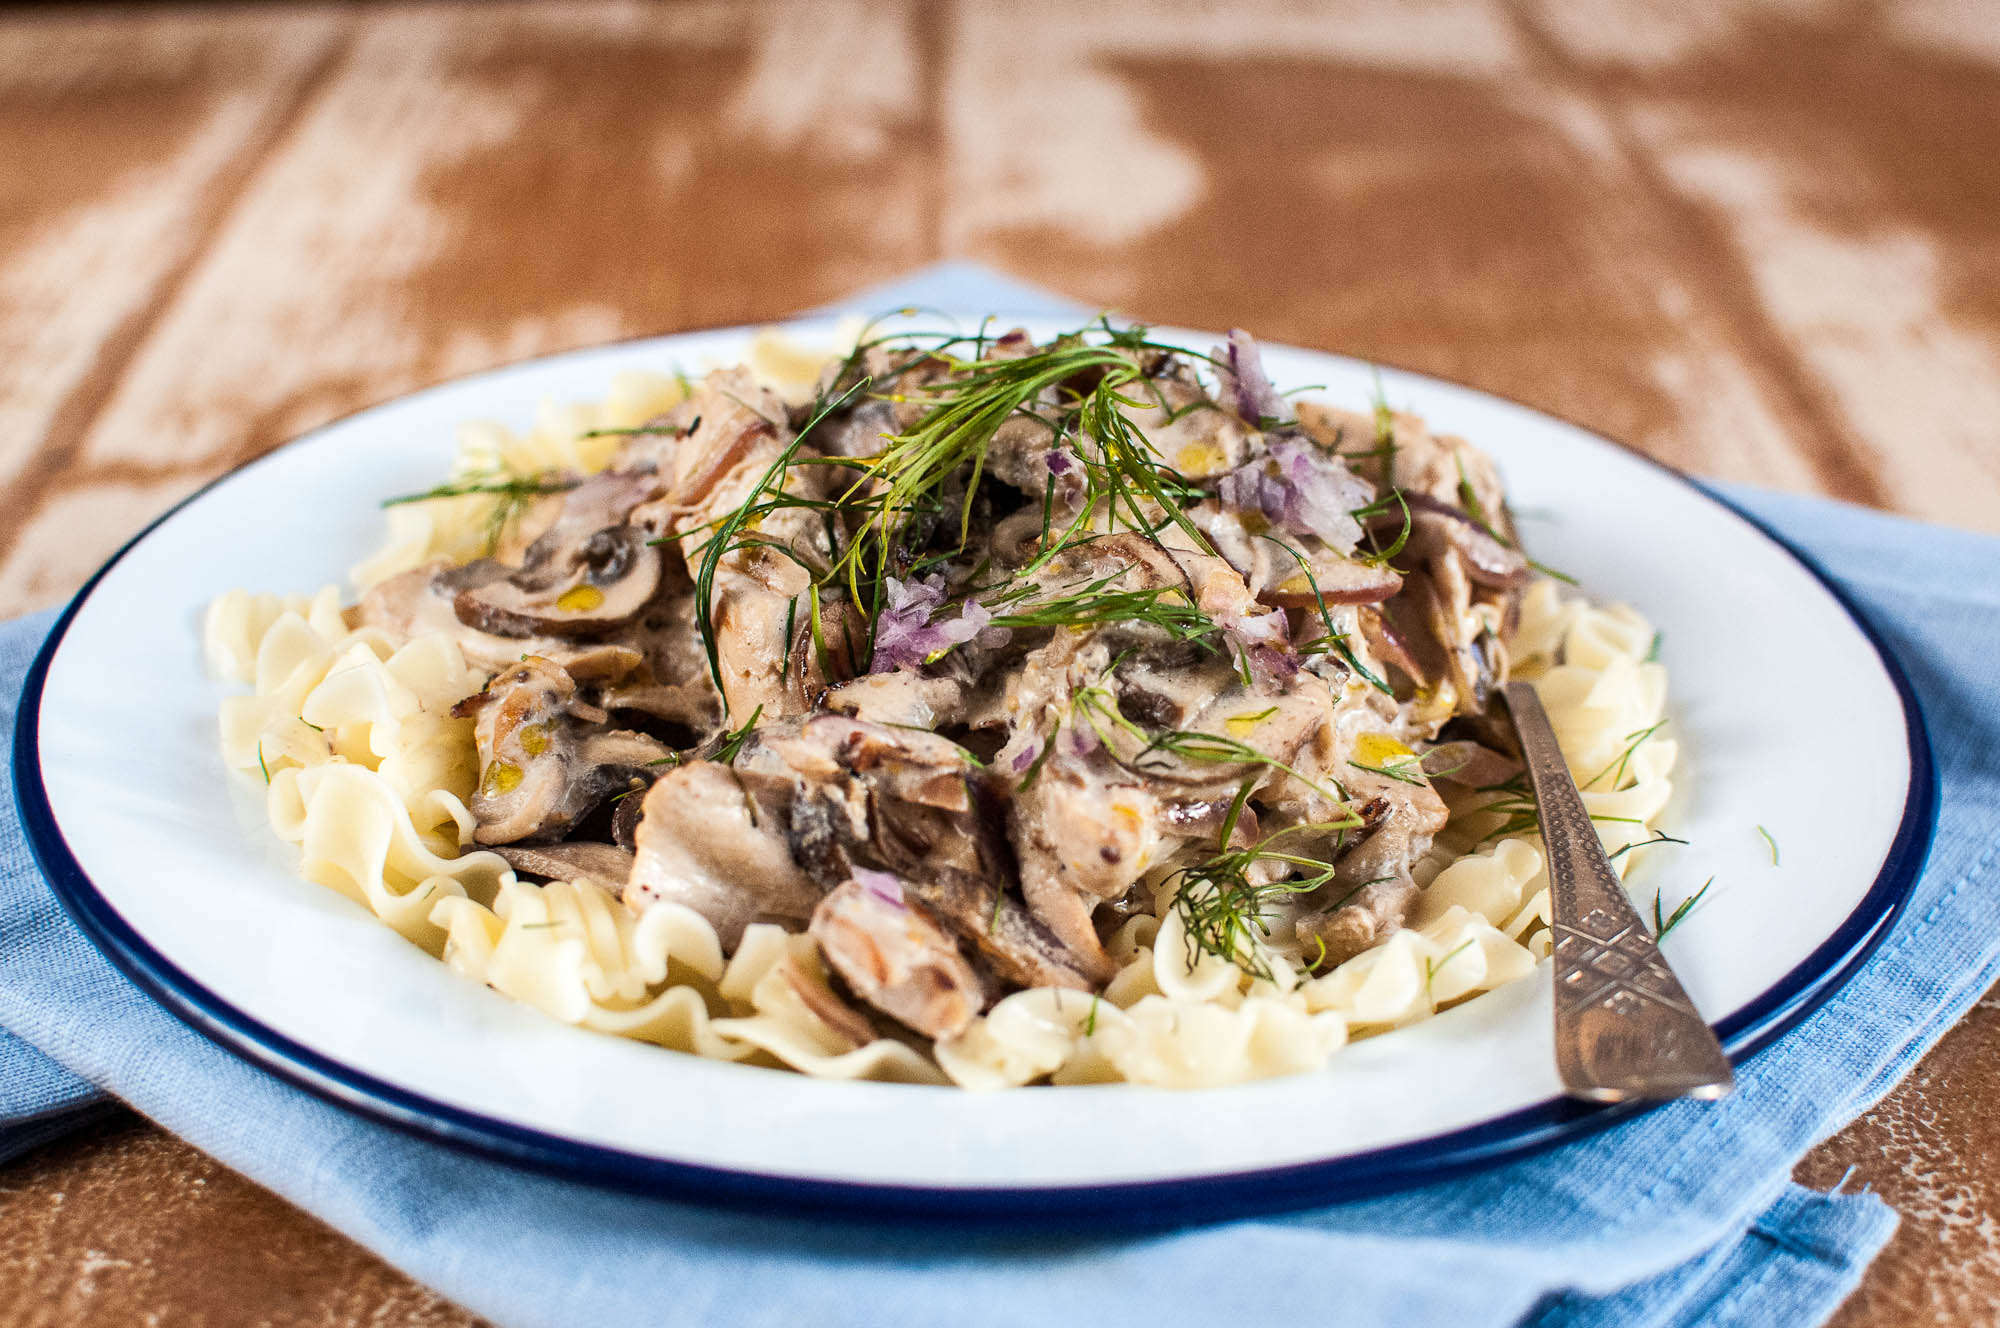
This is one of my favourite recipes from my cookbook Wild Honey and Rye for Polish Meatballs in a Mushroom Sauce, which you can find on page 118.

I serve my meatballs with a light cucumber, sour cream and dill salad and a grated beetroot salad. There’s no need for potatoes, although my Mama would serve hers with potatoes (the apple mashed potatoes on page 85 or  the new potatoes with butter and dill on page 89) both work really well. Small meatballs in Poland are known as kotleciki or pulpety, larger ones are called kotlety mielone.

Skip straight to the recipe here

Wild Honey & Rye - Meatballs with Cucumber Salad
Image Credit: Yuki Sugiura for Pavilion Books

Wild Honey and Rye: Modern Polish Recipes is available in the UK here, published by Pavilion Books. 

The first American edition is also available for in the US here and will be published by Interlink Books in March 2018.

Thank you for all your support!


You may also like:

The Happy Launch of Wild Honey and Rye – read here.

Polish Mushroom Soup

5 Polish Recipes from Wild Honey and Rye 


With thanks to Pavilion Books for the permission to share this recipe from Wild Honey and Rye: Modern Polish Recipes.

December 11, 2017

3 Grain Risotto with Chicken and Dill

3 Grain Risotto with Chicken and Dill

I travelled as part of a press trip to Milan in Italy to visit Gallo, the Italian family business, established in 1856 and spanning 6 generations, to learn about rice and grains from the best in the business. This is one of the recipes I tried in Italy, using Gallo’s 3 Grain variety, with rice, spelt and barley, which I came home to re-create. 

3 Grains Risotto


Print

3 Grains (Rice, Spelt and Barley) with Chicken and Dill

Prep 10 mins

Cook 20 mins

Total 30 mins

Author Ren Behan

Yield 4

A perfect balance of three cereal varieties, this recipe uses Riso Gallo 3 Grains, Italian Rice, Spelt and Pearl Barley – all with the same cooking time – just 18 minutes. This is a healthier alternative to a traditional risotto dish as it is higher in fibre. 

Ingredients

  • Olive oil
  • 300g Riso Gallo 3 Grains (Rice, Barley & Spelt)
  • 1 white onion, peeled chopped
  • 1 carrot, peeled, finely chopped
  • 1 stick celery, peeled, chopped
  • 1 courgette, chopped
  • 250g cooked chicken breast, chopped or shredded
  • A splash of white wine or water
  • Fresh dill
  • Sea salt and freshly ground black pepper

Instructions

  1. Bring a large pan of salted water to the boil. Tip in the '3 grains' and cook for 18 minutes. If using the pre-cooked 3 Grains 'express' variety, you can skip this step. 
  2. In the meantime, place a large frying pan onto a medium heat. Add a tablespoon of olive oil, add the onion and cook for five minutes until translucent. Add the carrots and celery and continue cooking. 
  3. Once the vegetables have softened, add the courgette and chicken and cook for a further 5-6 minutes, adding a splash or wine or water to the pan. 
  4. Drain the 3 grains, rinse and add them into the pan (or tip in a pre-cooked packet of grains).
  5. Drizzle over a little more olive oil, stir and coat all the grains and season with sea salt and black pepper. Ensure the chicken is piping hot. 
  6. Serve, adding a little dill.  

Notes

The dish can also be chilled and served cold, as a salad. 

You may also like:

Katie’s Slimming World-Friendly Chicken, Dill and Vegetable Rice Pots, also inspired by our trip to Riso Gallo in Milan.

Delicious too – my Quick Risotto Stuffed Vegetables

Risotto Caprese with Tomato, Mozarella and Basil

Feeding children – they may like our favourite carrot and parmesan risotto 

Samples provided by Riso Gallo, this is an unpaid recipe post. 

July 11, 2017

Easy Chocolate Trifle

Easy Chocolate Trifle

The chocolate trifle is an absolute joy of a recipe. You can use almost any chocolate cake as a base – the recipe suggests chocolate muffins, but we used chocolate swiss roll. You add chopped bananas and white chocolate buttons, and then pour over some marmalade (let down with water) in place of jelly.

custard_eat_the_week


The really fun part is making your own chocolate custard. I was a bit daunted by this, but it was actually really straight forward. I’ve made it three times now, and have had no curdling at all. If you can master the custard recipe, you’ll always have this on hand to make for pouring over sponge puddings, or crumbles. You can leave the chocolate out and add a little vanilla for a plainer option, too. Or, simply use any custard you have at home.

chocolate trifle


Here’s the recipe by Simon Rimmer.

*I’ve made a couple of changes – I think you can get away with half a jar of marmalade and also, I leave the custard as it is and don’t stir in the whipped cream as there’s plenty of cream on top.

1 vote

Print

Chocolate Trifle

Prep 30 mins

Inactive 13 mins

Total 43 mins

Author Simon Rimmer for Eat the Week

Yield 8 portions

An indulgent home-made trifle using chocolate roll or muffins, fresh bananas, marmalade and buttons topped with a fresh chocolate custard and a mascarpone-vanilla cream. Perfect for playdates or to feed a crowd or a big family. 

Ingredients

3-4 large chocolate muffins or one large chocolate swiss roll

Good glug of brandy (optional, leave out if making for kids)

2-3 bananas – sliced

75g white chocolate buttons

1/2* jar of orange marmalade – let down with 100ml hot water

Fresh Custard

6 egg yolks

125g caster sugar

40g flour

300ml double cream

100ml milk

150g dark chocolate – chopped

200ml double cream – whipped (optional)

Topping

250ml double cream – softly whipped

250g mascarpone cheese

1 vanilla pod – seeds scrapped

To decorate – 100s and 1000s

Instructions

  1. Break up the muffins or slice the chocolate swiss roll and put into a trifle bowl. Add a good glug of brandy, if using. 
  2. Add the banana slices, chocolate buttons and then pour over the let-down marmalade.
  3. Custard – whisk the egg yolks and sugar and flour together.
  4. Bring the cream and milk to simmering point and then pour over the egg mix, a little at a time, whisking together well until smooth.
  5. Put the custard mixture back into the pan with the dark chocolate and stir until chocolate melts and the mixture thickens. Do this over a very low medium, stirring continuously for about 5 minutes. Transfer into a cool bowl. Cover with cling film and leave to cool completely.
  6. Once cool, fold in the whipped cream, if using. Pour the custard over the sponge/bananas/buttons.
  7. Topping – mix the cream, mascarpone and vanilla together until well combined. Pipe or spoon over the top and sprinkle with 100s and 1000s.

Notes

1 jar of marmalade reduced to 1/2 jar 

Courses Dessert

Cuisine British


I hope you get to try this recipe, or any of the others from Eat the Week – I have loved them!

With thanks to Iceland Foods for commissioning this post #ad

July 9, 2017

Sausages Baked with Squash [One Pan]

Sausages Baked with Squash [One Pan]

In partnership with Iceland #ad

One Pan Baked Sausages and Squash
Sausages Baked with Squash

If you regularly cook for your family, you’ll probably find, as I do, that some of the biggest challenges you face in a typical week revolve around coming up with a constant stream of nutritious meals, whilst fitting things in around your family’s schedule and dietary requirements. This is when a bit of meal planning comes into its own, as do shortcuts by way of handy items that can easily be pulled out of the freezer.

How can the freezer help?

  • I keep key items on hand, ready for when I’ve not had time to plan ahead, allowing me to quickly and easily rustle up a healthy family meal, such as frozen rice for stuffed vegetables or one-pot dishes, frozen chopped onions, frozen fruit (for quick smoothies), frozen seafood such as king prawns and salmon fillets for fishy pasta, and frozen pastry for quick my quick chicken pie.
  • Frozen food, especially frozen veggies, can often be just as good frozen as fresh
  • The freezer can act as a great back up, saving space in the fridge

So, this week our meal plan will feature some of Simon’s recipes, such as Sausages Baked with Squash and Rosemary (see the recipe below) and a retro Chocolate Trifle for pudding which will last a couple of days at least as it’s so big!


My ultimate food hacks

  • Scale up and batch cook so that one meal lasts a couple of nights
  • Keep things such as frozen chopped onions and packets of frozen vegetables to hand in the freezer
  • Go for ‘tray-bakes’ or one-pan dishes as much as possible – this is where you throw lots of items together and bake them on one tray in the oven. We love chicken thighs with chorizo and new potatoes, or salmon with roasted vegetables too.

Commissioned post by Iceland #PowerofFrozen #ad

March 19, 2017

Salmon, Egg and Cress Sourdough Toasts

Salmon, Egg and Cress Sourdough Toasts

Read this post to learn about growing your own cress at home

Salmon Egg and Cress Toast

1 vote

Print

Salmon, Egg and Cress Sourdough Toasts

Author Ren Behan

Yield 2 slices

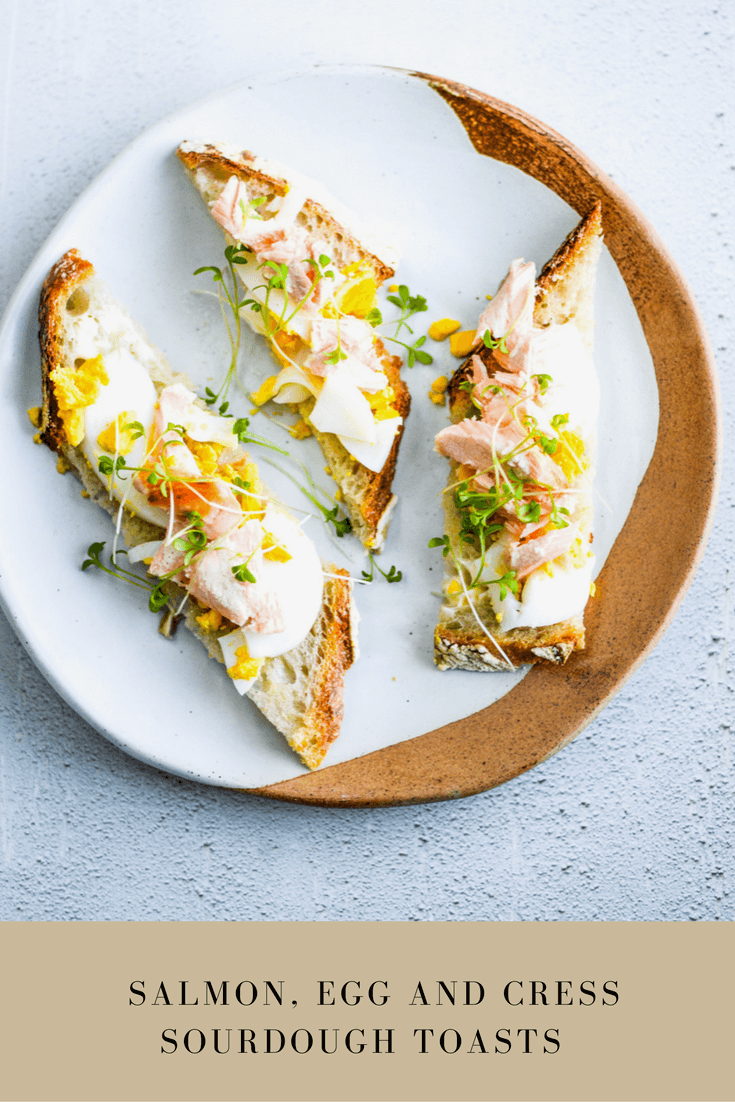
A high-protein breakfast, brunch or spring starter made with sourdough, roasted salmon, egg and home grown cress

Ingredients

2 slices fresh sourdough

2 tsp butter

1 egg, hard boiled, sliced

1 poached or roasted salmon portion (90g)

2 tbsp cress (try growing your own)

Black pepper

Instructions

Lightly toast the sourdough bread. Spread with butter. Cut each slice into three fingers.

Arrange the sliced hard boiled egg over the top. Scatter over the cooked salmon and cress.

Season with a little freshly ground black pepper. Serve immediately.


September 20, 2016

Lamb Steaks Wild Mushroom Sauce and Dill Mash

Lamb Steaks Wild Mushroom Sauce and Dill Mash

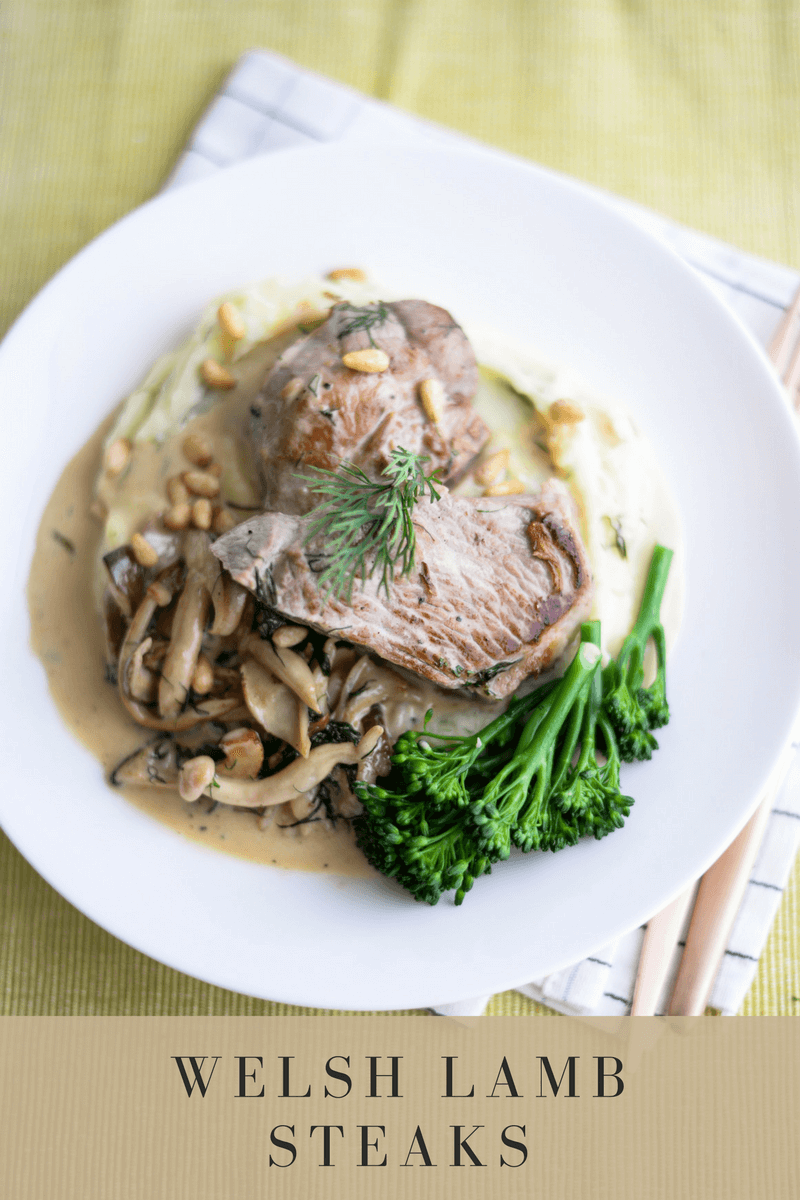
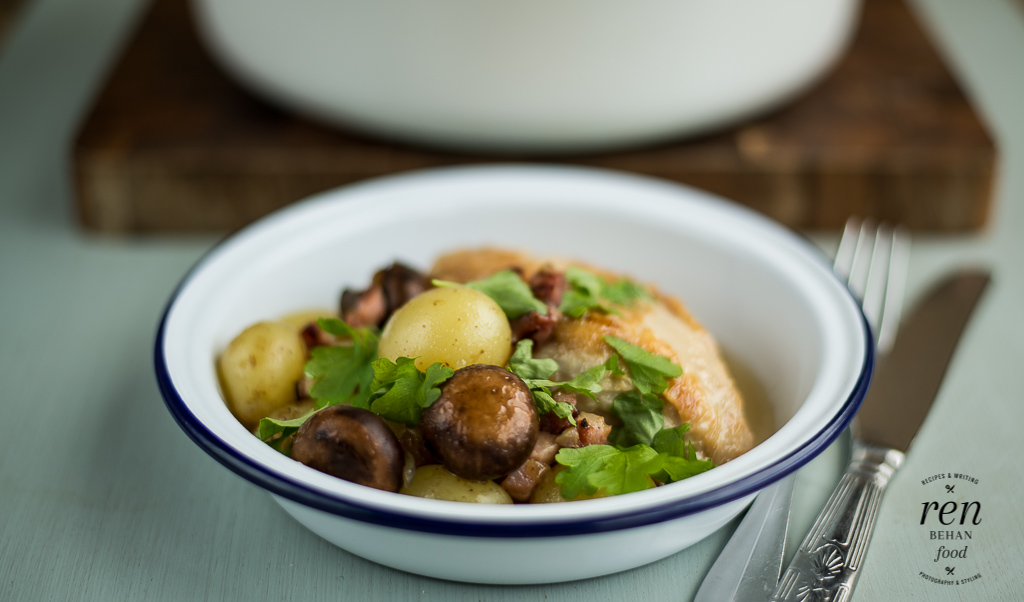
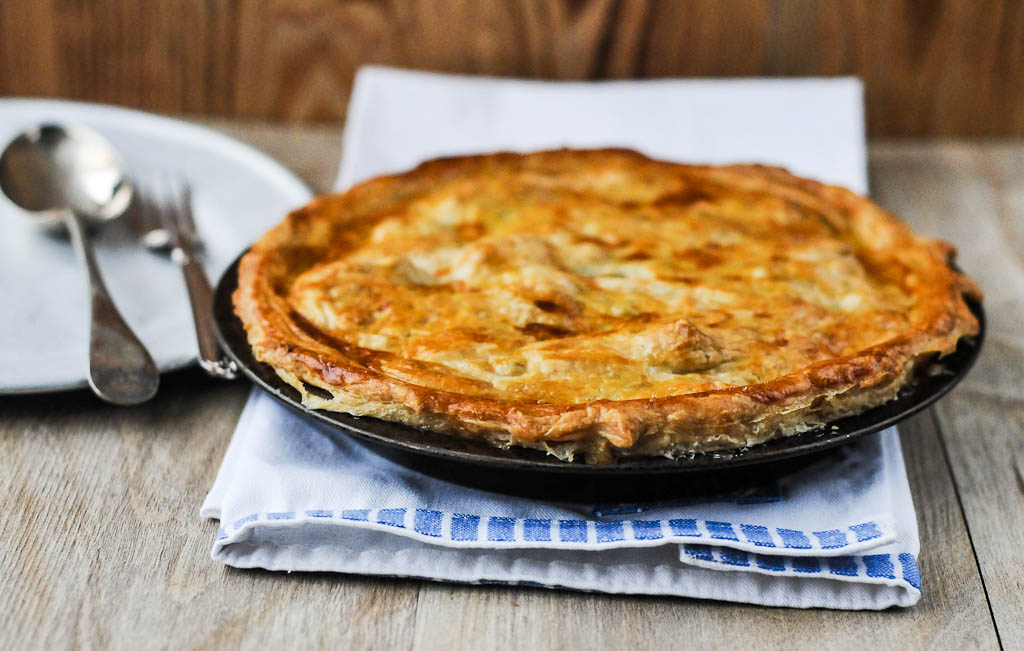
A comforting recipe for Eat Welsh Lamb and Welsh Beef

welsh-lamb-ren_-2

Print

Lamb Steaks with Wild Mushroom Sauce and Dill Mash

Prep 30 mins

Cook 15 mins

Total 45 mins

Author Ren Behan

Yield 4 servings

A creamy and comforting recipe using Welsh lamb steaks. 

Instructions

  1. Season the lamb steaks with sea salt and freshly ground black pepper, on both sides. Drizzle a little oil onto the steaks and rub the oil into the meat. Set to one side.
  2. Drain the peeled potatoes and put them into a pan of fresh cold water, cover, bring to the boil and cook for 15 minutes, or until the potatoes are tender. Drain into a colander and set to one side to dry.
  3. Place a dry frying pan onto a low heat. Throw in the pine nuts and allow them to toast until they turn golden – this will take around 30 seconds. Tip the pine nuts onto a plate and set to one side.
  4. Add a little oil to the same pan, turn up the heat to medium-high and add the lamb steak to the pan. Fry for 5 minutes on one side then flip them over. Add the mushrooms to the pan and a teaspoon of butter and continue to cook for 3-4 minutes. Remove the lamb steaks (which will be cooked rare-medium rare) and leave them to rest on a plate.
  5. Pour the stock into the pan, swirl the stock around and allow to bubble for a minute. Add the fresh dill and double cream, stir and and bring up to the boil. Then take the pan off the heat.
  6. Mash the cooked potatoes, or put them through a potato ricer. Add one tablespoon butter, double cream and the fresh dill. Season with salt and pepper. Using a wooden spoon, stir the butter, cream and dill into the mashed potatoes, until the potatoes are creamy and smooth.
  7. Divide the potatoes onto 4 plates. Slice each lamb steak in half and place on top of the mash. Spoon over over the creamy mushroom sauce. Sprinkle with the toasted pine nuts and serve straight away.

Courses Main

Cuisine British

You may also like:

Lamb Steaks with Mint Ajika Sauce (Olia Hercules for Marley Spoon)

One-Pot Cypriot Lamb with Orzo 

Make-Ahead Lamb and Potato Moussaka

Jamie Oliver’s Mothership Roast Lamb

This is a paid recipe commission for Eat Welsh Lamb and Welsh Beef. Find more Llambassador recipes here.


September 10, 2015

Seattle-Style Cream Cheese Hot Dogs with a Quick Pickled Cabbage Salad

Seattle-Style Cream Cheese Hot Dogs with a Quick Pickled Cabbage Salad

It’s been a few years since my last visit to Seattle, where my sister lives, which means too long since my first taste of a Seattle Dog – cream cheese adorned hot dogs sold by street vendors around Seattle. A little stand in Pioneer Square called ‘Dog in the Park’ sold me my best-ever Seattle Dog…in case you are ever visiting. The Seattle Dog is often made with a Polish hot dog sausage (bonus) and is usually served with cream cheese, onions, sauerkraut or cabbage and fried potatoes, oh, and mayo or chilli sauce. The cream cheese, in case you are wondering, is spread onto the inside of the toasted hot dog bun. They are not the easiest things to eat (pick up an extra large stash of napkins) but my goodness, as street food goes, they are really good.

Seatle Cream Cheese Hot Dogs

A few little tips to make this recipe extra special: after boiling the hot dogs, split them and griddle them in a hot pan. Also, split the buns and griddle them, too to warm them up a little. You can make the Quick Pickled Cabbage Salad in advance – store in in a jar for up to three days in the fridge.

Sarsons Street Food Recipe

3 votes

Print

Cream Cheese Hot Dogs with Pickled Cabbage

Prep 10 mins

Cook 10 mins

Total 20 mins

Author Ren Behan

Yield 4

A Seattle-style hot dog, with cream cheese and onions. 

Ingredients

  • 4 good quality hot dogs – all-beef, or Polish sausage preferable
  • 4 hot dog buns
  • 4 tbsp cream cheese
  • 1 tbsp butter
  • 1 medium white onion
  • ½ head of white cabbage
  • 1 medium carrot
  • 1 tsp salt
  • 1 tbsp pickling vinegar, I used Sarsons 
  • 1 tsp mild olive oil
  • 2 tsp caster sugar

Instructions

  1. Bring a pan of water to the boil. Reduce the heat to a simmer, place the hot dogs into the water and cook for 5 minutes. Remove from the water, place on a plate and keep to one side.
  2. In the meantime, finely chop the onions. Melt the butter in a frying pan and add the onions to the pan. Cook for ten minutes on the heat, stirring occasionally, and cook until caramelised.
  3. Very finely shred the cabbage and grate the carrot and tip into a large bowl. Sprinkle over the salt and mix well. Set to one side.
  4. Heat a separate frying pan. Split the hot dogs in half lengthways and place them into the frying pan, flat-side down. Gently fry the pre-cooked hot dogs until they are a little browned. Split the hot dog buns in half and gently toast them in the griddle pan, split side down for a few seconds.
  5. Drain some of the liquid away from the salted cabbage and pour in the Sarsons malt vinegar, olive oil and sugar. Mix well.
  6. To assemble the dogs, spread the cream cheese onto the inside of the toasted hot dog bun. Add the griddled hot dogs, sprinkle over some of the caramelised onions and top with the quick pickled cabbage salad.

Cuisine American

What has been your best street food experience ever? I’d love to know!

With thanks to Sarsons for commissioning this recipe. Photo credit: Sarsons #ad

September 4, 2015

Pizza Pasta Soup

Pizza Pasta Soup

Think of this as a hearty soup, suitable for stretching a little leftover bolognese. You could also use a jar of tomato sauce – a good quality one and add the same amount of stock to achieve a soup consistency. On other occasions, I’ve thrown in chopped, fried pepperoni, mushrooms or shredded chicken. A good sprinkle of mozzarella is a must and a big heap of grated Parmesan cheese for the top. Fresh basil or oregano is lovely, too. Get creative!

Pizza Pasta Soup

5 votes

Print

Rainy Day Pizza Pasta Soup

Prep 10 mins

Cook 10 mins

Total 20 mins

Author Ren Behan

Yield 4

A great way to use up leftover tomato or Bolognese sauce. Simply add a handfull of pasta and some of your favourite 'toppings' such as chopped, fried pepperoni, mushrooms, or shredded chicken. Add grated mozzarella and a good handful of Parmesan cheese on the top.

Ingredients

  • 500g/two cups Bolognese or good quality tomato sauce (leftovers are ideal)
  • 250ml/one cup vegetable or chicken stock
  • 1 bay leaf
  • sea salt
  • black pepper
  • 280g/2 cups cooked pasta
  • 100g mozzarella, torn or grated
  • 100g fresh Parmesan cheese
  • 1 small bunch fresh basil, leaves and stalks separated
  • (optional - fried pepperoni, mushrooms or shredded chicken)

Instructions

  1. Pour the Bolognese or tomato sauce into a large pan. On a medium heat, bring to the boil. Add in the stock and stir well. Add in the bay leaf. Stir in half a teaspoon each of sea salt and black pepper.
  2. When hot, add in the cooked pasta and stir. Remove the bay leaf Add the optional extras, such as pepperoni, if using. Divide the soup between four bowls.
  3. Add the torn mozzarella, and top with grated Parmesan cheese and a few basil leaves per bowl.
  4. Serve straight away

Cuisine Italian-ish

Pizza Pasta Soup


Let me know if you make this by tagging me on Instagram or Twitter as @foodren

Or, add your recipes and ideas to our Pizza Love Pinterest board (338K followers)

Follow Ren Behan Food’s board Pizza Love! on Pinterest.

August 27, 2015

Recipe: Skinny Carbonara from {Everyday Super Food by Jamie Oliver}

Recipe: Skinny Carbonara from {Everyday Super Food by Jamie Oliver}

Today sees the publication of Jamie Oliver’s brand new cookbook Everyday Super Food and I’ve been busy trying out some of the recipes for myself at home, beginning with Jamie’s Skinny Carbonara.

If you’ve been following Jamie on Instagram or on the You app, you’ll have noticed that this is the year he turned 40. He himself has enjoyed making some simple lifestyle changes, for example, by practicing mindfulness and by making some changes to his diet and lifestyle. Everyday Super Food is really his ultimate manifesto for helping you do the same.

I have four copies of Jamie’s new book to giveaway (see entry form below) with the recipe for Jamie’s Skinny Carbonara also shared below with the publisher’s permission.

Every Day Super Food

The Skinny Carbonara was very tasty and quick to make – fifteen minutes at most. I didn’t see any instructions for juicing the lemon and I ended up adding in the juice of one whole lemon. Next time, I would use the juice of half a lemon. I had quite a lot of pea mixture left over, so blitzed it up with some chicken stock and had a an extra cup of pea soup for lunch the next day. The whole family enjoyed it and the addition of peas and ground almonds gave the dish an extra lift and a bit of texture, along with the crispy bacon. Nobody noticed the wholewheat spaghetti so that’s a permanent switch for us in the future!

I can’t wait to try the Mega Veggie Burger featured by Helen here, or the Baked Eggs with Popped Beans that Katherine tried here. I’m also looking forward to trying Jamie’s Grilled Corn and Quinoa Salad, shared by The Happy Foodie.

Skinny Carbonara Ren Behan
My version of the tasty Skinny Carbonara recipe from the book

The book ties in with a new six-part Channel 4 series, Jamie’s Super Food, due to broadcast this autumn and you can buy the book from today.

Print

SKINNY CARBONARA SMOKY BACON, PEAS, ALMONDS & BASIL

Prep 10 mins

Cook 10 mins

Total 20 mins

Author Jamie Oliver

Yield 2

Humble little peas are a source of nine different micronutrients, and are especially high in thiamin, a B vitamin that helps our hearts to function properly

Ingredients

  • 200g freshly podded or frozen peas
  • 1 tablespoon flaked almonds
  • 1 small clove of garlic
  • ½ a bunch of fresh basil (15g)
  • 15g Parmesan cheese
  • 1 lemon
  • 150g wholewheat spaghetti
  • 1 rasher of higher-welfare smoked streaky bacon
  • olive oil
  • 1 large free-range egg
  • 100g fat-free natural yoghurt

Instructions

  1. Put a pan of boiling salted water on the heat for your pasta, dunk a sieve containing the peas into the water for just 30 seconds, then put aside, leaving the pan on the heat.
  2. Very lightly toast the almonds in a dry non-stick frying pan on a medium heat, then blitz until fine in a food processor. With the processor still running, peel and drop in the garlic, a pinch of sea salt, the basil leaves, the finely grated Parmesan and the lemon juice. Blitz until it comes together, then pulse in the peas, to try and keep a bit of texture.
  3. Cook the pasta in the boiling salted water according to the packet instructions. Meanwhile, very finely slice the bacon and fry slowly in the frying pan with 1 teaspoon of oil on a medium-low heat until golden and crispy, then use a slotted spoon to transfer to kitchen paper, so the flavoursome fat stays in the pan.
  4. Scoop in three-quarters of your pea mixture to heat through.
  5. Whisk the egg and yoghurt together well. When the pasta’s done, reserving a mugful of cooking water, drain the pasta and toss straight into the pea pan, mixing well, then take the pan off the heat (this is very important, otherwise the egg will scramble when you add it, and we don’t want that).
  6. Pour in the egg mixture and toss until evenly coated, silky and creamy, loosening with cooking water if needed. Taste and season to perfection, and serve topped with the remaining pea mixture and the crispy bacon.
  7. It might be skinny, but it’s beautifully light and delicious. Enjoy!

Courses Healthy

Cuisine Italian


Skinny Carbonara
Jamie’s Skinny Carbonara {Image from the book, taken by Jamie Oliver}

Giveway – Enter Here
a Rafflecopter giveaway

Everyday Super Food by Jamie Oliver is published by Penguin Random House

ⓒ Jamie Oliver Enterprises Limited (2015 Everyday Super Food) Photographer: Jamie Oliver

With thanks to Jamie’s PR team for the recipes, previews and review copy in the post.

October 21, 2014

Quick Risotto-Stuffed Vegetables

Quick Risotto-Stuffed Vegetables

My mother (who is an amazing cook) can always make ‘something out of nothing’ and I’m hoping that this recipe will always remind me of that.

Vegetables

Last week, when my mum came to stay, I was completely on the back foot. I hadn’t managed a big shop and the fridge was uncharacteristically empty. We found a few red and green (bell) peppers, two courgettes, a plum tomato, a stick of celery, a carrot and a cup of leftover peas. There was also a chunk of Parmesan cheese. The obvious solution would have been to make a pan of soup, but I fancied something a bit more substantial than that. “We”ll stuff the veg!” declared my mum, and after a quick whizz of my cupboards she found some vegetable stock, a tin of tomatoes and one of those two-minute pouches of rice. Yes, I have those in my cupboard.

Stuffed Vegetables

Within minutes the kitchen was filled with the aroma of a bubbling ‘quick’ risotto and after a sprinkle of some sea salt and fresh pepper, the vegetables began baking in the oven.

Cooking with Kids

The pre-cooked rice was really the key to the speediness in this recipe – you can shave off a good ten minutes. If you had some leftover risotto, it would be quicker, still and you could just use that to stuff the vegetables with instead. You can also buy a quicker cook ‘pronto’ version of risotto now in pouches, too, though I haven’t tried those. You can even make it with ‘easy cook rice’ – you’ll just need to simmer it a little longer. The rice should be ‘almost’ cooked before you stuff your vegetables with it.

Risotto Stuffed Veg

Once you know how to stuff veggies (always pre-bake them for at least ten minutes before stuffing just to get them going a bit) you can make all kinds of fillings. You can even stuff them with a bolognese ragu like this one.

And look what you end up with – Risotto-Stuffed Vegetables – fit for a King or Queen.

Risotto Stuffed Veg

We serve ours with some tiny cubed courgettes and a really good sprinkling of Parmesan cheese.

Risotto Stuffed Veg

My mother might just be the cleverest cook in the world. She’s always an inspiration to me.


I hope you’re enjoying the (slightly blustery) autumnal weather! If you are not, make these instead, then stay inside and keep warm and happy.

Risotto Stuffed Veg

Print

Quick Risotto-Stuffed Veggies

Author Ren Behan

Ingredients

  • Olive oil
  • Sea Salt and pepper
  • 2-3 bell peppers
  • 1 large (beef or plum) tomato
  • 2 courgettes/zucchini
  • 1 sweet onion, chopped
  • 1 stick celery, finely chopped
  • 1 carrot, peeled and chopped into cubes
  • A cupful of frozen peas
  • 1 packet quick-to-cook rice, or 250g leftover cooked rice
  • 250ml/one cup vegetable stock
  • 1 tin of chopped tomatoes
  • To garnish - half a courgette and some Parmesan cheese

Instructions

  1. Preheat the oven 200C/180C fan/gas 6.
  2. Chop the tops off the peppers and scoop out any seeds. Do the same with the tomato. Cut one of the courgettes in half and using a teaspoon, scoop out the centre. Dice the second courgette for the garnish, keep to one side. Place the prepared veggies in a foil lined baking tin, drizzle with olive oil, sprinkle with salt and pepper and bake for ten minutes. Alongside those, spread the diced courgette onto a flat baking tray, drizzle with olive oil and bake for ten minutes, too.
  3. In the meantime, drizzle some olive oil into a frying pan. Fry the onions for three to four minutes, then add in the celery and carrot and cook for a further few minutes.Throw in the peas and the rice, pour in the stock and add the tinned tomatoes. Season with salt and pepper and simmer for around five minutes. If you are not using pre-cooked rice, you''ll need to cover and simmer the rice until it is cooked - around ten minutes.
  4. Take the vegetables out of the oven and carefully fill the peppers, tomato and courgettes with the rice mixture. Put the stuffed vegetables back in the oven and bake for a further ten minutes.The vegetables should be soft, take them out and set to one side.
  5. Serve the baked, stuffed veggies with some of the courgette cubes and a grating of fresh Parmesan cheese.

Love you, Mama!

Ooh, if you wanted to stuff your veggies with a traditional risotto – follow my tips over on JamieOliver.com here.

Read all about my trip to Lombardy and Piedmont, with Riso Gallo, who produce one of Italy’s best brands of rice.

Simple Risotto

September 17, 2014

Easy Stove Top Chicken Casserole

Easy Stove Top Chicken Casserole

As we ease ourselves into autumn, there is plenty to encourage us into the kitchen. Perhaps we might be inspired to preserve some of those late summer gluts, or try a recipe from an ‘up and coming’ cuisine, or to simply dig out those slow-cookers and cast-iron pans to get a nice, warming stew or casserole on the go. There are lots of recipes that have caught my attention already in the various food magazines that I subscribe to popping through the door, in particular, the classic, stove top chicken casserole I’ve shared below. I’ve also noticed a number of new cookery related supplements and magazines recently, which is a good thing, as it means larger brands and retailers are continuing to see an upwards trend in home cooking. Pinterest is another wonderful place to gather some autumnal cooking ideas together, too. This week I’ve bookmarked a lasagne soup to try as it pretty much ticks every box on my comfort food hit-list.

Cook Edition
Images taken from JohnLewis.com with permission

One of the latest, free, foodie publications that you might spot is ‘Cook Edition’ at John Lewis. I had a good flick through – very much admiring the food photography within it. I was very tempted by Trine Hahnemann’s sticky, sweet and perfectly spiced cinnamon rolls (featured on page 2 of the Autumn supplement) but in the end, I decided on a family favourite instead; a classic chicken casserole (featured on page 10, alongside some one-pot tips). If you have an ipad, you can also find Cook Edition for free via iTunes. 

Aside from my slow cooker making a reappearance, autumn cooking is also brilliantly suited to more robust pans and stew-pots. I was recently sent a 24cm lidded casserole pan in a new shade of cotton, which although takes up a bit of kitchen cupboard space, means that you can comfortably cook a casserole, or a stew for a family of four with minimum fuss. I’ve also used the pan this week to make a generous risotto. It’s also ideal for soup and can also go into the oven (with its lid) when making a roast chicken, for example, or an oven-baked casserole or pasta bake.

Le Creuset

Le Creuset is a brand that has become very well known in the UK for classic, durable and long-lasting cookware; it is made in France, each piece is hand crafted and it is guaranteed for the lifetime of the original owner, whether a self purchase or a gift. Note, the guarantee doesn’t cover wear and tear or misuse, so you do have to show your pans a little bit of love. I do put mine into the dishwasher, but in fact, they are very, very easy to clean with liquid soap and water, too. I’ve never had any issues with my Le Creuset pans or cookware – I also own a square griddle pan and two 18cm round casseroles. The diametre of the pan is etched into the lid – in case you ever want to know! I always remember my sister using Le Creuset and in fact, when she read this post, she confirmed she had owned her 24cm casserole for 24 years and that it is most often used for making a ragu al bolognese.

Classic Chicken Casserole

Print

Easy Stove Top Chicken Casserole

Prep 10 mins

Cook 50 mins

Total 60 mins

Author Ren Behan

A classic stove top chicken casserole made with sweet onions, pancetta, mushrooms and baby potatoes.

Ingredients

  • 3 tbsp olive oil
  • 8 pieces of high welfare chicken, e.g thighs, legs
  • 250g cubed pancetta
  • 1 large, sweet white onion
  • 200g baby chestnut button mushrooms
  • 1 litre hot chicken stock
  • 500g baby potatoes
  • 2 tbsp cornflour mixed with 3-4 tbsp cold water
  • Fresh herbs, such as parsley, to flavour

Instructions

  1. Heat one tablespoon of olive oil in a stove top safe casserole pan. Add the cubed pancetta and cook on a medium heat until the pancetta starts to become crispy and any fat renders. Add the chopped onions and cook for ten minutes on a very low heat, until translucent. Add the button mushrooms and cook for a further few minutes. Remove the pancetta, onions and mushrooms from the pan and set aside.
  2. Season the chicken pieces with salt and pepper. Add the remaining olive oil to the pan and place the chicken pieces, skin side down, into the pan. Sear them until golden brown, then carefully flip the pieces over and cook for a further few minutes.
  3. Pour in the chicken stock and add in the baby potatoes - the potatoes and chicken should be covered. Cover the pan with a lid and simmer on a gentle heat for twenty minutes.
  4. Add the pancetta, onions and mushrooms back in and cook with the lid off for a further ten minutes. The sauce should reduce slightly. Stir in the cornflour mixed with water and bring the casserole back up to the boil. The sauce should thicken.Take the casserole off the heat and leave it to sit on the stove for ten minutes before serving. Add any fresh herbs just before serving.

Notes

You can use a whole chicken and chop it into eight pieces instead if your prefer. Be careful when using poultry shears or a sharp knife to chop the chicken.

So, this week I’ve made a lasagne, risotto, a chicken casserole and a Victoria plum fruit bowl cake – what should be next on our comfort food cook list?

Here are some other recipes I have bookmarked –

Slow Cooked Beef Brisket with Celeriac Mash and Wild Mushrooms – own recipe

Veggie Packed Lasagne by Katie at Feeding Boys and a Firefighter

Healthier S’mores Smoothie – by Helen at Fuss Free Flavours

Cinnamon Apple Meringue Tartlets by Nazima at Franglais Kitchen

Disclosure: I was sent a copy of Cook Edition to review and cook from, as well as a 24cm Le Creuset Casserole and some vouchers to pay for the ingredients I used. 

May 28, 2014

Lamb and Potato Moussaka

Lamb and Potato Moussaka

With less than two weeks to go until my third baby arrives, I’ve been in nesting mode  – it’s amazing really how this instinct kicks in just when you think you have no energy left! For me, this has also meant batch cooking and madly bookmarking easy and healthy recipes to support being a new mummy again, such as Pinch of Yum’s Creamy Potato Kale Soup, portions of vegetable lasagna (also layered up with kale and spinach) and ‘quick to throw together or stick in the oven’ recipes, such as the easy Lamb and Potato Moussaka below. A traditional Moussaka would use layers of grilled aubergine, but my kids are really not keen on the texture, so I just replace the aubergine with thinly sliced potatoes. I’m also sure I won’t want to be standing around stirring a Béchamel (white sauce) so a fail-safe tub of crème fraîche along with some grated cheese is a useful back-up plan for making a super-quick cheese sauce ready to pour over the top of this dish before it goes into the oven. I’ve included tips for making ahead and freezing in the recipe notes below.

Lamb and Potato Moussaka

Part-way through my marathon batch-cook, the freezer decided to break down. So I’ve been scrubbing, clearing out and cleaning that, too. Remind me never to freeze red wine in sandwich bags again for later use in sauces, since that’s what created the biggest mess. Can I blame Nigella for that one?! I’m sure it was one of her tips… Luckily, I’ve saved most of what I had already prepared food-wise, but still, it’s not what you need. On the plus side, everyone, including the husband, declared the Lamb and Potato Moussaka dish to be super-tasty – so much so that I’ll have to make another batch to freeze. If you are vegetarian or simply looking to include more pulses into your diet, you can add a tin of cooked lentils to the lamb or leave out the lamb altogether and just make the base out of beans and/lentils (with onions, garlic, the tomato sauce and spices).

Lamb Moussaka

I’ve also been busy road-testing a new kitchen gadget – the Sage By Heston Blumenthal Kitchen Wizz Pro, which I hope to be writing about tomorrow. It’s really a super-powerful food processor, with plenty of chopping and slicing options. I was able to quickly whizz up the onions and garlic for this Moussaka, make my own quick lamb mince (I used British lam leg steaks) as well as thinly slicing the potatoes for the top of this dish. I’ve been extremely pleased with results so far and look forward to coming up with more time-saving recipes, soon.

5 votes

Print

Easy Lamb and Potato Moussaka

Prep 40 mins

Cook 40 mins

Total 1 hour, 20 mins

Author Ren Behan

Yield 4 -6

A quick and tasty Lamb and Potato Moussaka recipe, using potatoes in place of aubergine, flavoured with cinnamon and oregano and topped with an instant, tangy cheese sauce.

Ingredients

  • 5-6 large potatoes, I used Maris Piper, peels and finely sliced
  • 2-4 tablespoons olive oil or rapeseed oil
  • 1 onion, peeled and chopped
  • 1 clove garlic, peeled and chopped
  • 500g/one pound lean ground lamb mince
  • 1 teaspoon cinnamon
  • 1 teaspoon dried oregano
  • 1 teaspoon tomato paste/puree
  • 1 can chopped plum tomatoes
  • Sea salt and freshly ground black pepper
  • For the cheese sauce -
  • 200g/one cup crème fraîche
  • 50g/half a cup grated cheddar cheese
  • 50g/half a cup grated Parmesan cheese
  • A dash of milk
  • 1 egg, beaten
  • A little butter for the baking dish

Instructions

  1. Heat a tablespoon of rapeseed oil in a large, flat pan. Firstly, start by gently browning the potato slices. Do this by frying a few slices for one-two minutes on each side, in batches, until they are all slightly golden. Add a little more oil to the pan as necessary. Keep all the potatoes to one side, on some kitchen paper, until later. You can skip the potato-browning stage if you want a quicker version.
  2. Once that's done, in the same pan, add a further tablespoon of oil and cook the onions and garlic until soft and golden. Add the minced/ground lamb, turning up the heat a little to brown the meat all over. Sprinkle over the cinnamon and dried oregano and stir. Add in the tomato paste, canned tomatoes and season with salt and pepper. Turn down the heat and allow the sauce to simmer for 30 minutes.
  3. In the meantime, make the quick cheese sauce by gently heating the creme fraiche and stirring through all the cheese until melted. Add a splash of milk to loosen the sauce, take it off the heat, allow to cool a little then whisk in the beaten egg.
  4. When you are ready to eat, preheat the oven to 180C/350F/Gas 4.
  5. Lightly grease three small dishes or one large baking dish with a little butter. Spoon in some of the lamb sauce, then a layer of potato, then a further layer of lamb sauce followed again by potato. Pour the cheese sauce over the top.
  6. Bake in the pre-heated oven for 35-40 minutes, until the potatoes are soft and the top is golden.

Notes

Freezer Tip: Bake the Moussaka and cool completely. Portion up into small containers, double-wrap in foil and freeze. Defrost in the usual manner and reheat in microwave (or oven) until thoroughly heated through for a quick meal.

Courses Main

Cuisine Greek

I hope you feel inspired to give this easy Lamb and Potato Moussaka a try – it’s a great family-friendly meal or perhaps even a crowd-pleased to bookmark for the upcoming World Cup!

What are your favourite batch-cook or make ahead recipes?

May 25, 2014

3 Quick Cheese Snacks for the Good Food Channel

3 Quick Cheese Snacks for the Good Food Channel

Today is officially the last day of National Vegetarian Week 2014. In case you’ve taken the challenge and are in search of some simple and tasty recipes to round off the weekend, I thought I’d highlight three recent quick cheese snacks, created for the Good Food Channel. Really though, who needs an excuse to indulge in a little melted cheese?! Of course, you can also use any of your favourite vegetarian alternative cheeses in these recipes…

Three Cheese Snacks
3 Quick Cheese Snacks created for the Good Food Channel

Firstly, a super-quick Mexican inspired snack – my Cheese Quesadillas with tinned black beans, tomatoes, spring onions and grated cheese. Use a chilli cheese if you fancy, and any beans – black, pinto or fava beans – drained and washed.

Cheese Quesadillas

Cheese Quesadillas {Recipe Here} for the Good Food Channel

Next, one of our favourites for a quick cheese snack, are my Three Cheese Toasties, with leek, garlic and thyme on sourdough. They take around ten minutes to make, and I simply used a griddle pan to make mine, weighed down a little with a heavy lid. If you have a panini machine or a toastie maker, you can use that instead. I usually like to use a combination of cheddar, mozzarella and Gruyère or Comte – but really, use any cheese that you like or have in the fridge to use up – or a vegetarian alternative.

Three Cheese Toasties

 Three Cheese Toasties {Recipe Here} for the Good Food Channel

Finally, if you have hungry kids, you can’t go wrong with these Cheese and Marmite Swirls. Simply keep a packet of ready rolled/ready to use puff pastry in the fridge or freezer, then unroll, spread with Marmite, sprinkle over the granted cheese and roll up. Once sliced, place them on a baking tray lined with paper, brush with a little beaten egg and bake for fifteen minutes. Serve when warm, but not too hot for little fingers!

Cheese and Marmite Swirls

Cheese and Marmite Swirls {Recipe Here} for the Good Food Channel

I hope that’s given you a little inspiration for the Bank Holiday weekend, or perhaps, for an after school snack or quick lunch.

How did you get on with the challenge to “go green” for National Vegetarian Week?

Recipes commissioned by the Good Food Channel – recipes, styling and photography by Ren Behan. 

May 17, 2014

Asparagus, Smoked Salmon and Cream Cheese Pasta

Asparagus, Smoked Salmon and Cream Cheese Pasta

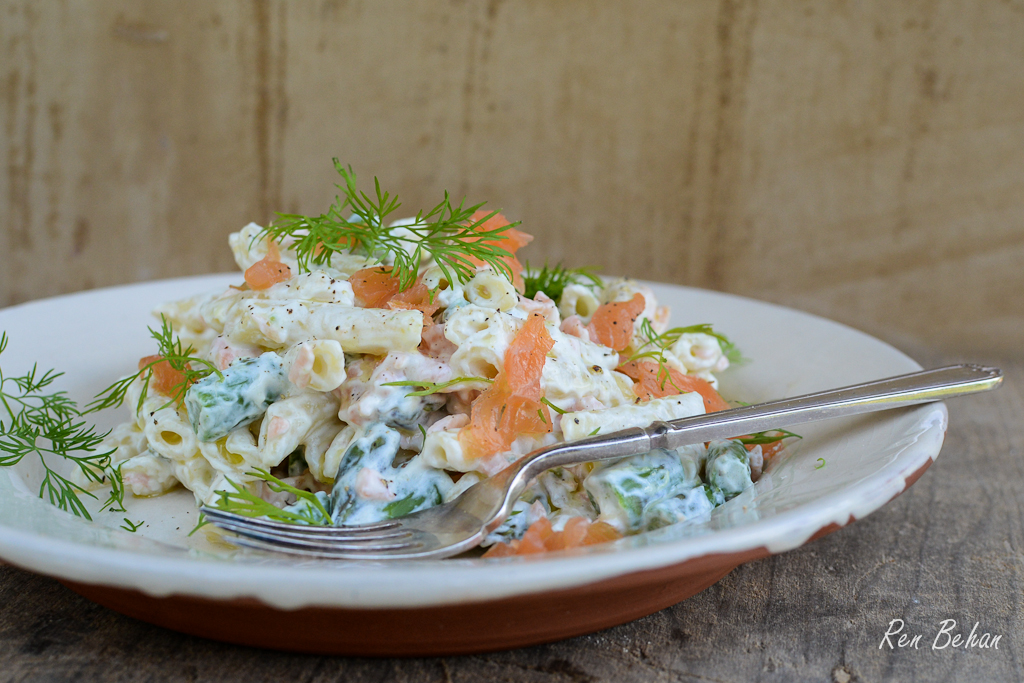
 British asparagus season is in full swing!

Asparagus, Salmon and Cream Cheese Pasta
A simple, seasonal dish ready in minutes!

I’ve been craving the combination of smoked salmon and cream cheese in every form this week, which is unusual for me. Strong, salty flavours are vying for my attention, as well as the sourness of beetroot and pickled cucumbers. Still, at 37 weeks pregnant, it could be worse and at least my sweet tooth has been calmed. I’ve also been eating plenty of fresh, British asparagus, as it’s in season now in the UK, with some of the best spears coming from the counties of Lincolnshire, Staffordshire and Worcestershire. The Vale of Evesham is also renowned for its asparagus, with the British Asparagus Festival 2014 running between 23rd April and 21st June. This pasta dish of asparagus, smoked salmon and cream cheese is very quick to make with just a few ingredients. I’ve used small penne tubes, though any small pasta shapes work well with this almost-instant cream cheese sauce.

Asparagus, Salmon and Cream Cheese Pasta

Asparagus, Salmon and Cream Cheese Pasta

2 votes

Print

Asparagus, Smoked Salmon and Cream Cheese Pasta

Prep 10 mins

Cook 8 mins

Total 18 mins

Author Ren Behan

Yield 2

British asparagus spears, paired with smoked salmon in a simple and quick cream cheese sauce with penne

Ingredients

  • 250g/ one cup dried Penne pasta, or other small shapes
  • One bunch/one cup fresh asparagus, chopped into one inch pieces
  • 200g/ 3/4 cup cream cheese, regular or light
  • A glug of olive oil
  • 120g (one small packet) smoked salmon
  • Fresh dill to garnish
  • Sea salt and freshly ground black pepper

Instructions

  1. Bring a large pan of salted water to the boil. Once boiling, add in the pasta shapes and cook for 8 minutes, or according to the packet instructions.
  2. Two minutes before the end of cooking time, add the chopped asparagus to the water. Take out one cup of pasta water for the sauce. After two minutes, drain the pasta and asparagus.
  3. Add the cup of pasta water back into the same pan, stir in the cream cheese and a glug of olive oil, season with sea salt and pepper. Add in the cooked pasta and asparagus.
  4. Stir through the chopped smoked salmon, leaving a few pieces to garnish the top. Sprinkle over the fresh dill and serve immediately.

Courses Main

Cuisine Italian

I’m entering this dish into a few blog event challenges this month. Firstly, to Pasta Please! created by Jac of Tinned Tomatoes and this month hosted by Nazima at Franglais Kitchen with a theme of pasta sauces.

pasta please

Next, the post goes on to Four Seasons Food, celebrating all things spring. This event is jointly hosted by Louisa at Eat Your Veg and  Anneli at Delicieux.

fsf-spring

And finally, to my own Simple and in Season Spring, open here.

Simple and in Season

More asparagus recipes to try

British Asparagus and Westcombe Cheddar Tart for JamieOliver.com

British Asparagus, Spinach, Halloumi and Beetroot Salad

Fresh Pasta with Asparagus, Goat’s Cheese and Lemon

Asparagus, Salmon and Cream Cheese Pasta

 Have you been enjoying any seasonal asparagus in simple, family meals?

Next week it’s National Vegetarian Week so look out for plenty of veg-packed recipes!

March 2, 2014

Blueberry and Vanilla Cheesecake Pancakes

Blueberry and Vanilla Cheesecake Pancakes

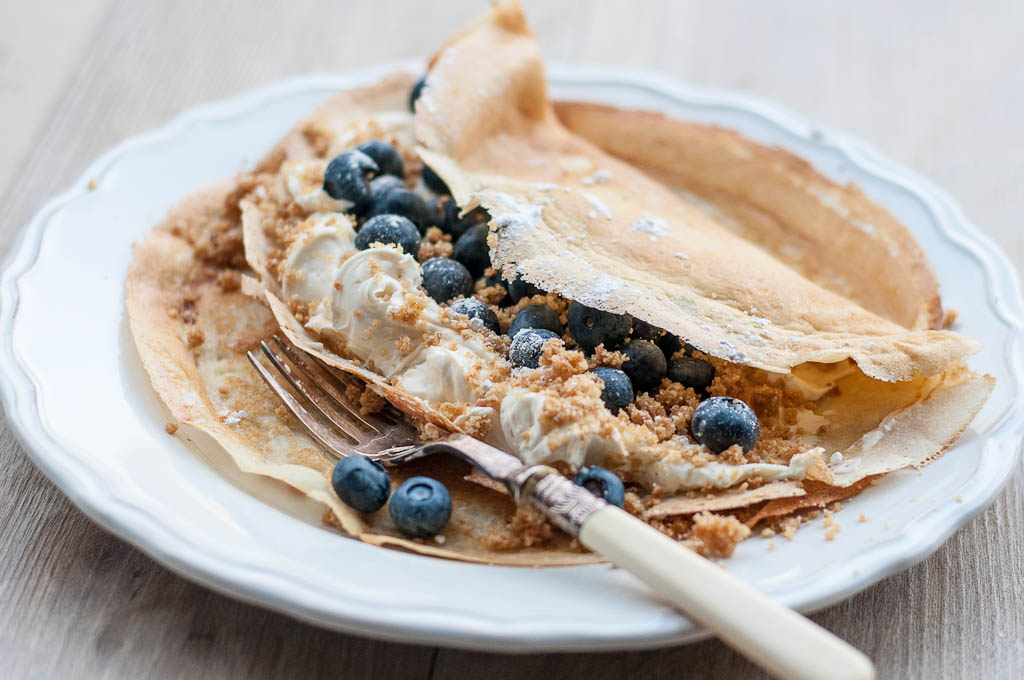
I can’t believe we’ve almost hit Shrove Tuesday, or Pancake Day, on the foodie calendar. This means it’s very nearly time to start our Lenten fasts and use up all of the eggs, sugar and sweet things from our cupboards. Of course, it never really is the end of all the sweet stuff, but it’s a good occasion to mark, in any case.  Now, I’m afraid I’ve been a bad blogger and haven’t posted any recipes very recently, so I’m hoping to appease you all with one of my very favoruite pancake recipes – Blueberry and Vanilla Cheesecake Pancakes – yes, it’s a (no-bake) cheesecake, in a pancake, and there is no better thing, trust me. The good folks over at ASDA challenged me to come up with something unusual and so I hope I met the challenge with these. Once you’ve made your vanilla cream cheese pancake filling, simply fill your pancakes with the filling adding  almost any fruit, sprinkle over your cheesecake biscuit crumbs and a drizzle of maple syrup (or some fruity sauce) for good measure and you’ll experience something very special indeed.

Blueberry Vanilla Cheesecake Pancakes-6

To make my pancakes, I tried out Asda’s new mix-o-meter, which cleverly allows you to type in the number of people you are cooking for and the number of pancakes you’d like each. The mix-o-meter then works out the quantities of flour, eggs and milk that you’ll need. My pancakes turned out lovely and thin and crispy using this method, with just a little drizzle of oil in the pan for each one.

Pancakes

For even more Pancake Day inspiration, pop over to Asda’s website here where you’ll find some fun facts and tasty recipes.

Bluberry and Vanilla CheeseCake Pancakes-

Or, take a look at some of my other creations –

Polish Apple Pancakes (similar to American-style pancakes)

Creamy Chicken and Spinach (Savoury Dutch Pancakes)

Plus, come back later for my Rhubarb and Ginger Curd Pancakes!

Of course, you can guess what my four year old chose to pick up on our shopping trip….!

Peppa Pix Pancake MixHappy Pancake Day for Tuesday!

Bluberry and Vanilla CheeseCake Pancakes

Here’s my recipe:

Bluberry and Vanilla CheeseCake Pancakes-

3 votes

Print

Blueberry and Vanilla Cheesecake Pancakes

Prep 20 mins

Total 20 mins

Author Ren Behan

Yield 8

Pancakes filled with a sweet vanilla cheesecake filling, and topped with blueberries and biscuit crumbs

Ingredients

  • 8 thin pancakes or crepes
  • 200g full fat cream cheese
  • 150g Mascarpone Italian cheese
  • 3 tbs icing sugar (plus extra for dusting)
  • 100ml double cream
  • 2 tsp vanilla extract
  • 100g digestive biscuits, crushed to fine crumbs
  • 3 tbsp melted butter
  • Blueberries or other fruit to fill

Instructions

  1. Whisk together the cream cheese, Mascarpone cheese and icing sugar until well combined. Add in the double cream and vanilla extract and whisk again. Set to one side.
  2. To make the cheesecake crumbs, stir the melted butter into the digestive crumbs - you should have a sandy mixture.
  3. Heat the pancakes gently, then fill each pancake with a few spoonfuls of the cheesecake mixture. Sprinkle over some blueberries or other fresh fruit and then the sandy cheesecake biscuit crumbs. Fold each pancake over, dust with icing sugar and drizzle over some maple syrup or fruity sauce.

Courses Dessert

With many thanks to ASDA for the supermarket vouchers to enable me to shop for the ingredients and create this post. All ingredients were purchased at ASDA. 

ASDA will be picking their favoruite recipe and the winner will receive a prize. 

January 13, 2014

Farfalle with British Pancetta and Italian Artichokes

Farfalle with British Pancetta and Italian Artichokes

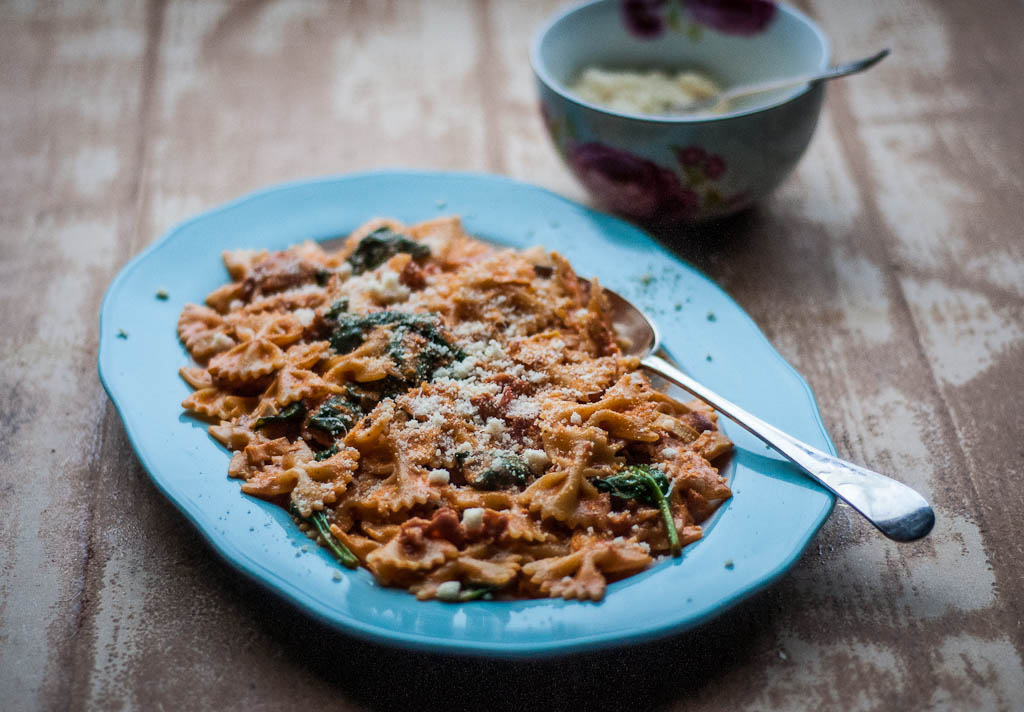
I have an Italian recipe for you today – using ‘farfalle,’ bow-tie or butterfly pasta and a tasty sauce flavoured with British pancetta, garlic, artichokes, fresh spinach, tomato and cream. This is a lovely supper for a chilly evening and one that reminds me of our wonderful trip to Northern Italy late last spring. A piping hot plate of pasta is the perfect dish to serve up to a large family. The recipe itself is inspired by a new range of Italian products called Parioli Cucina to the theme of ‘seasonal, Italian and savoury.’

Parioli Pasta

One of the things I noticed in Italy, particularly when wandering around the food markets of Bologna, was the abundance of fresh artichokes on offer. The same doesn’t really translate over in Britain and I always think that we’re short of ideas on what to do with artichokes. Granted, preparing fresh artichokes takes a tiny bit of practice, although I follow the steps outlined by David Lebovitz here. As David says “Artichokes are not hard to prepare but they do take a bit of determination.” Since fresh artichokes usually come into season during the late spring (May/June) a good alternative is to use an authentic supply of artichokes in a jar, which are harvested in season, marinated, grilled and then preserved in vegetable oil. I’ve also added British spinach to my dish, from Kent.

Parioli Pasta

A quick note on the British pancetta, too. I was looking out for Italian pancetta, but this caught my eye at the supermarket and as I haven’t seen British pancetta before I was keen to try it. I was impressed to read that it is hand-cured, made with outdoor bred pork and is air dried for ten days. The smoked pancetta really made the dish. It gave it a little extra edge, complimenting the grilled artichokes and fresh spinach beautifully. If you can find some smoked pancetta, do try it in this recipe. Otherwise, use any good quality Italian pancetta you can find.

Parioli Pasta

As to the rest of the ingredients from Parioli Cucina, these are made and imported from Italy. Parioli is a neighbourhood in the north of Rome in Italy and the range includes dried pasta, sauces, olive oil and balsamic vinegar, chopped and plum tomatoes, antipasti (including the grilled artichokes) and olives. For this recipe, I used the Parioli farfalle pasta – which I really liked because the pasta bows were quite small and bite-sized; smaller than farfalle I’ve tried in other ranges. The pasta had a good bite and worked really well with my sauce. I also used some of their tomato sauce called ‘Basilico’ – a Sicilian basil and tomato sauce, made with vine ripened tomatoes from the Puglia region and fresh basil leaves from Neapolitan farms. The sauce had a very rich flavour and I would say was of a better quality to any of the more well-known branded pasta sauces that I’ve tried.

So, all in all, a lovely mix of flavours and textures with both British and Italian ingredients.

I hope you get to try this dish. Let me know if you do and whether you agree with me on the quality of the products used.

Parioli Cucina Range

Parioli Pasta

1 vote

Print

Farfalle with British Pancetta and Italian Artichokes

Prep 10 mins

Cook 10 mins

Total 20 mins

Author Ren Behan

Yield 4

A family pasta recipe made with both British seasonal and Italian ingredients from the Parioli Cucina range

Ingredients

  • 400g Farfalle or bow-tie pasta (100g per person), I used Parioli Cucina Pasta
  • 2 teaspoons olive oil or oil from the jar of artichokes
  • 2 cloves garlic, finely chopped or grated
  • 180g pancetta, I used Tesco finest British smoked pancetta
  • 280g jar grilled artichoke hearts, drained, oil reserved, I used the Parioli Cucina brand
  • 170g or half a jar tomato and basil pasta sauce, I used Parioli Cucina ‘Basilico’
  • 450g/ 2 cups fresh spinach
  • 80ml or 1/3 cup double/heavy cream
  • Sea salt for the pasta water
  • Optional, Parmesan cheese for serving

Instructions

  1. Bring a large pan of salted water to the boil. Cook the farfalle according to the packet instructions, or until al dente. When the pasta is cooked, take out one cup of the pasta water and set aside. Drain the rest of the pasta until the sauce is done.
  2. Heat two teaspoons oil in a frying pan, add the garlic and chopped pancetta. Fry until the pancetta is golden brown. Finely chop the artichoke hearts and add them to the pan, stir well. Pour in the tomato sauce and bring to the boil. Stir in the fresh spinach and keep stirring until wilted. Finally, add the reserved cup of pasta water to the pan and stir in the double cream and take the pan off the heat.
  3. Mix the cooked pasta with the sauce. Serve whilst piping hot, with Parmesan cheese grated over the top, if you like.

Courses Main

Cuisine Italian

I’m linking this recipe up with Simple and in Season, a community blog event hosted by me here. The spinach wilted down so much I could have really used twice the amount. It’s also a lovely recipe to bookmark for late Spring when we start to see fresh artichokes in season, too.

Simple and in Season

With many thanks to Parioli Cucina for inviting me to create this recipe. 

January 9, 2014

Polish Apple Pancakes

Polish Apple Pancakes

Polish Apple Pancakes

Happy New Year! I’m back. I’ve indulged in a long break. In fact, the longer I took, the harder it became to throw myself back into blogging and recipe creating. This year I’ve buried my head in the sand a bit too when it comes to ‘diet’ food or New Year’s resolutions. I make resolutions throughout the year. I constantly try and stick to things, and I fail, so I set new goals and targets and start again. It’s never just a January thing. Besides which, it’s far too grey and cold outside to think about salads or healthy things or fresh starts. I still want to hibernate and eat pancakes and wrap myself up in a big blanket. The funny thing is that the two most popular recipes on my blog so far this year have been my Healthy Hot Chocolate Breakfast Smoothies and my Nutella Bread Pudding with Leftover Christmas Panettone. So I’m thinking, that whilst half of you are searching for the good stuff to help you along with diets and food resolutions, half of you (like me) want to prolong the festive sweet-fest, invoking the excuse of finding ways of using up all the tempting treats lurking in our cupboards….

Read more

November 15, 2013

Recipe:Turkey Stroganoff with Soured Cream

Recipe:Turkey Stroganoff with Soured Cream

It’s time to think smart when it comes to making the most out of the food we buy and using up our leftovers. I was pretty shocked to read that the average family in Britain wastes nearly £60 a month (the equivalent of 6 meals a week or 24 meals a month) in unused food. As we approach Christmas, two for one deals and special offers go into overdrive, which means that if we’re not careful, we’ll end up buying too much and then throwing some of it away. The one thing we are very good at doing is coming up with ways to use up our turkey leftovers and I’ve been challenged to do just that by the Lean on Turkey campaign. Although we shouldn’t just be thinking of leftovers at Christmas or Thanksgiving, using up all the little bits we have in the fridge and making the most of a roast should be the way forward all year round. I’m tapping into my Eastern European roots a little with this recipe for a turkey stroganoff, which uses up leftover turkey (or any poultry, really) along with some red onions, mushrooms, mustard, soured cream and a few sprigs of dill. It’s perfect for a Boxing Day buffet or for a quick family supper, whenever you have some leftovers to use up. Stroganoff can be made with a tablespoon or mustard or tomato puree and an optional sprinkle of paprika. Always use ‘smetana’ or soured cream.

Turkey leftovers (1 of 3)-2

Costings (to come in at under £10 for 4)

  • Leftover Turkey (nominal as it should be leftover) – £2
  • 1 tablespoon olive oil (store cupboard)
  • 1 red onion – 40p
  • Mushrooms 200g – £1.69
  • 1 tablespoon mustard – 5p
  • Soured cream 300ml – 99p
  • Fresh dill – 25p
  • Noodles/Rice – £1.50

Total – £6.88 to feed 4 (Ocado)

Print

Turkey Stroganoff with Soured Cream

Prep 10 mins

Cook 10 mins

Total 20 mins

Author Ren Behan

Yield 4

A quick and easy dish to use up leftover turkey

Ingredients

  • 1 tbsp olive oil
  • 1 red onion
  • 1 tbsp wholegrain mustard
  • 300g mushrooms
  • 500g leftover turkey
  • 300ml soured cream
  • A splash of whole milk
  • Fresh dill to garnish
  • Noddles, pasta or rice to serve

Instructions

  1. Cook the noodles, pasta or rice according to the packet instructions.
  2. Add 1 tablespoon olive oil to a large frying pan. Cook the onions over a medium heat for five minutes, until soft. Stir in the wholegrain mustard and the mushrooms and season with freshly ground black pepper and a little salt. Cook for a further five minutes.
  3. Add the leftover turkey to the pan and mix together well. Pour in the soured cream, adding a splash of milk if the sauce is a little thick. Cook for another five minutes, or until the turkey is piping hot.
  4. Serve on a bed of noodles, pasta or rice and garnish with fresh dill. Optional: drizzle over a little extra olive oil.

Previous #LeanonTurkey recipes

Challenge 5 – Turkey and Leek Meatballs with Tomato Tagliatelle

Challenge 6 – Coronation Turkey Picnic Rolls

Lean on Turkey Blogger’s Page

This is a recipe commission in association with Lean on Turkey. Ingredients + development time paid for.  

November 5, 2013

Toffee Apple Tarts, 3 years of blogging and a refresh!

Toffee Apple Tarts, 3 years of blogging and a refresh!

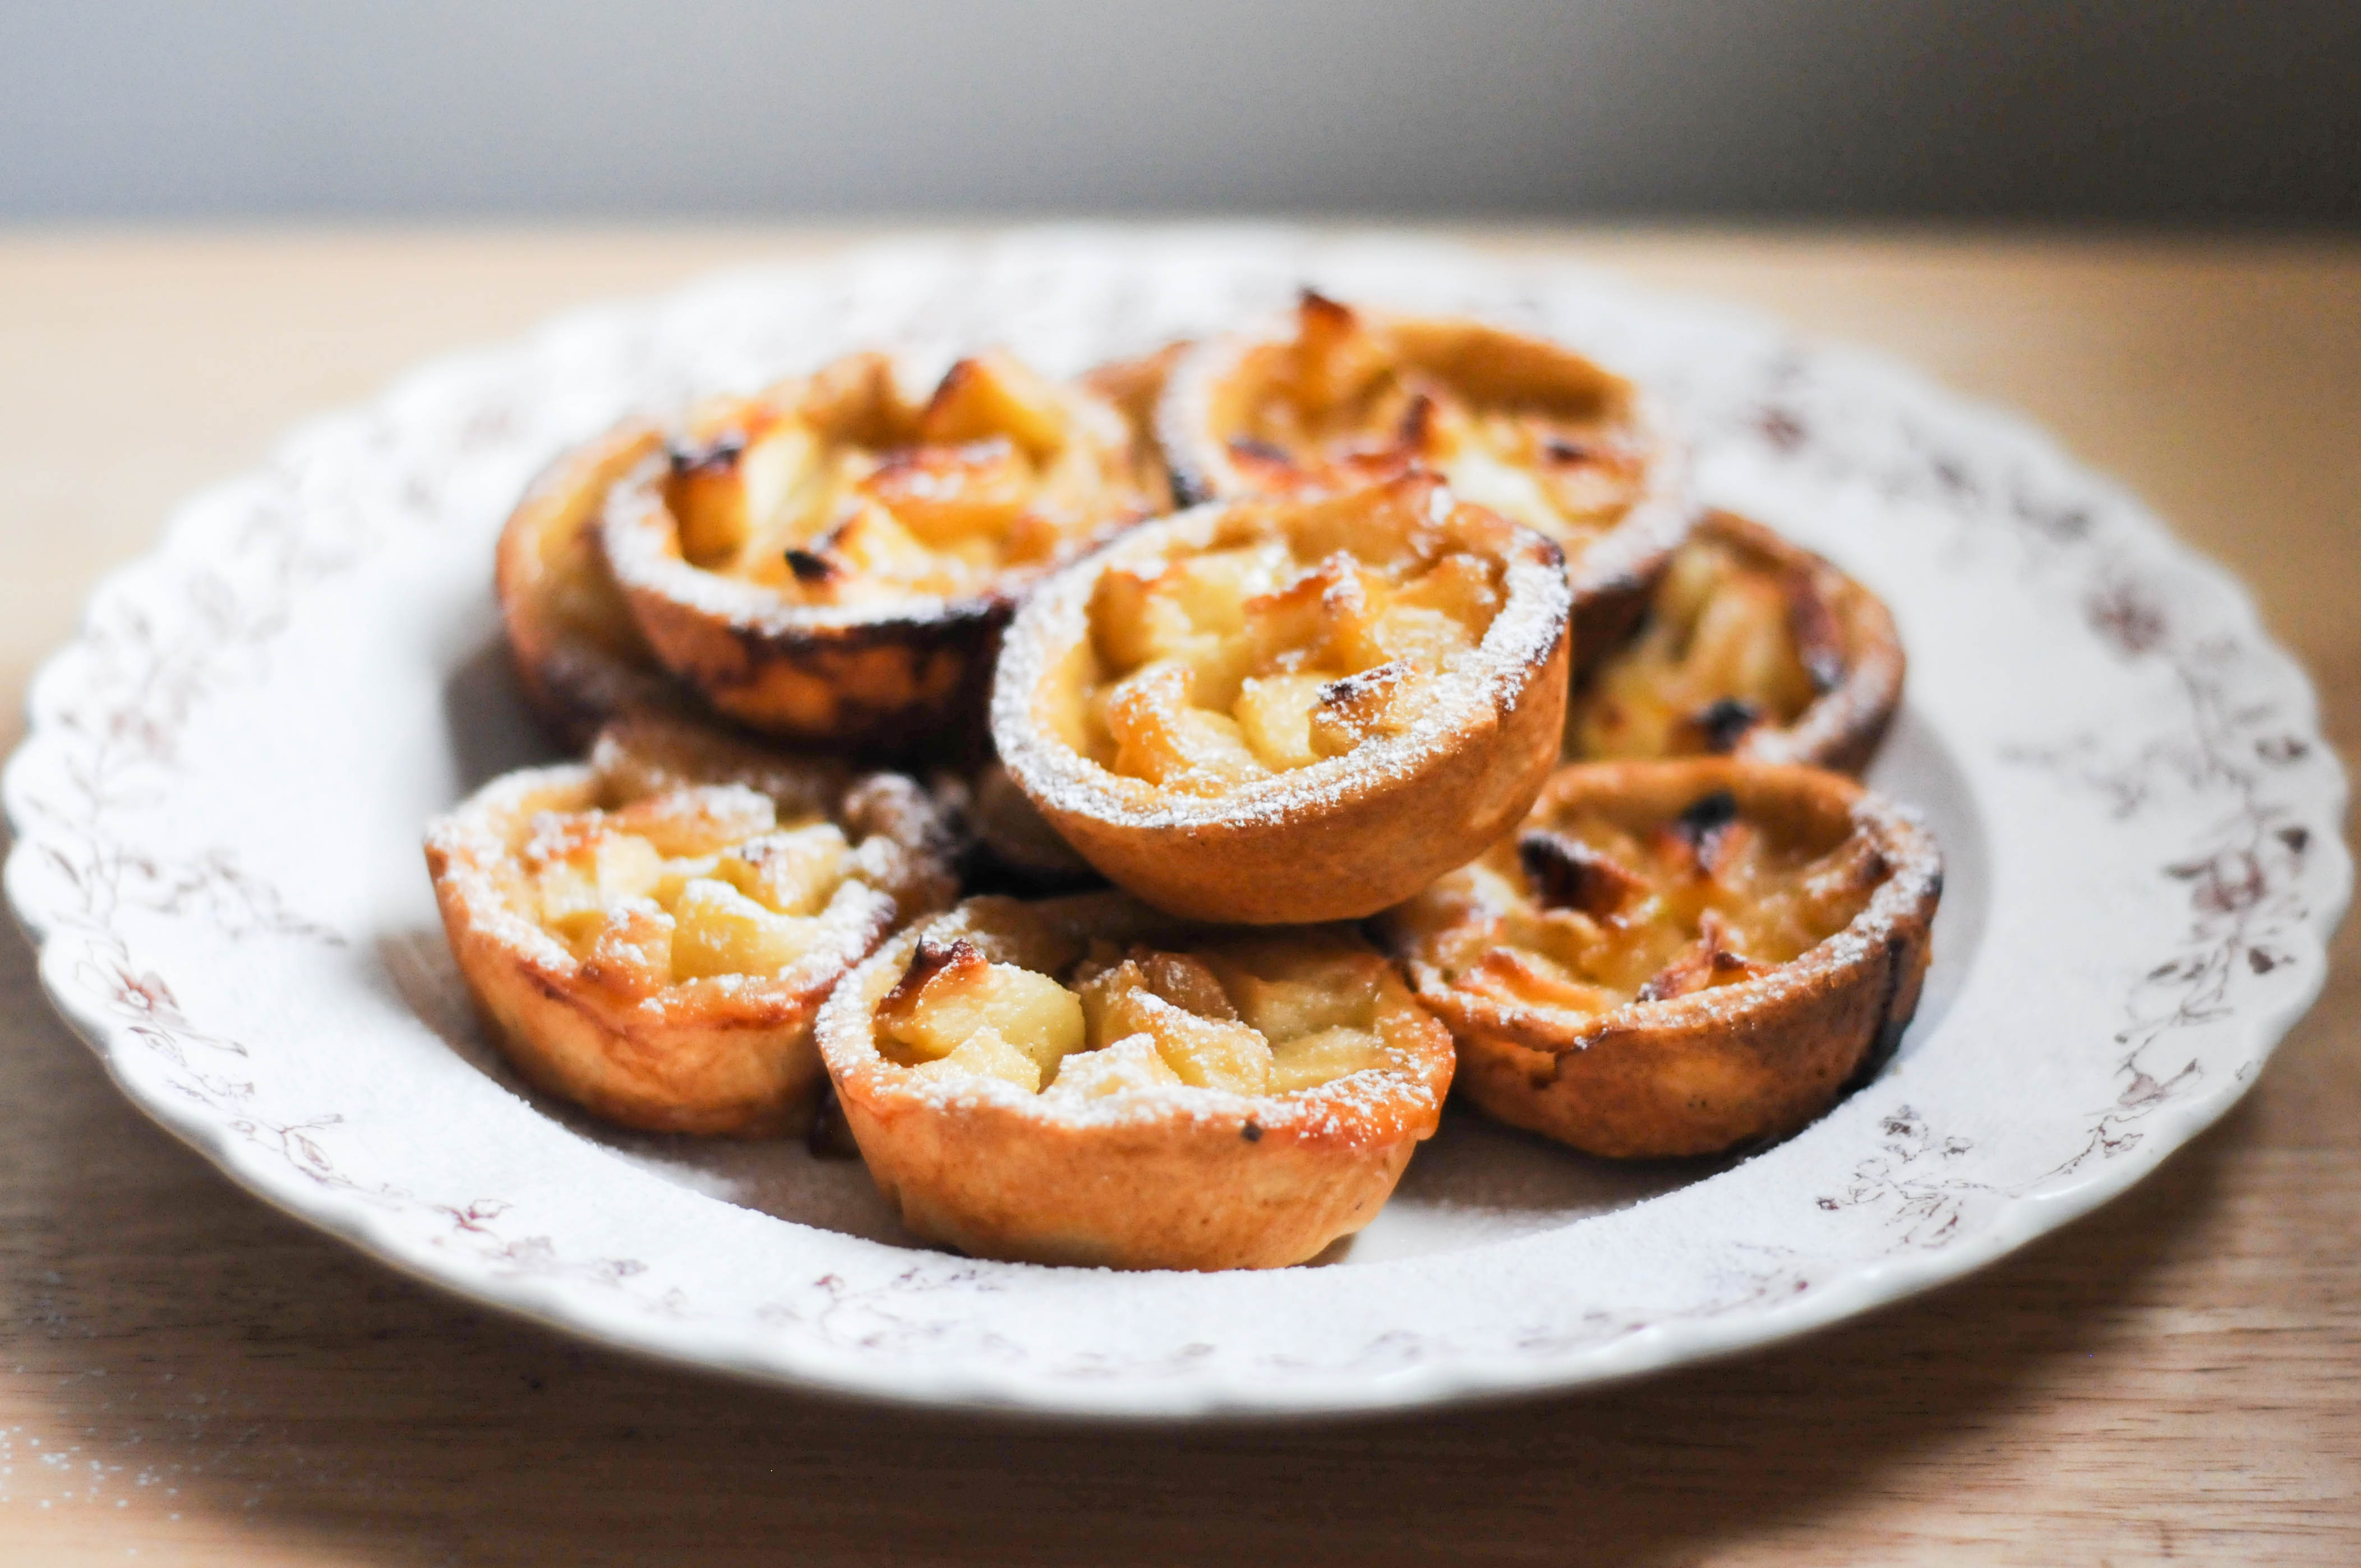
At the bottom of our garden, we have an imposing Bramley apple tree, planted during the ‘Dig for Britain’ campaign during the second world war. Last year, British crops suffered and there were hardly any apples at all. This year, and following a good prune, we seem to have our apples back – big and shiny and rosy on the edge receiving sunlight.  Since we also had an apple tree in our back garden growing up at home, apples conjure up comforting memories of cinnamon-spiked apple pies, cakes and crumbles. Apples can also be useful loot to swap for other homegrown produce. Since it’s Bonfire Night tonight, we’ve made some Toffee Apple Tarts and if time allows, a Spiced Toffee Apple Cake will also await lashings of custard. I’ve also written a post over at JamieOliver.com highlighting some other Bonfire Night treats you might like to try.

Bramley Apples

Blog Refresh

My blog has had a little refresh and you’ll have probably noticed a few changes. The main change is the installation of a new WordPress theme called Foodie, cleverly designed by Shay Bocks, offering some very neat features, such as updated coding and a customised home & recipe page with improved plugins and features. I still have quite a big job to do with my post categories, so over the next week or so, there may be a little maintenance going on. I have also had a refreshed header installed, which I think is fun – I love my bowl of seasonal plums. My existing logo and old header, designed by Miss Foodwise and husband Bruno, have been updated and will get an upgrade to Ren Behan Food – a new site (also under construction) which will become home to some examples of my freelance work.

Ren Behan Banner
New site coming soon!

3 Years of Blogging

I almost missed my blogging anniversary! As I began to type this post, I remembered that I published my first post, Hello World, on 2nd November 2010 – back then, my blog was called Fabulicious Food!  Starting a blog and hitting publish placed me on the path of a great adventure. I’ve made so many friends as a consequence of starting this little food blog. I’ve also had opportunities to cook with and receive help, advice and words of wisdom from some of the people I most admire in the world of food. Perhaps as a result of sticking at something I love doing very much, I’m now settling into a freelance writing and recipe development career.

Things I’ve learnt along the way

I have learnt that it takes time to build a community and to build up new skills. Although I always loved to cook, I had no idea how to translate a love of food into recipe writing and I had only ever used a camera to take holiday and family shots. I’ve read lots of books and other blogs – including It Starts With Food by Diane Jacob and The Recipe Writer’s Handbook by Barbaba Gibbs Ostmann. I have also studied food magazines, taken courses, and have developed my own way of describing how to cook something or bake something.

Many bloggers expect to start blogging, generate attention and become a success overnight. I’d say, don’t expect readership to happen overnight. A blog will grown over time. Keep going and crucially, if you begin to value your time and your worth, you can turn blogging for fun into something more than a hobby. My best advice is to keep moving forward  – don’t be afraid of change or of trying something new. Set yourself some targets, don’t just accept every offer that comes your way – analyse what you are being asked to do, to create,  to write and then decide if it is worth it. If you decide to work with brands, be aware when commercial companies (who pay PR’s to contact you!) are trying to get something for nothing and don’t sell yourself short. Learn how to negotiate and very importantly, make an effort to understand some of the legal aspects of blogging. For example, always be honest and disclose to your readers whether you have received something for free or as an incentive to write about a certain topic or product. State clearly if you have been paid to feature a brand, a product, a recipe, a video, or have been asked to include links to specific pages. Blogging, both as a means of communication and an extension of social media is changing rapidly – make sure you keep up with any significant changes and always be aware that as a blogger you are ultimately an ‘influencer’ – tread carefully. That being said, the best and most successful blogs (in my view) are the ones written by people who truly love writing and communicating and who see blogging and tending to a blog as a creative process rather than a money-making scheme.

Apple Tarts

2 votes

Print

Toffee Apple Tarts

Prep 15 mins

Cook 15 mins

Total 30 mins

Author Ren Behan

Yield 12

Easy to bake toffee apple tartlets using British Bramley apples

Ingredients

  • 375g sweet shortcrust pastry (ready to roll is fine)
  • 4 large cooking apples
  • 50g butter
  • 125g light soft brown sugar (plus extra for sprinkling)
  • 2 tablespoons golden syrup
  • 1 tablespoon double cream (optional)
  • A little butter for greasing the tin
  • A sprinkle of flour for the pastry board

Instructions

  1. Grease a 12-hole muffin tin with a small amount of butter. Sprinkle some flour onto a board and roll out the pastry. Cut out 12 circles of pastry and carefully place each disc into a hole in the tin and press down gently. Place the pastry-lined tin in the fridge whilst you make the apples.
  2. Peel, core and dice the apples. Place them into a large pan. Add the butter, sugar and golden syrup cook for five minutes. Take off the heat and add the double cream, if using. Pour any excess toffee sauce into a cup so that the apples are just coated.
  3. Take the pastry-lined tin out of the fridge and spoon some toffee coated apples into each tart. Sprinkle the apples with a little extra sugar. Bake for 15-20 minutes until golden and bubbling. Remove from the tin and serve whilst warm.

Courses Dessert

Cuisine British

What do you think makes a successful blog? I’d love to know your thoughts…

August 30, 2013

Mini Pasta Bakes (Proware Kitchen)

Mini Pasta Bakes (Proware Kitchen)

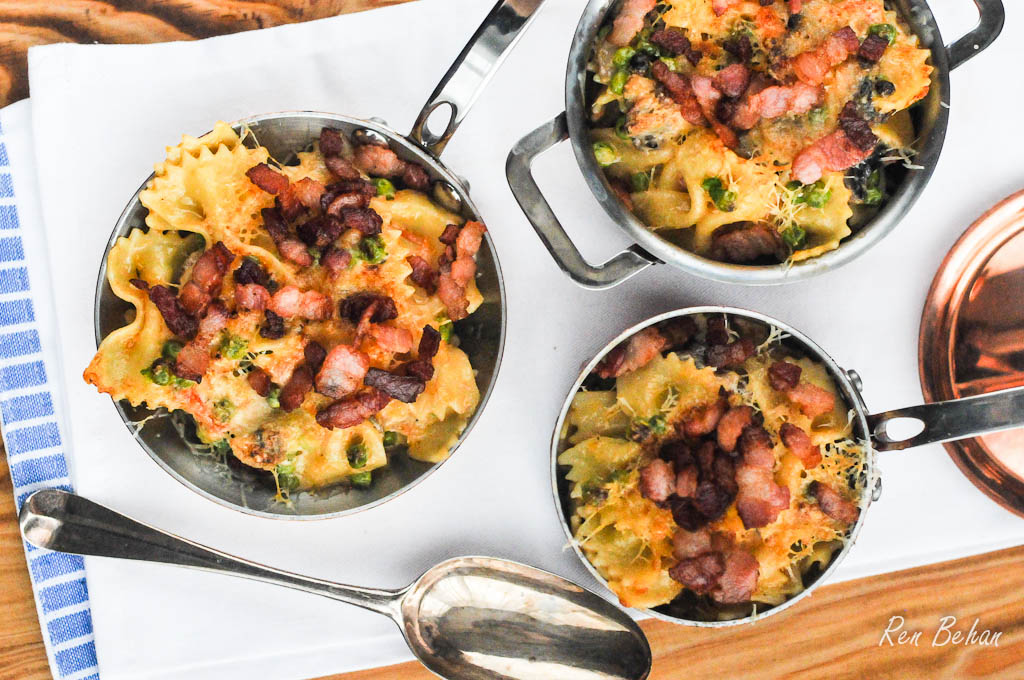
I mentioned cooking with Proware Kitchen’s Tri-Ply copper pans on my blog shortly before Christmas, when I tested a set sent to me by Proware Kitchen. They’ve stood up extremely well in my kitchen and so I was pleased to see some new pans added to the range, including a 24cm saute pan, a 24cm stockpot, a 12cm mini frying pan and a 12cm mini casserole. I’ve now tried out the newbies, too and have been equally happy with them – the 24cm saute pan being my most used and loved pan in the range. Lakeland stock the pans exclusively and since the beginning of the summer Lakeland have had them on special offer – 3 for 2, with the lowest price item being free.

Proware 24cm Saute Pan

 A tasty filling for an Easy Chicken Pie – {find my recipe here}

Caring for my Copper Tri-Ply Pans

My Proware Kitchen Copper Tri-Ply pans have been through the dishwasher lots of times, though their website states that where possible, they should just be washed in warm soapy water. Copper does tarnish over time, which gives them a lovely, rustic, well-used look, although I’ve found that either Brasso (an inexpensive metal polish) or better still, half a lemon dipped in salt and gently rubbed onto the copper, brings them back to their shiny state easily enough.  

The photo on the left is before cleaning the pans. On the right, the pan on the top left was cleaned with half a lemon dipped in salt and the pan on the bottom right was cleaned and polished with Brasso.

ProWare Copper Pans

The new mini pans are also incredibly cute. They remind me of a posh meal, with perhaps a roasted chicken breast and some bright green petit pois served in a little pan alongside, or even a tasty sauce. I use mine to make mini pasta bakes in, which can then be served as individual portions. You have to be very careful though, as straight out of the oven the copper is very hot! The mini frying pans are great for single fried eggs, or mini omelettes, too.

Copper pans are excellent conductors of heat. The benefit of using Tri-Ply copper pans is that they are lighter than traditional copper pans, less expensive and have a three layer structure – a copper exterior, an aluminium core second layer and then they are finished with a thin layer of stainless steel inside the pans. So basically, the pans stand up to professional or domestic use, they look pretty and food cooks evenly and without sticking or burning as you can generally use a lower heat.

Here’s a very simple Pea and Bacon Pasta Bake recipe that I often make at home. Below the recipe, you’ll also find a giveaway for a mini frying pan – good luck!

Mini Pasta Bakes

[kitchenbug-your-recipe-appears-here-12784]

ProWare Kitchen Giveaway

a Rafflecopter giveaway

With thanks to ProWare Kitchen for sending me the latest pans in the range to review and for providing a giveaway prize. I was not required to write a positive review and this is an unpaid post.

More Pasta Recipes

Easy Macaroni Cheese with Baby Leeks

Quick Tuna Fish Pasta


August 12, 2013

Coronation Turkey Picnic Rolls

Coronation Turkey Picnic Rolls

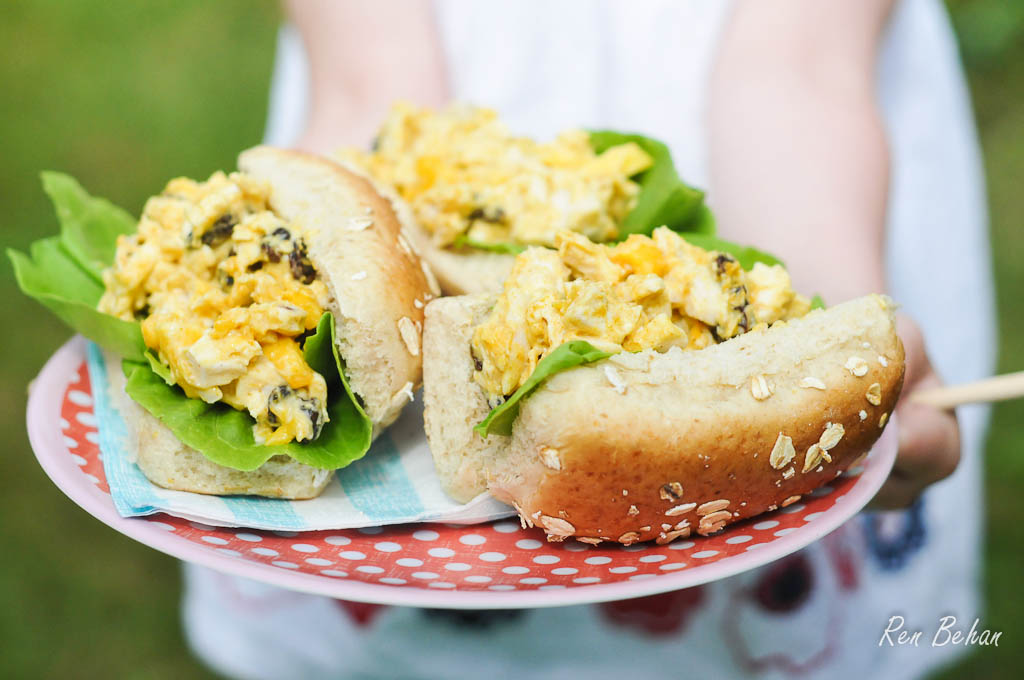
Ever since eating a steaming hot jacket potato recently in a Welsh café, topped with coronation chicken (and discovering that the kids liked it, too) I’ve been making my own version at home. So, when Lean on Turkey asked me to create a recipe suitable for kids and picnics (under £10) we decided on some coronation turkey picnic rolls. You could also fill some tasty wraps with the filling, or even stir it through some pasta to make a coronation turkey pasta salad. Coronation chicken was a dish first said to have been created for the coronation of Queen Elizabeth II in 1953, made with cold chicken, raisins, herbs and spices. We swapped traditional chicken for some shredded, cooked turkey adding a few dollops of light mayo, curry powder, raisins and chopped mango. If you don’t want your rolls or wraps to go soggy, either line them with lettuce (as we did) or else take the coronation turkey mix in a separate jar and fill when you arrive at your favourite picnic destination!

Coronation Turkey

[kitchenbug-your-recipe-appears-here-12069]

Coronation Turkey

Breakdown of costs – with some ingredients leftover

Roast Turkey Breast Slices – £2.49

Essentials Waitrose Mayonnaise – £1.09 (500ml)

Curry Powder – £1.25 (100g)

Raisins – £1.00

Mango – £1.75

Lettuce – £1.00

Oaten Bread Rolls x 4 – £1.14

Total – £9.72 

Coronation Turkey

More picnic recipes –

Polish Carrot and Apple Salad

Nigella’s Spanish Chicken with Chorizo and Potatoes

Seasonal Cherry and Almond Traybake

Pear and Chocolate Brownies

You could also try my first recipe for the Lean on Turkey Challenge – Turkey and Leek Meatballs with Tomato Tagliatelle.

Sponsored Post + cost of ingredients covered

With many thanks to Lean on Turkey for asking me to create a picnic recipe. 

July 24, 2013

Easy Chicken Recipes – Good Food Channel

Easy Chicken Recipes – Good Food Channel

I’ve been a little busier than usual, creating some easy chicken recipes for the Good Food Channel . A particular highlight, I’d say, was cooking Buttermilk Fried Chicken on the hottest day of the year – a cold beer was necessary at the end of that shoot, I’ll tell you! It’s hard to pick a favourite recipe out of this batch – we loved the Easy Chicken Pie (it was slightly cooler that day!) and I think the Caribbean-inspired Jerk chicken has become a firm summer favourite, too.

Click through the links below the photos to go straight to the recipes.

Easy Chicken Pie

Easy Chicken Pie {Recipe Here} for the Good Food Channel

Lemon Chicken

Lemon Chicken {Recipe Here} for the Good Food Channel

Buttermilk Fried Chicken

Buttermilk Fried Chicken {Recipe Here} for the Good Food Channel

Chicken and Parmesan Pasta

Chicken Pasta with Parmesan and Basil {Recipe Here} for the Good Food Channel

Jerk Chicken

Jerk Chicken {Recipe Here} for the Good Food Channel

You can keep track of all my recipes for the Good Food Channel by checking out my profile here.

Earlier on this year, I was also interviewed by the lovely food journalist Katie Bryson and created a Rhubarb and Almond Cake to accompany the feature.

Ren Behan is a freelance contributor to UKTV Food/Good Food Channel – styling, photos and recipes author’s own.

Will any of these recipes take your fancy over the summer?

  • Page 1
  • Page 2
  • Next Page »

Primary Sidebar

Posts by email!

Subscribe now to get new posts direct to your email inbox

Search the site

Follow me on Instagram!

340,000+ Pinterest Followers – RenBehanFood

Visit Ren Behan Food's profile on Pinterest.

Archives

Footer

Copyright © 2023 Ren Behan · Custom Theme by Moonsteam Design