• Skip to primary navigation
  • Skip to content
  • Skip to primary sidebar
  • Skip to footer

Ren Behan - Author Wild Honey and Rye

Food Writer

Main navigation

  • Buy the Book (USA)
  • Media
  • Recipes
  • Lockdown
  • Buy the Book (UK)
  • About Ren
  • Blog
  • Widget Area for Top Menu

Lockdown

July 30, 2018

Risotto Caprese with Tomato, Mozarella and Basil (Gennaro Contaldo)

Risotto Caprese with Tomato, Mozarella and Basil (Gennaro Contaldo)

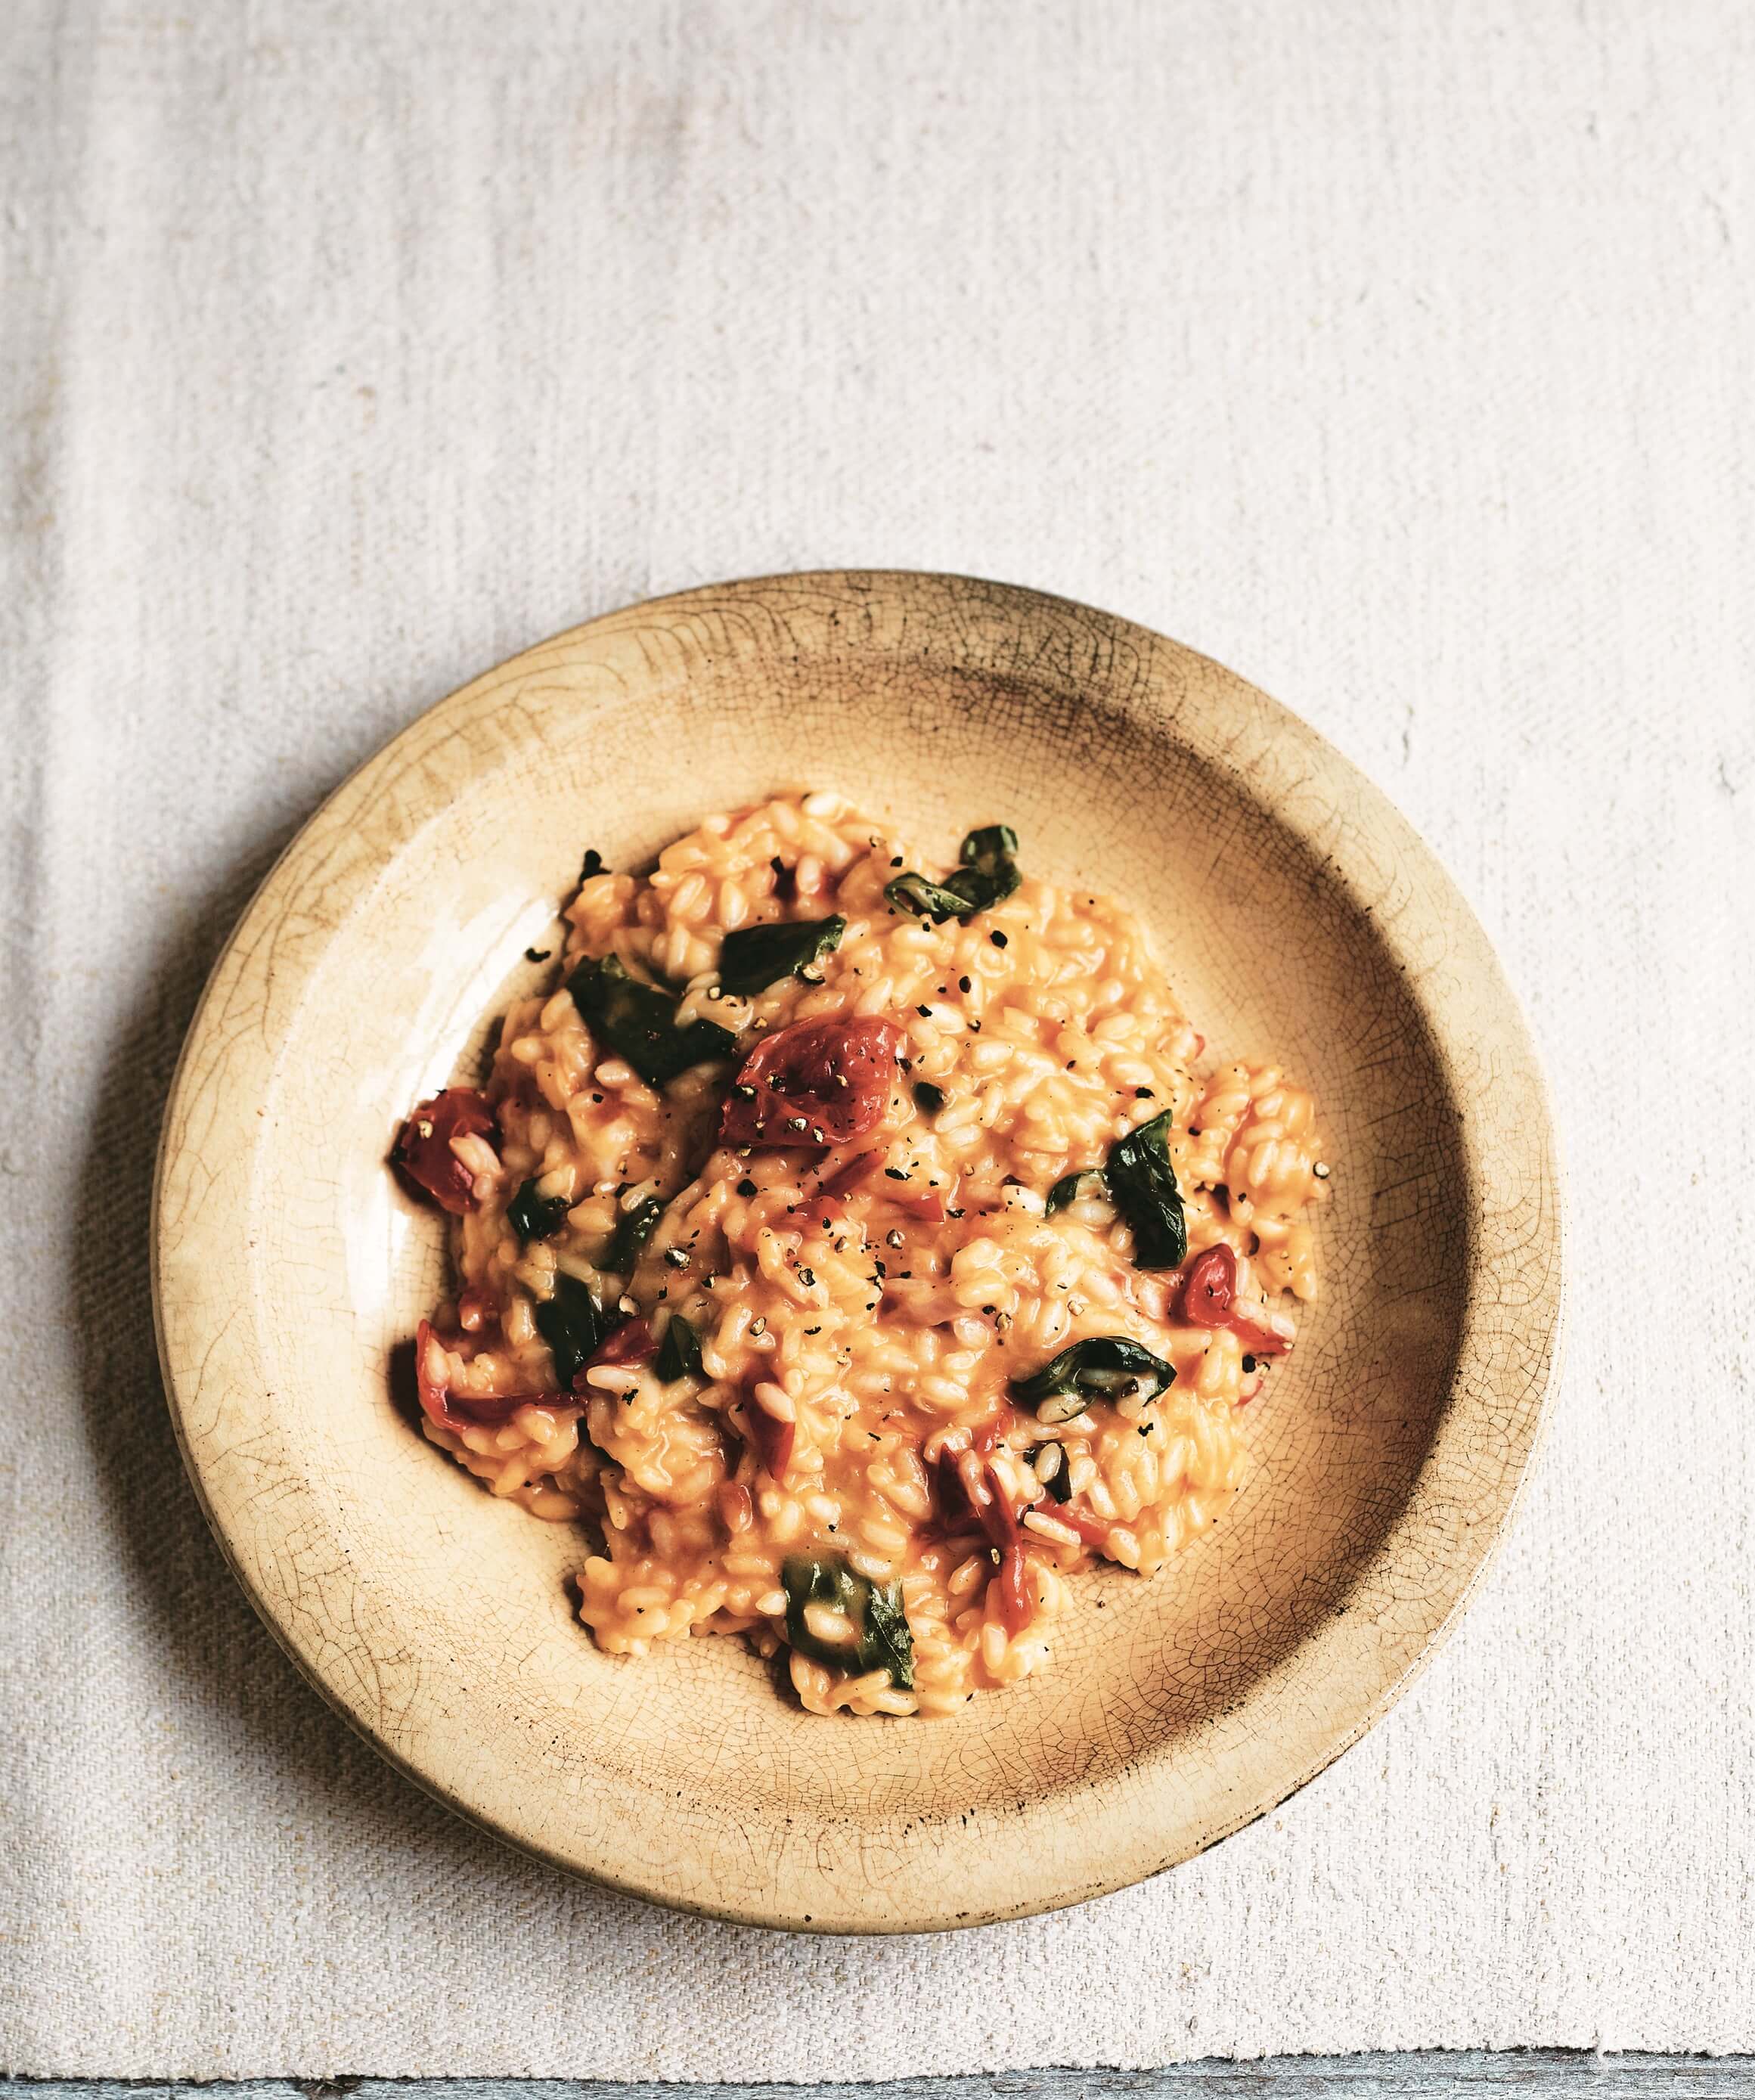
Ever since my trip to the Po Valley with Riso Gallo to understand more about how rice and other grains are produced in Italy, I have been obsessed with perfecting my risotto-making technique. During our visit, we ate in some truly memorable restaurants, sampling different grains and flavours of risotto, a particular highlight being a very simple aged-risotto grain, cooked with olive oil, butter and Parmesan cheese and adored with spring truffles.

Since then, making a risotto has become a weekly activity – in part prompted by the fact that all three of our children unanimously love risotto and so it’s one of the few meals that doesn’t have to be messed around with. It’s also a great, store-cupboard staple recipe. There are plenty of recipes here that you can make at home.

Of all the risotto recipe I have tried, this one, found in Gennaro Contaldo’s Fast Cook Italian is our winner – it is a Risotto Caprese – based on the flavours of the classic Caprese Salad of Tomato, Mozarella and Basil.

Contrary to the popular belief that making a risotto is time-consuming and labour intensive, you can have dinner on the table in around 25 minutes with this recipe.

I love the fact that Gennaro’s recipes are always easy to throw together and very family friendly.

Published with the permission of Pavilion Books.

Risotto Caprese - Risotto with Tomato, Mozarella and Basil

5 votes

Print

Risotto Caprese - Risotto with Tomato, Mozarella and Basil

Cook 30 mins

Total 30 mins

Author Gennaro Contaldo

Yield 4

The ingredients for this risotto are taken from the classic Caprese salad – tomatoes, mozzarella and basil. Simple to make and extremely tasty, it’s often my go-to midweek meal for the family - Gennaro Contaldo 


Ingredients

  • 40 g/1½ oz/2 generous tbsp butter
  • 2 tbsp extra-virgin olive oil
  • 1 small onion, finely chopped
  • 2 handfuls of basil leaves
  • 260 g/9¼ oz cherry tomatoes, quartered
  • 320 g/11¼ oz/1¾ cups risotto (Arborio) rice
  • 100 ml/3½ fl oz/7 tbsp white wine
  • 1.5 litres/52 fl oz/6½ cups hot vegetable stock (bouillon)
  • 200 g/7 oz mozzarella, cut into small cubes
  • 30 g/1 oz/1/3 cup grated Parmesan

Instructions

  1. Heat 20 g/¾ oz/1 generous tablespoon of butter and the olive oil in a large, heavy-based saucepan set over a medium heat. Add the onion and a couple of the basil leaves and sweat for 2 minutes.
  2. Stir in the tomatoes and continue to sweat for 1 minute. Stir in the rice, making sure each grain is coated in oil. Add the wine and cook until the rice has absorbed it.
  3. Then add a couple of ladles of hot stock, stirring with a wooden spoon until the rice has absorbed it all. Add a couple more ladles of stock and continue to cook in this way, stirring and adding more stock, for 17–20 minutes, until the risotto is cooked al dente.
  4. Remove from the heat and add the remaining butter and mozzarella, stirring well until it has nicely melted into the risotto.
  5. Stir in the grated Parmesan and remaining basil leaves and serve immediately.

Courses Main

Cuisine Italian

Photography Kim Lightbody. 

Gennaro’s Fast Cook Italian 

From Fridge to fork in 40 minutes or less

ISBN: 9781911595113

Price: £20.00

Publication date: 5 April 2018

Fast Cook Italian Gennaro COntaldo

Other risotto posts you may like:

Quick Risotto-Stuffed Vegetables 

3 Grains: Rice, Spelt and Barley Risotto with Chicken and Dill 

Sausage and Courgette Risotto  

February 1, 2018

Polish Meatballs with Mushroom Sauce

Polish Meatballs with Mushroom Sauce

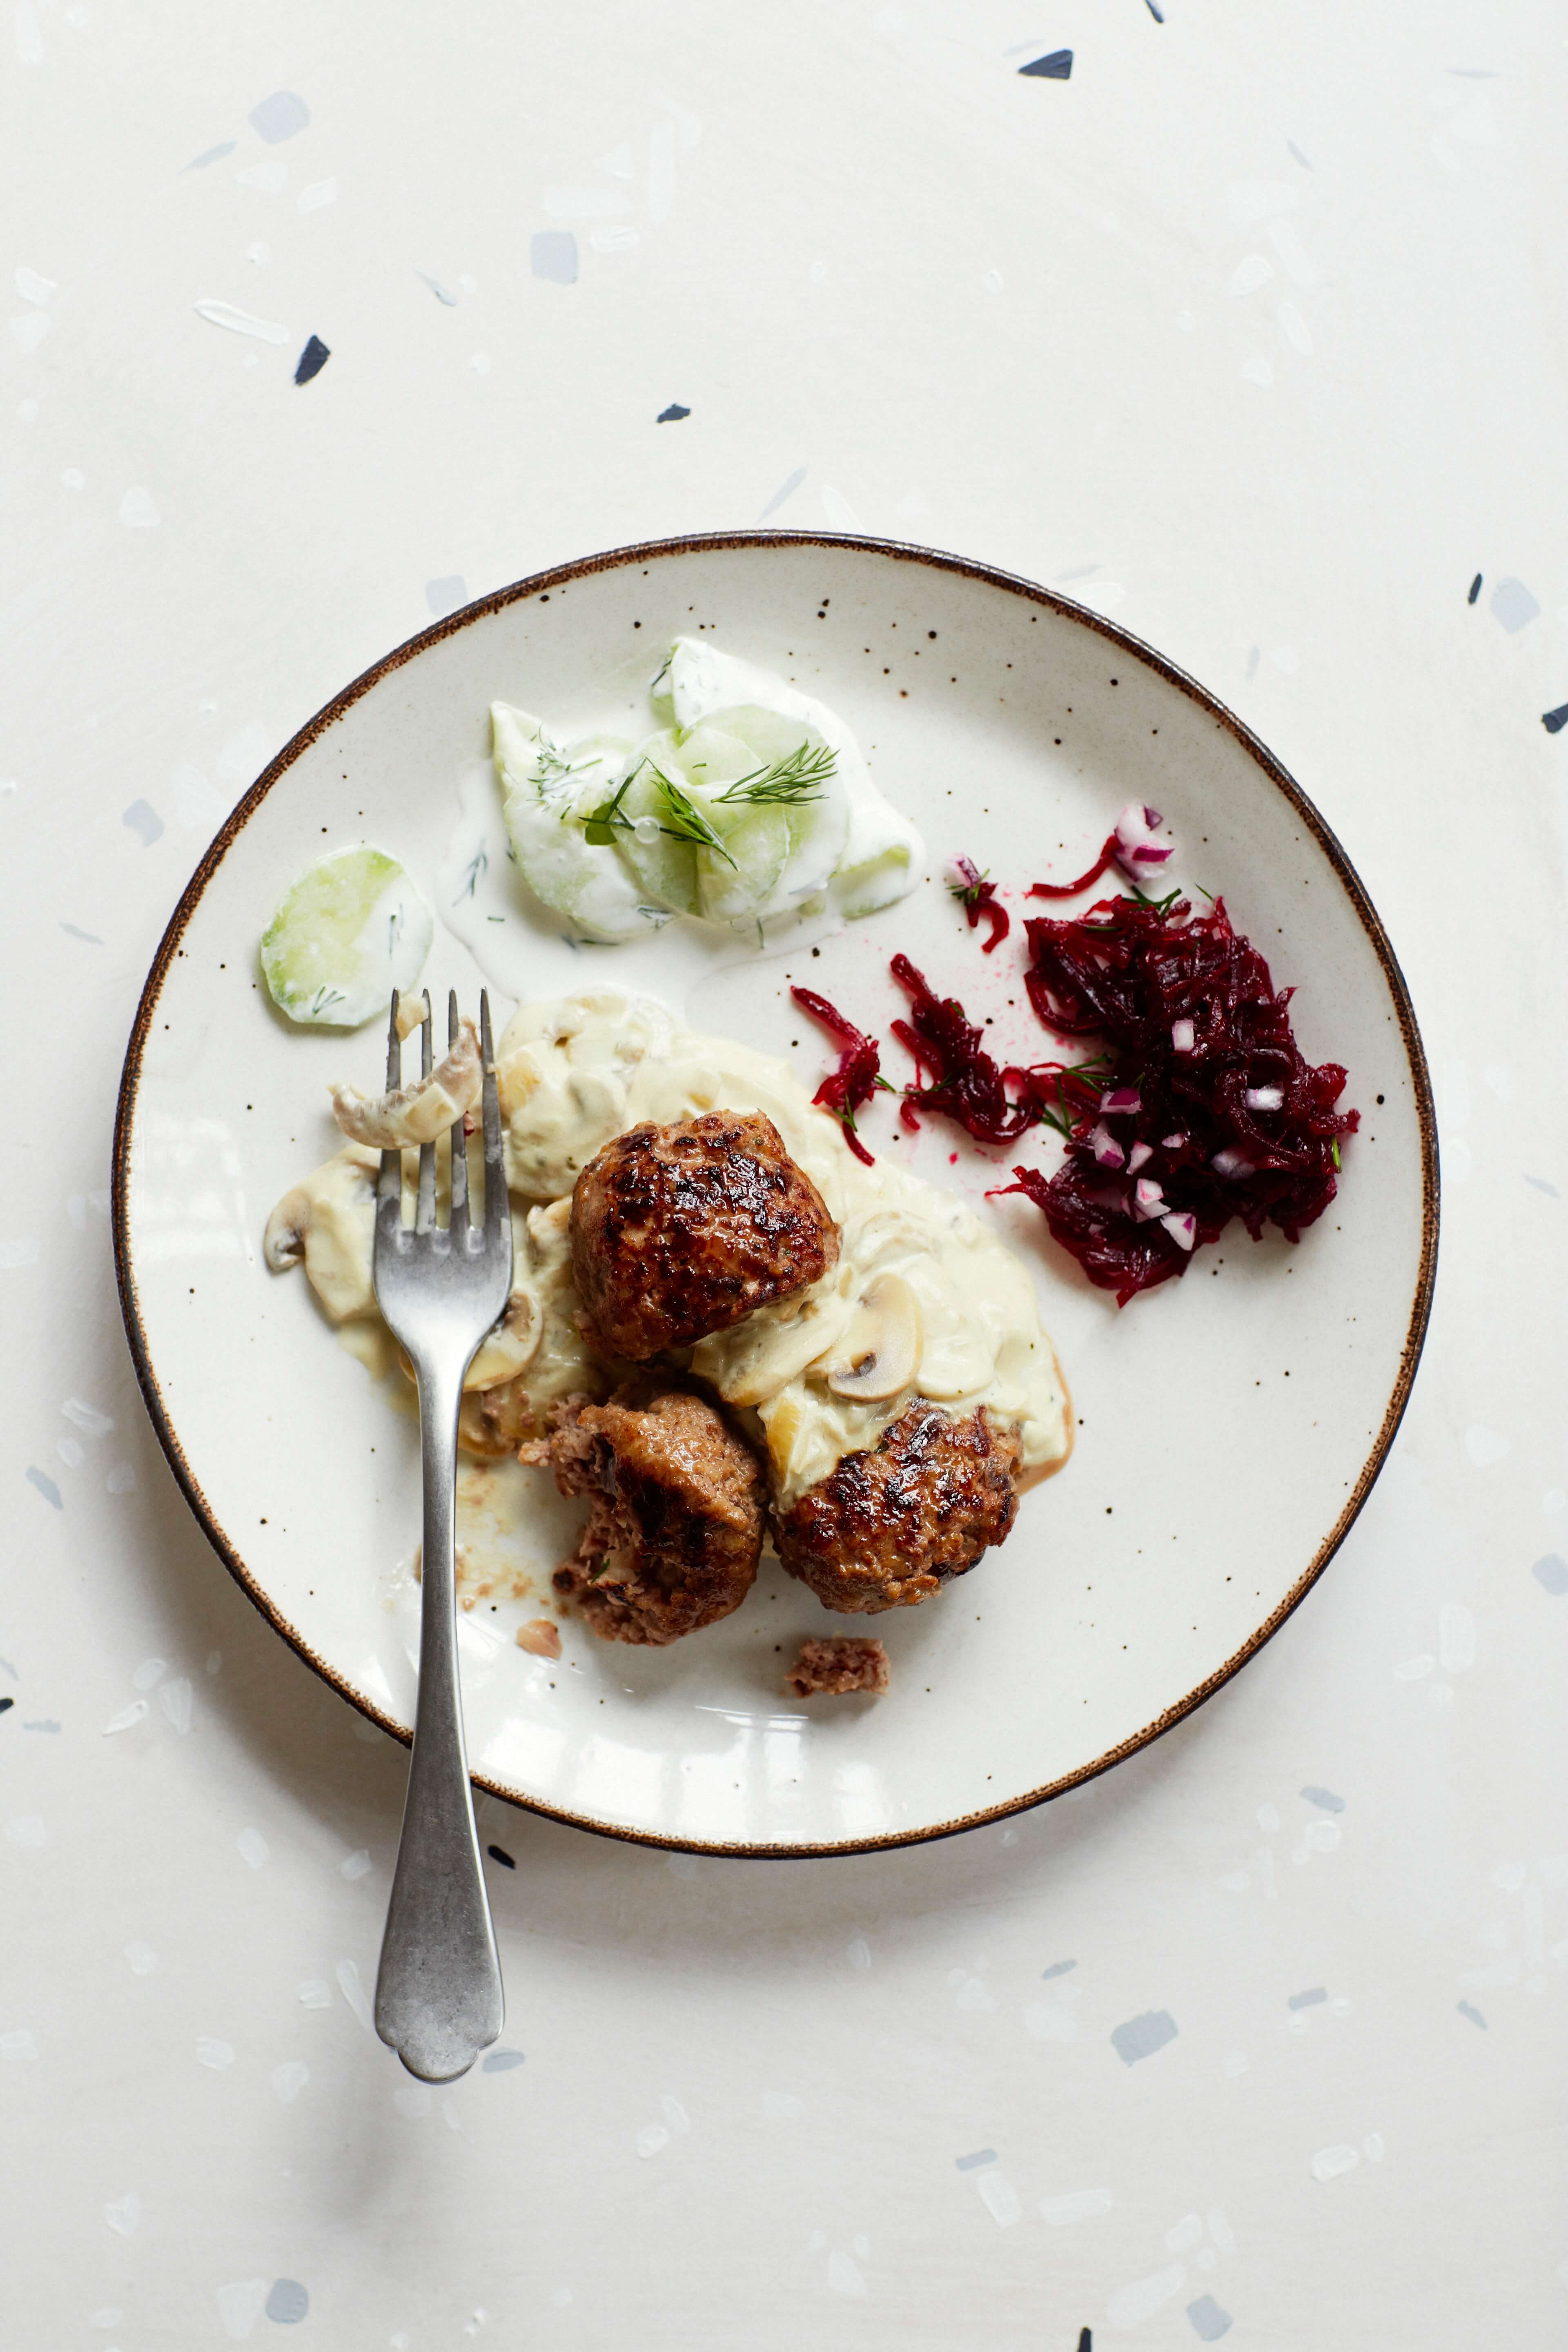
This is one of my favourite recipes from my cookbook Wild Honey and Rye for Polish Meatballs in a Mushroom Sauce, which you can find on page 118.

I serve my meatballs with a light cucumber, sour cream and dill salad and a grated beetroot salad. There’s no need for potatoes, although my Mama would serve hers with potatoes (the apple mashed potatoes on page 85 or  the new potatoes with butter and dill on page 89) both work really well. Small meatballs in Poland are known as kotleciki or pulpety, larger ones are called kotlety mielone.

Skip straight to the recipe here

Wild Honey & Rye - Meatballs with Cucumber Salad
Image Credit: Yuki Sugiura for Pavilion Books

Wild Honey and Rye: Modern Polish Recipes is available in the UK here, published by Pavilion Books. 

The first American edition is also available for in the US here and will be published by Interlink Books in March 2018.

Thank you for all your support!


You may also like:

The Happy Launch of Wild Honey and Rye – read here.

Polish Mushroom Soup

5 Polish Recipes from Wild Honey and Rye 


With thanks to Pavilion Books for the permission to share this recipe from Wild Honey and Rye: Modern Polish Recipes.

December 11, 2017

3 Grain Risotto with Chicken and Dill

3 Grain Risotto with Chicken and Dill

I travelled as part of a press trip to Milan in Italy to visit Gallo, the Italian family business, established in 1856 and spanning 6 generations, to learn about rice and grains from the best in the business. This is one of the recipes I tried in Italy, using Gallo’s 3 Grain variety, with rice, spelt and barley, which I came home to re-create. 

3 Grains Risotto


Print

3 Grains (Rice, Spelt and Barley) with Chicken and Dill

Prep 10 mins

Cook 20 mins

Total 30 mins

Author Ren Behan

Yield 4

A perfect balance of three cereal varieties, this recipe uses Riso Gallo 3 Grains, Italian Rice, Spelt and Pearl Barley – all with the same cooking time – just 18 minutes. This is a healthier alternative to a traditional risotto dish as it is higher in fibre. 

Ingredients

  • Olive oil
  • 300g Riso Gallo 3 Grains (Rice, Barley & Spelt)
  • 1 white onion, peeled chopped
  • 1 carrot, peeled, finely chopped
  • 1 stick celery, peeled, chopped
  • 1 courgette, chopped
  • 250g cooked chicken breast, chopped or shredded
  • A splash of white wine or water
  • Fresh dill
  • Sea salt and freshly ground black pepper

Instructions

  1. Bring a large pan of salted water to the boil. Tip in the '3 grains' and cook for 18 minutes. If using the pre-cooked 3 Grains 'express' variety, you can skip this step. 
  2. In the meantime, place a large frying pan onto a medium heat. Add a tablespoon of olive oil, add the onion and cook for five minutes until translucent. Add the carrots and celery and continue cooking. 
  3. Once the vegetables have softened, add the courgette and chicken and cook for a further 5-6 minutes, adding a splash or wine or water to the pan. 
  4. Drain the 3 grains, rinse and add them into the pan (or tip in a pre-cooked packet of grains).
  5. Drizzle over a little more olive oil, stir and coat all the grains and season with sea salt and black pepper. Ensure the chicken is piping hot. 
  6. Serve, adding a little dill.  

Notes

The dish can also be chilled and served cold, as a salad. 

You may also like:

Katie’s Slimming World-Friendly Chicken, Dill and Vegetable Rice Pots, also inspired by our trip to Riso Gallo in Milan.

Delicious too – my Quick Risotto Stuffed Vegetables

Risotto Caprese with Tomato, Mozarella and Basil

Feeding children – they may like our favourite carrot and parmesan risotto 

Samples provided by Riso Gallo, this is an unpaid recipe post. 

November 2, 2017

Pumpkin (or Butternut) Soup with Kefir and Poppy Seeds

Pumpkin (or Butternut) Soup with Kefir and Poppy Seeds

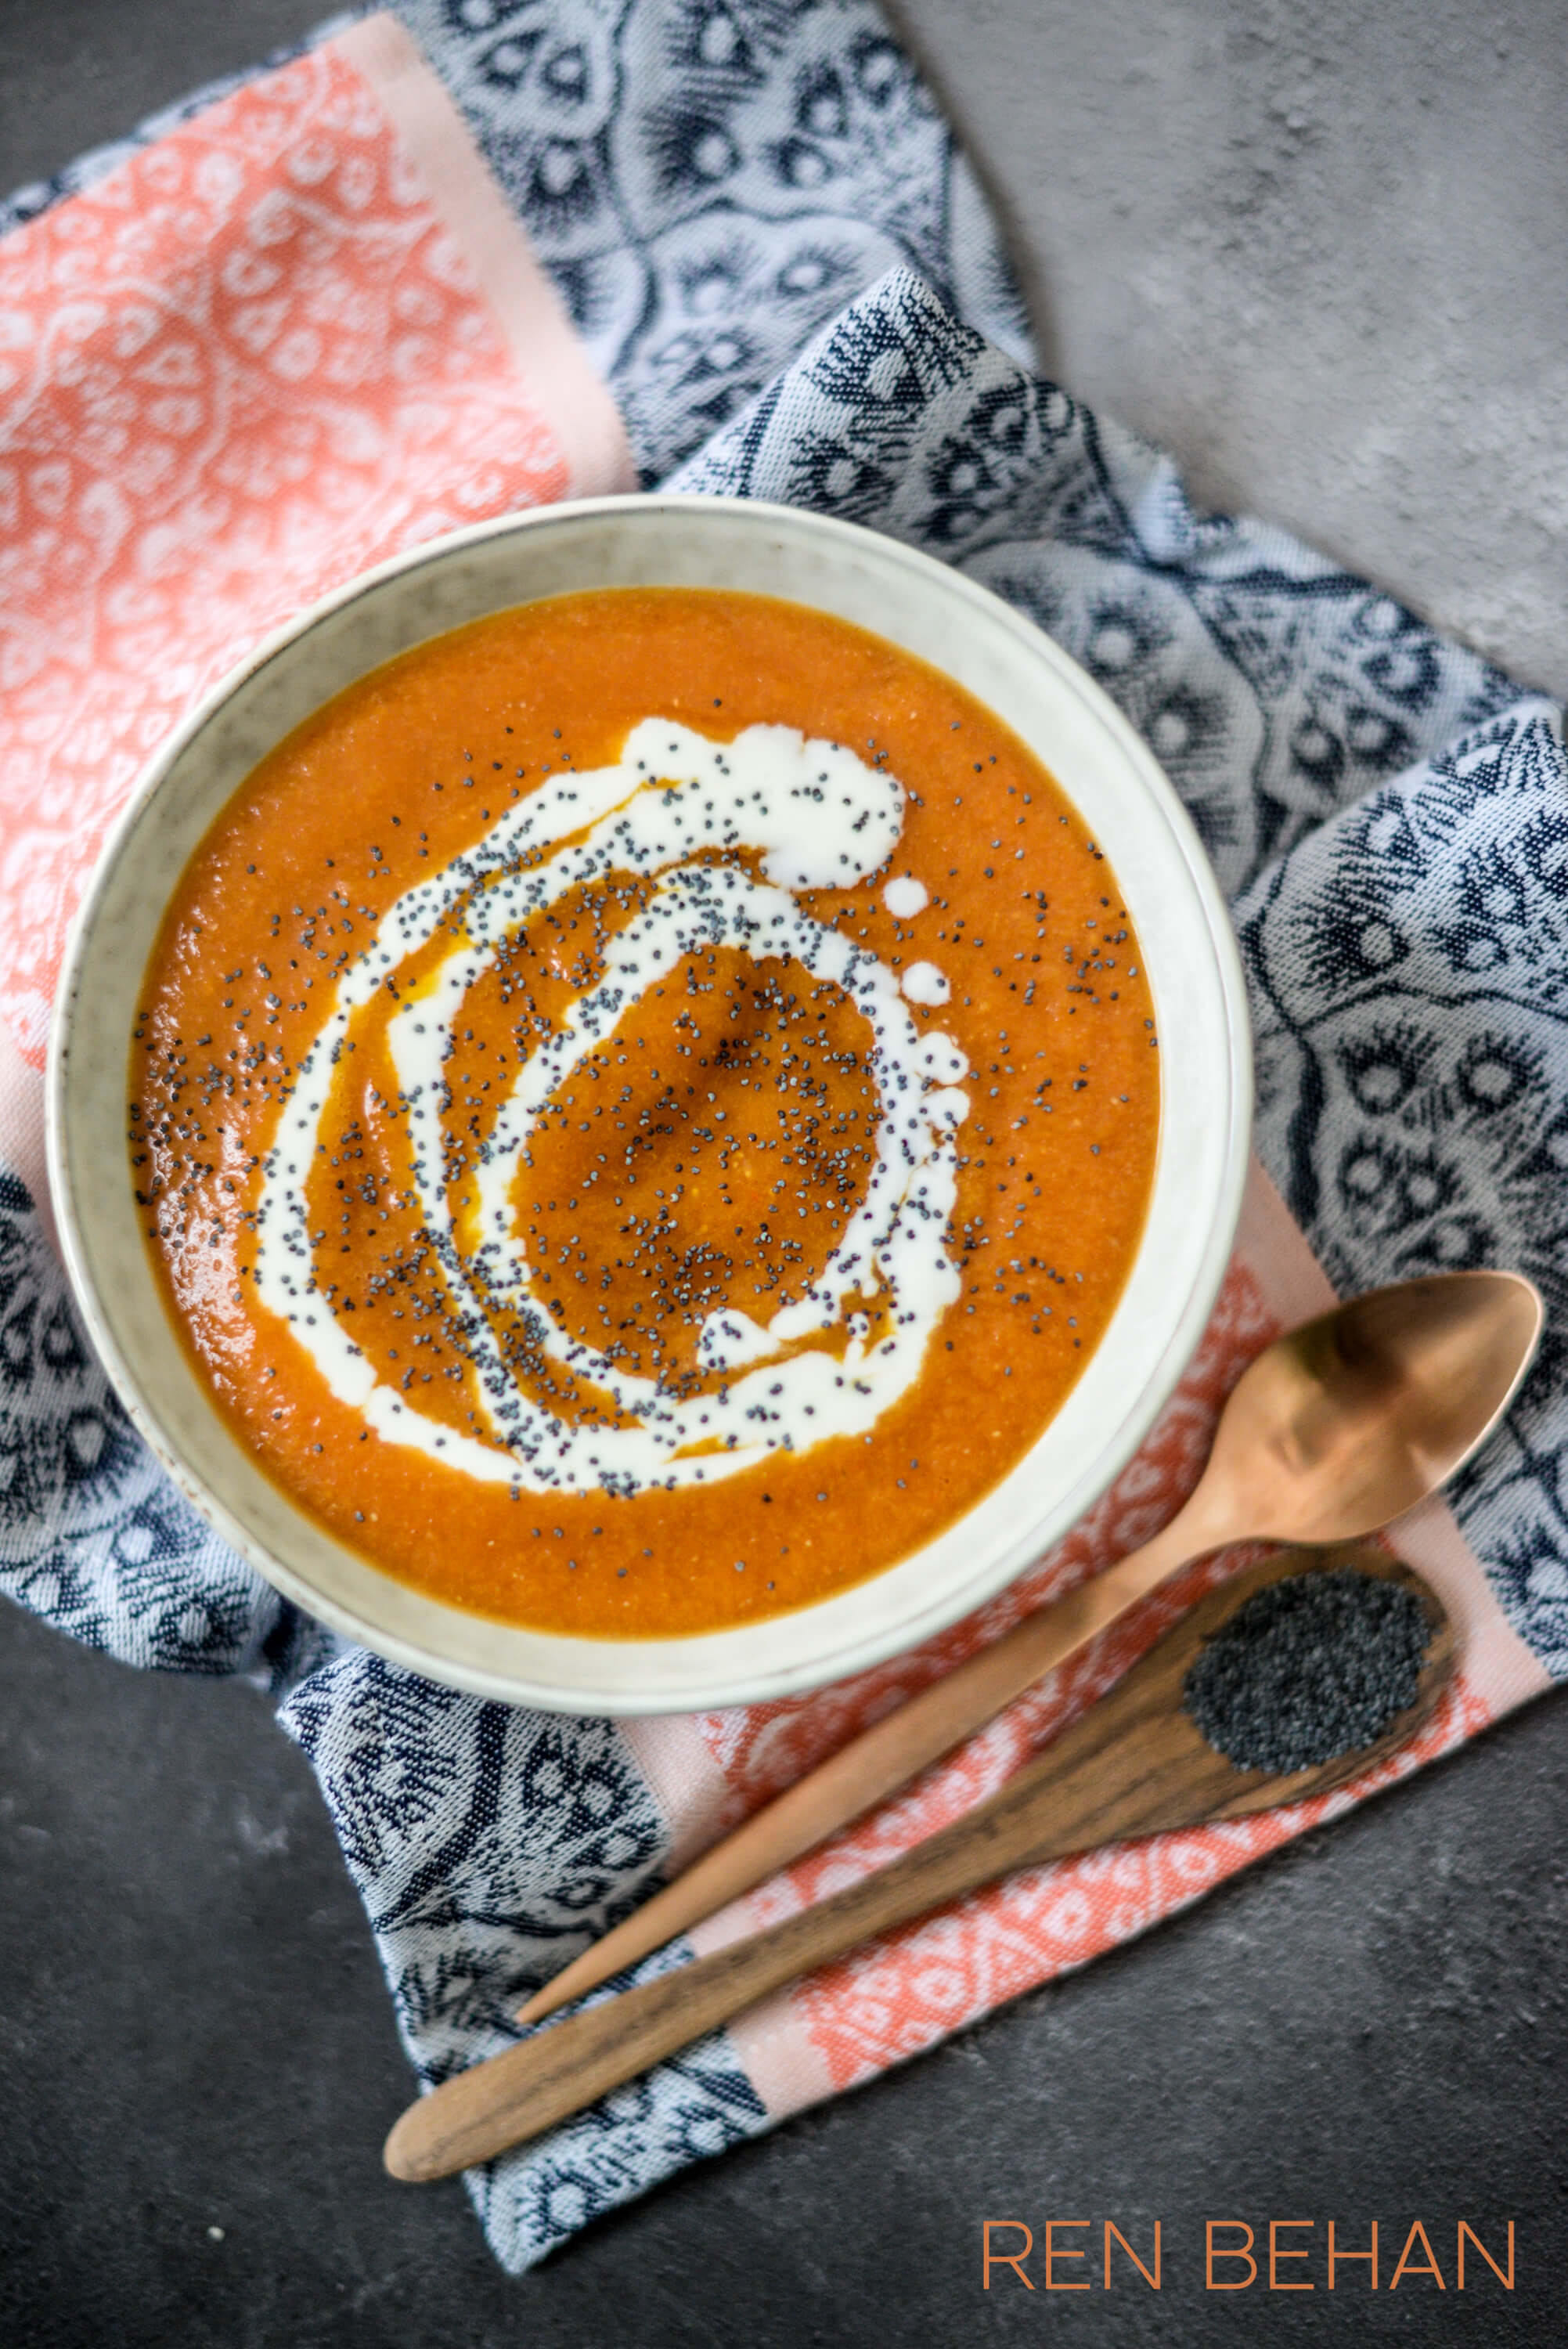
You can make this soup with fresh pumpkin, or butternut squash. Kefir is a gut-friendly dairy produce, but you can swirl fresh cream or sour cream through this soup, too. If you’re vegan, you can follow exactly the same recipe, but swap the kefir for some vegan/soy yoghurt instead and be sure to use a vegan-friendly, vegetable stock.


Aside from being packed full of fresh veggies, most of the other ingredients you’ll find in the store cupboard – red lentils, stock, a tin of tomatoes or passata and since I had a packet of poppy seeds open from making a Plum and Poppy Seed traybake, I sprinkled some over the finished soup, but the roasted seeds or any other seeds would be nice too.

leftover pumpkin soup with kefir


leftover pumpkin soup with kefir
Print

Pumpkin Soup with Kefir and Poppy Seeds

Prep 10 mins

Cook 14 mins

Total 24 mins

Author Ren Behan

Yield 6 servings

Whip up this simple and healthy seasonal pumpkin soup (or use squash) for the perfect autumnal bowl of comfort for lunch or as a light supper. Add a drizzle of kefir for a dose of healthy probiotic and a sprinkle of poppy seeds for a bit of crunch.

Ingredients

  • 1 tbsp olive oil
  • 2 white onions, peeled, halved
  • 700g pumpkin or squash, peeled, de-seeded and chopped into cubes
  • 2 carrots, peeled, chopped
  • 1 stick celery, washed
  • 200g/1 cup red lentils
  • 1 x 400g tin tomatoes or tomato passata
  • 1 litre vegetable or chicken stock
  • Sea salt and black pepper
  • 200ml kefir (cultured milk drink) or use natural yoghurt 
  • 1 tsp poppy seeds per bowl

Instructions

  1. Take a large 24cm pan or stock pot, add the olive oil and heat. Add the onions and fry until slightly softened and golden brown.
  2. Add the pumpkin, carrots and celery, stir well and continue to cook for 5 minutes.  
  3. Add the red lentils, tomatoes/passata and stock to the pan. Ensure everything is covered with stock, if not, add a cupful more of water.
  4. Bring to the boil and simmer gently for 20 minutes until all the vegetables are soft (the carrots will take the longest to cook).
  5. Season well with sea salt and black pepper.
  6. Allow the soup to cool a little and then use a stick blender to blend the soup, or transfer into a jug blender (you may need to blend in two batches)
  7. Serve the soup with a drizzle of kefir and sprinkle over some poppy seeds, or other seeds of your choice.

You may like:

Beetroot and Kale Soup with Almond Crumble

Spiced Pumpkin, Carrot and Sweet Potato Soup by Helen at Fuss Free Flavours

Polish Forest Mushroom Soup 


Thank you to Jude for the pretty napkins from Anthropolgie which were a book launch gift – I love them. 

August 3, 2017

Carrot Gingerbread Cake

Carrot Gingerbread Cake

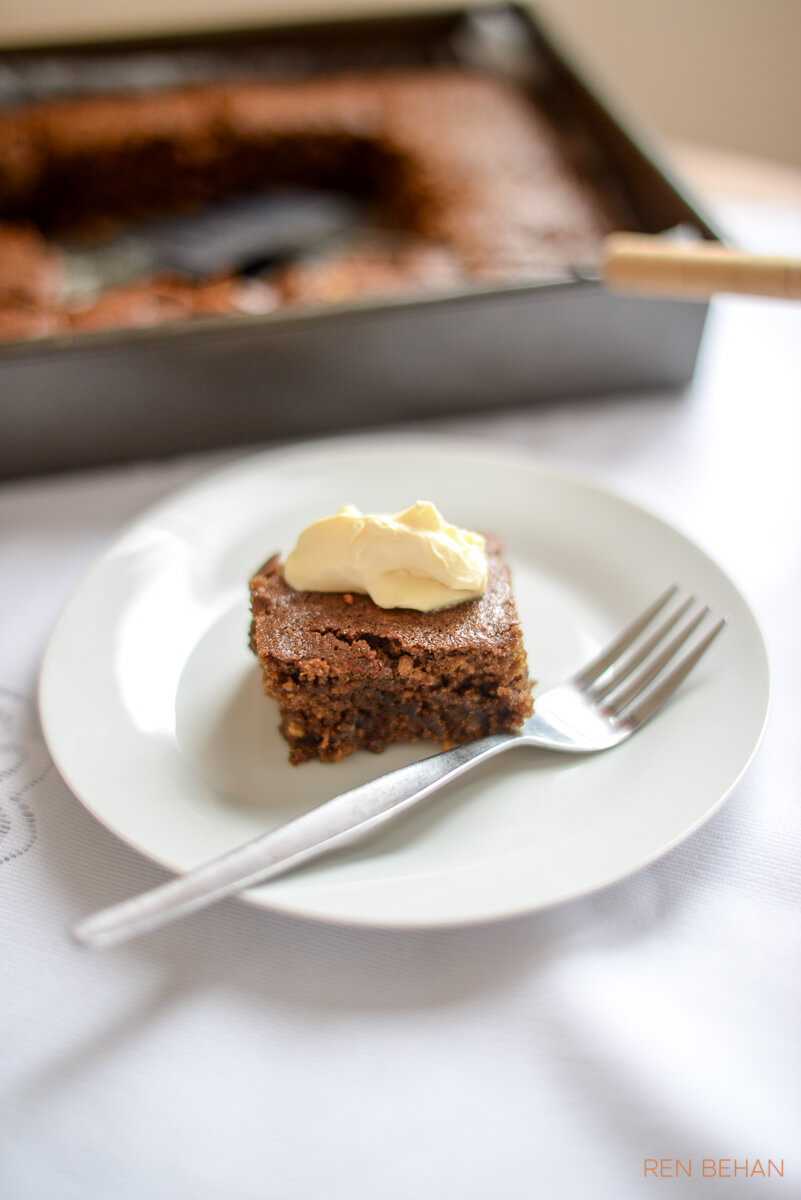
This recipe is taken from Veggie Desserts + Cakes – Carrot Cake and Beyond by Kate Kackworthy, with permission from Pavilion Books. Kate writes at Veggie Desserts.

Carrot_Gingerbread


7 votes

Print

Carrot Gingerbread

Author Kate Hackworthy Veggie Desserts + Cakes

Yield 20

"These chunky slabs of gingerbread are rich, dark and elegantly spiced. I’ve added lots of grated carrot to make them extra moist, and it blends beautifully with the treacle and ginger. Although this old-fashioned classic takes a while in the oven, it is very easy to make. For extra decadence, serve the gingerbread with hot custard, although a dollop of whipped cream or vanilla ice cream would also team up very well." Kate Hackworthy

Ingredients

  • 200g/7oz/scant 1 cup unsalted butter, plus extra for greasing
  • 200g/7oz/scant 1 cup light soft brown sugar
  • 200g/7oz/2⁄3 cup black treacle (molasses)
  • 375g/13oz/3 cups plain (all-purpose) flour
  • 3 tsp ground ginger
  • 2 tsp bicarbonate of soda (baking soda)
  • 250ml/8½fl oz/1 cup whole milk
  • 150g/5¼oz carrot (1½ medium carrots, peeled, grated)
  • 2 large free-range eggs, beaten
  • 3 pieces of stem ginger in syrup, chopped

Instructions

  1. Preheat the oven to 160°C/140°C fan/320°F/gas 3. Grease and line a 23 x 30mm/9 x 12in baking pan with baking parchment.
  2. Heat the butter, sugar and treacle in a pan, stirring, until smooth and melted. Leave to cool slightly.
  3. Sift the flour, ginger and bicarbonate of soda into a large bowl. Stir in the milk, carrot, beaten egg, stem ginger and treacle mixture and stir to combine.
  4. Pour the mixture into the prepared pan and bake for 1 hour until well risen and springy in the middle.
  5. Leave to cool in the pan for a few minutes, then turn out onto a wire rack to cool completely before cutting into squares.

Notes

I increased the heat to Gas Mark 3. 

Courses Dessert

Veggie Deserts and Cakes, Carrot Cake and Beyond is published by Pavilion Books, RRP £14.99.

July 26, 2017

Warm New Potato, Asparagus and Halloumi Salad

Warm New Potato, Asparagus and Halloumi Salad

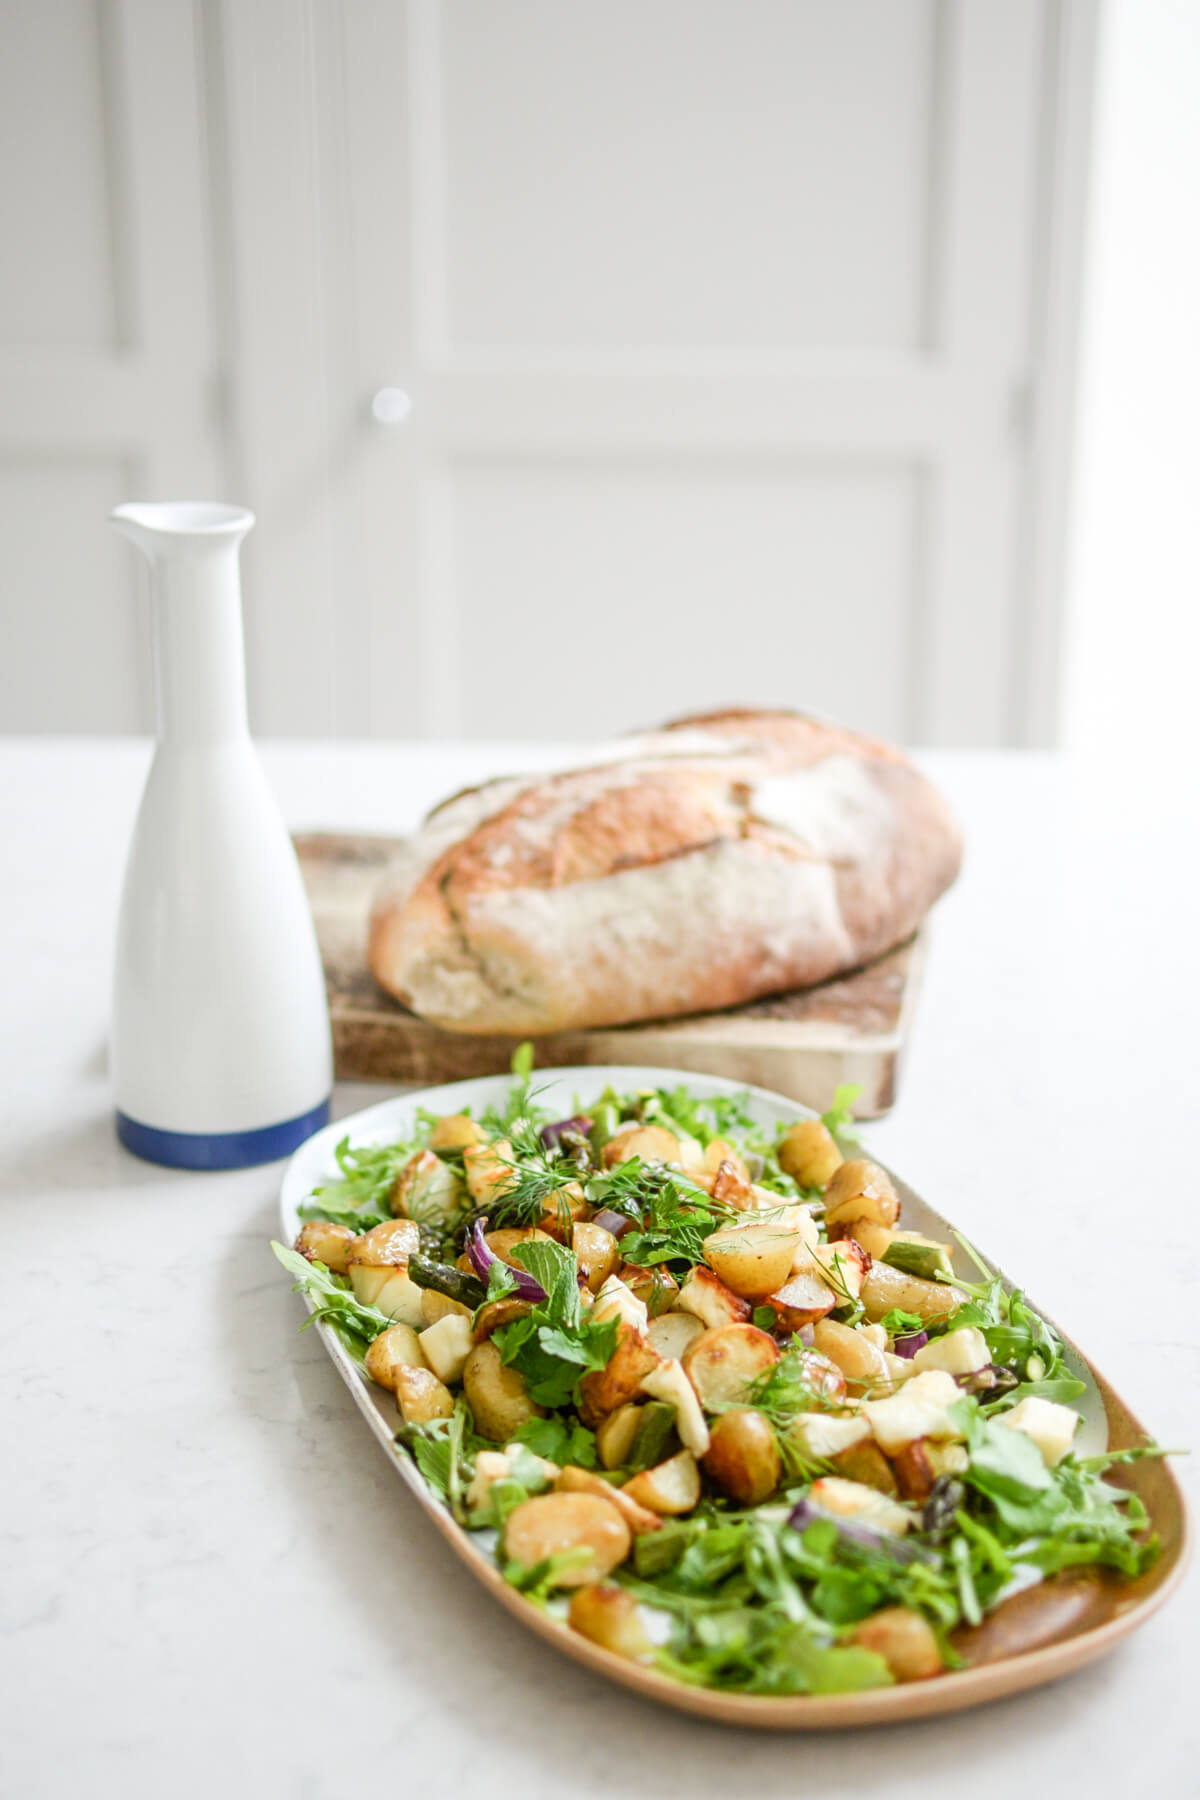
The asparagus season runs from April to June here in the UK. You can also use courgettes in place of asparagus.

asparagus_new_potato


asparagus_potato_salad

1 vote

Print

Recipe: Warm New Potato, Asparagus and Halloumi Salad

Prep 10 mins

Cook 30 mins

Total 40 mins

Author Ren Behan

Yield 2

A simple, seasonal sheet pan supper with new potatoes, asparagus and halloumi cheese. 

Ingredients

  • 500g/2 1/2 cups Jersey Royal new potatoes
  • 500g (2 bunches) fresh asparagus
  • 1 lemon
  • 250g/2 cups halloumi cheese, cubed
  • 1 red onion, peeled
  • 3 tbsp olive oil
  • 60g/one cup rocket leaves, rinsed, drained
  • 10g/2 tbsp fresh herbs, e.g. dill, mint
  • Sea salt and black pepper 

Instructions

  1. Preheat the oven to 180C/350F
  2. Chop the new potatoes in half. Spread the potatoes out evenly on a large baking tray. Drizzle with olive oil, season with salt and pepper and grate over the zest of one lemon. Roast for 15 minutes in the oven.
  3. In the meantime, snap the woody ends away from the asparagus spears, then chop into 1 inch pieces. Chop the onion into 8 pieces.
  4. Remove the potatoes from the oven. Add the asparagus, cubed halloumi and onion to the tray. Mix together with the potatoes. Bake for a further 15 minutes.
  5. Take the tray out of the oven. Arrange the rocket leaves onto a large platter. Scatter the roasted potatoes, asparagus and halloumi. Scatter over some fresh herbs and serve immediately.

Notes

You can also scatter over some shredded rotisserie chicken for a non-vegetarian version

Courses Lunch

Cuisine British

Nutrition Facts

Serving Size 2

Amount Per Serving

Calories 931

% Daily Value

Total Fat 61.6 g

95%

Saturated Fat 30.9 g

155%

Sodium 475 mg

20%

Total Carbohydrates 57.5 g

19%

Protein 39.9 g

80%

* Percent Daily Values are based on a 2,000 calorie diet. Your daily values may be higher or lower depending on your calorie needs.

You May Also Like:

Asparagus, Smoked Salmon and Cream Cheese Pasta

Asparagus, Beetroot and Halloumi Salad

Asparagus and Mozarella Salad

Linked recipes video: Dinner Renovations created by Michelle Becker at Pink Soul Pictures.

Disclosure: Recipes and video commissioned by Safestore. #ad

July 11, 2017

Easy Chocolate Trifle

Easy Chocolate Trifle

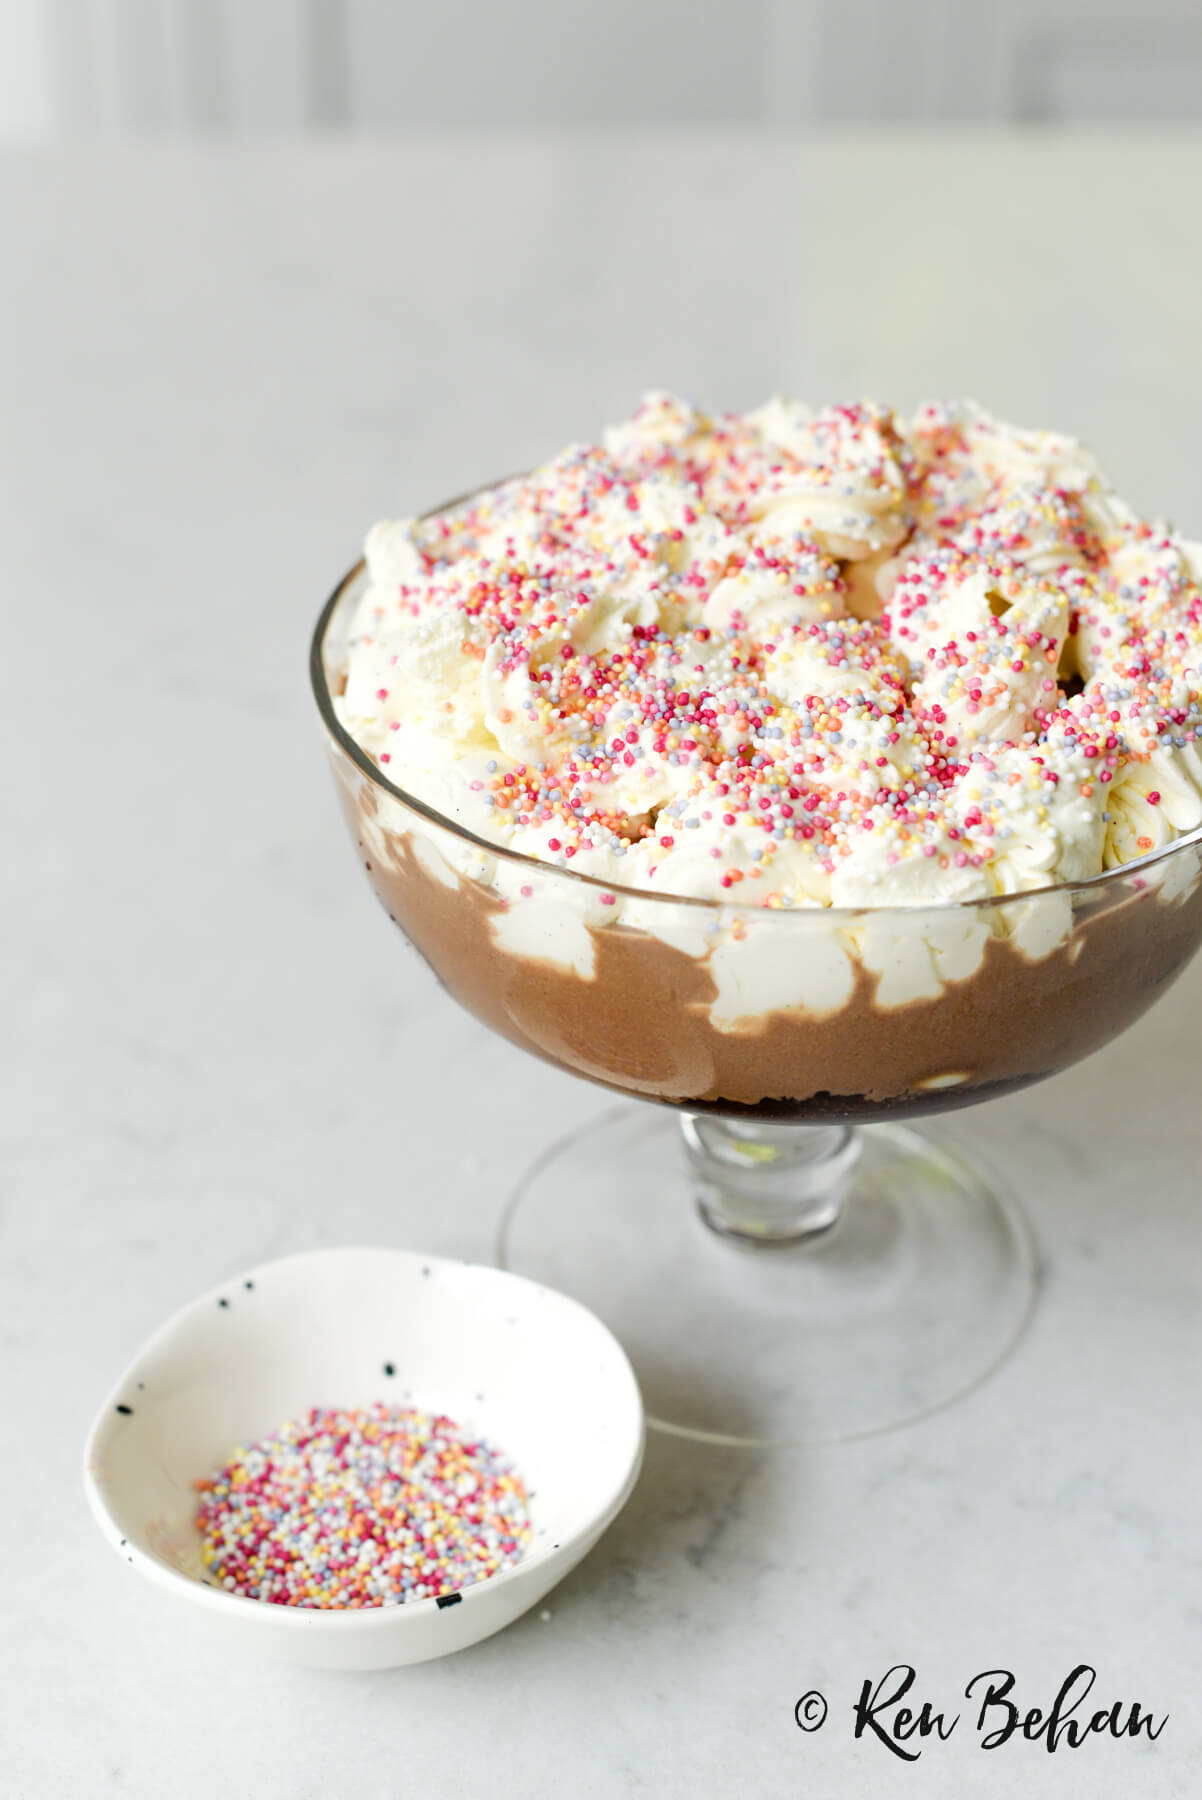
The chocolate trifle is an absolute joy of a recipe. You can use almost any chocolate cake as a base – the recipe suggests chocolate muffins, but we used chocolate swiss roll. You add chopped bananas and white chocolate buttons, and then pour over some marmalade (let down with water) in place of jelly.

custard_eat_the_week


The really fun part is making your own chocolate custard. I was a bit daunted by this, but it was actually really straight forward. I’ve made it three times now, and have had no curdling at all. If you can master the custard recipe, you’ll always have this on hand to make for pouring over sponge puddings, or crumbles. You can leave the chocolate out and add a little vanilla for a plainer option, too. Or, simply use any custard you have at home.

chocolate trifle


Here’s the recipe by Simon Rimmer.

*I’ve made a couple of changes – I think you can get away with half a jar of marmalade and also, I leave the custard as it is and don’t stir in the whipped cream as there’s plenty of cream on top.

1 vote

Print

Chocolate Trifle

Prep 30 mins

Inactive 13 mins

Total 43 mins

Author Simon Rimmer for Eat the Week

Yield 8 portions

An indulgent home-made trifle using chocolate roll or muffins, fresh bananas, marmalade and buttons topped with a fresh chocolate custard and a mascarpone-vanilla cream. Perfect for playdates or to feed a crowd or a big family. 

Ingredients

3-4 large chocolate muffins or one large chocolate swiss roll

Good glug of brandy (optional, leave out if making for kids)

2-3 bananas – sliced

75g white chocolate buttons

1/2* jar of orange marmalade – let down with 100ml hot water

Fresh Custard

6 egg yolks

125g caster sugar

40g flour

300ml double cream

100ml milk

150g dark chocolate – chopped

200ml double cream – whipped (optional)

Topping

250ml double cream – softly whipped

250g mascarpone cheese

1 vanilla pod – seeds scrapped

To decorate – 100s and 1000s

Instructions

  1. Break up the muffins or slice the chocolate swiss roll and put into a trifle bowl. Add a good glug of brandy, if using. 
  2. Add the banana slices, chocolate buttons and then pour over the let-down marmalade.
  3. Custard – whisk the egg yolks and sugar and flour together.
  4. Bring the cream and milk to simmering point and then pour over the egg mix, a little at a time, whisking together well until smooth.
  5. Put the custard mixture back into the pan with the dark chocolate and stir until chocolate melts and the mixture thickens. Do this over a very low medium, stirring continuously for about 5 minutes. Transfer into a cool bowl. Cover with cling film and leave to cool completely.
  6. Once cool, fold in the whipped cream, if using. Pour the custard over the sponge/bananas/buttons.
  7. Topping – mix the cream, mascarpone and vanilla together until well combined. Pipe or spoon over the top and sprinkle with 100s and 1000s.

Notes

1 jar of marmalade reduced to 1/2 jar 

Courses Dessert

Cuisine British


I hope you get to try this recipe, or any of the others from Eat the Week – I have loved them!

With thanks to Iceland Foods for commissioning this post #ad

July 9, 2017

Sausages Baked with Squash [One Pan]

Sausages Baked with Squash [One Pan]

In partnership with Iceland #ad

One Pan Baked Sausages and Squash
Sausages Baked with Squash

If you regularly cook for your family, you’ll probably find, as I do, that some of the biggest challenges you face in a typical week revolve around coming up with a constant stream of nutritious meals, whilst fitting things in around your family’s schedule and dietary requirements. This is when a bit of meal planning comes into its own, as do shortcuts by way of handy items that can easily be pulled out of the freezer.

How can the freezer help?

  • I keep key items on hand, ready for when I’ve not had time to plan ahead, allowing me to quickly and easily rustle up a healthy family meal, such as frozen rice for stuffed vegetables or one-pot dishes, frozen chopped onions, frozen fruit (for quick smoothies), frozen seafood such as king prawns and salmon fillets for fishy pasta, and frozen pastry for quick my quick chicken pie.
  • Frozen food, especially frozen veggies, can often be just as good frozen as fresh
  • The freezer can act as a great back up, saving space in the fridge

So, this week our meal plan will feature some of Simon’s recipes, such as Sausages Baked with Squash and Rosemary (see the recipe below) and a retro Chocolate Trifle for pudding which will last a couple of days at least as it’s so big!


My ultimate food hacks

  • Scale up and batch cook so that one meal lasts a couple of nights
  • Keep things such as frozen chopped onions and packets of frozen vegetables to hand in the freezer
  • Go for ‘tray-bakes’ or one-pan dishes as much as possible – this is where you throw lots of items together and bake them on one tray in the oven. We love chicken thighs with chorizo and new potatoes, or salmon with roasted vegetables too.

Commissioned post by Iceland #PowerofFrozen #ad

May 25, 2017

Coconut, Pistachio and Goji Berry Granola Bars

Coconut, Pistachio and Goji Berry Granola Bars

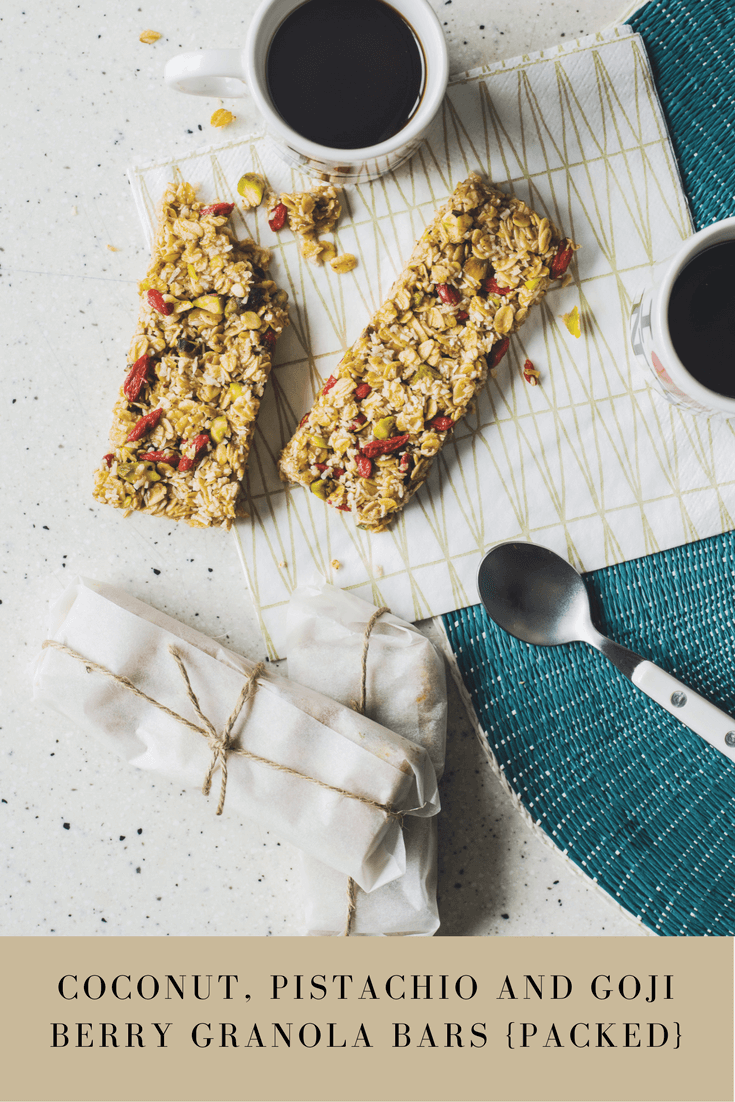
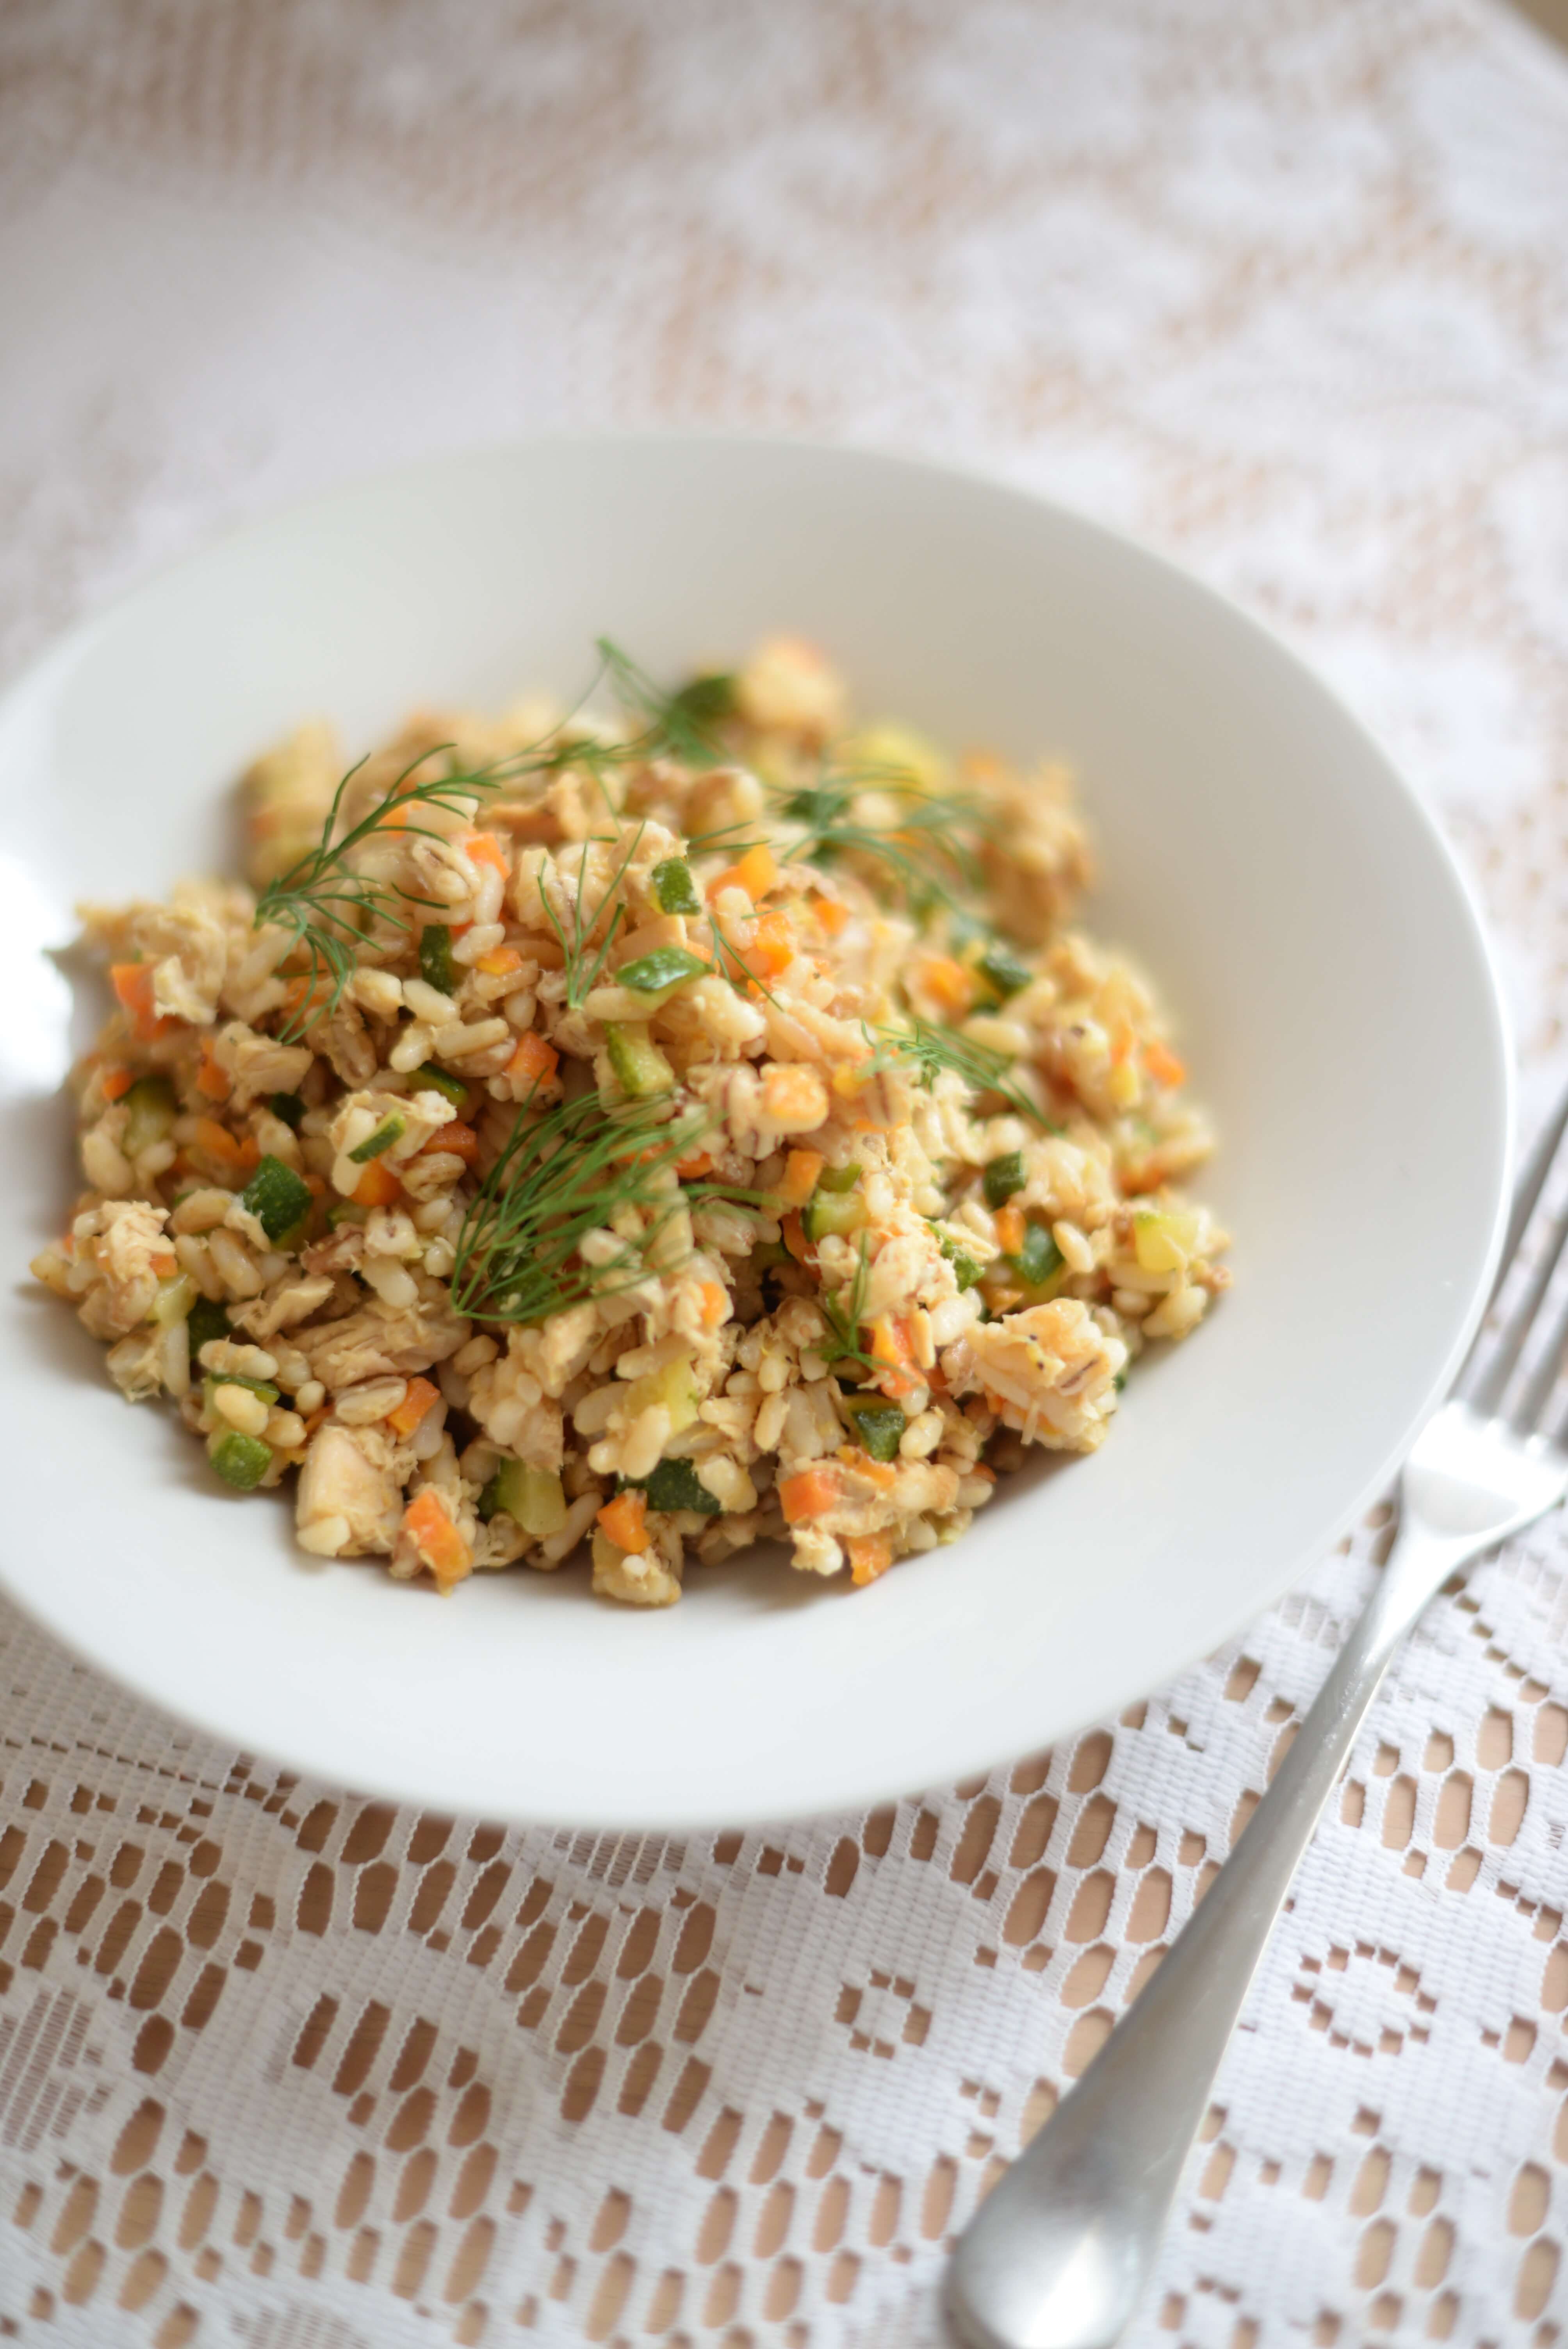
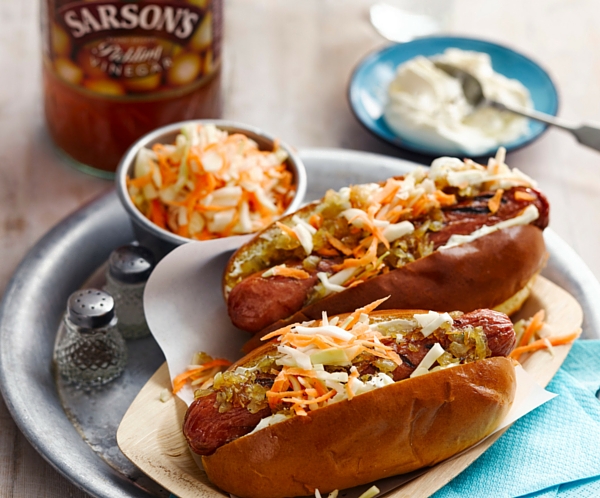
You can read my full review of Packed, by Becky Alexander and Michelle Lake, published by Nourish Books here. Today, I’m happy to be sharing one of my favourite recipes from the book, Coconut, Pistachio and Goji Berry Granola Bars, from the Get Up and Go chapter. These bars perfect for mid-morning munchies or an afternoon snack. I’ve also made these with dried cranberries and raisins, in place of goji berries, but goji berries pack the most punch!

Recipe and image shared with the permission of the publisher. Image by Haarala Hamilton. 

Goji Granola Bars Haarala Hamilton
Photo: Liz and Max Haarala Hamilton

1 vote

Print

Author Becky Alexander and Michelle Lake

Yield 8 bars

Easy to rustle up, these bars are a good option when you need to eat breakfast on the go or for an afternoon snack. Almond, cashew or macadamia nut butters all work well to add protein and flavour. 

Ingredients

  • 100g/3 1/2 oz/ 1 cup jumbo/rolled oats
  • 50g/1 3/4 oz/ 1/4 cup extra virgin coconut oil 
  • 2 tbsp honey (I use raw honey)
  • 2 tbsp nut butter (of choice)
  • 1 tsp vanilla extract 
  • 3 tbsp raw, shelled pistachio nuts, roughly chopped
  • 50g/1 3/4 oz/ 2/3 cup desiccated coconut/dried shredded coconut
  • 2 tbsp dried goji berries 

Instructions

  1. Preheat the oven to 180C/350F/Gas 4. Line a 23 x 15cm/9 x 6 inch shallow baking pan with baking/parchment paper. Spread the oats thinly over the parchment and bake for 15 minutes or until golden. 
  2. Put the oil, honey, nut butter and vanilla extract in a saucepan over a medium-low heat, and heat gently until well combined and the oil is melted. 
  3. Stir in the baked oats until well coated. Add the remaining ingredients and mix well. 
  4. Tip the mixture back into the baking pan and press down firmly using damp hands.
  5. Put in the fridge for 1 hour, or until firm, and then cut into 8 bars. Wrap each bar in parchment to take to work. Store in an airtight container for up to one week or freeze for up to 3 months. Defrost at room temperature for a couple of hours.  

Notes

"Packed with...Vibrant red and intensely flavoured, the goji berry is rich in carotenoids and antioxidents that help to protect our eyes from damage. They are a little pricey, but they keep well and you only need to add a small amount to bars, porridge/oatmeal, granola or salads to reap their health benefits." 

Courses Breakfast, or lunchtime snack

Cuisine British

Recipe and image shared with the permission of the publisher. With thanks to Nourish Books, Becky and Michelle. 

September 20, 2016

Lamb Steaks Wild Mushroom Sauce and Dill Mash

Lamb Steaks Wild Mushroom Sauce and Dill Mash

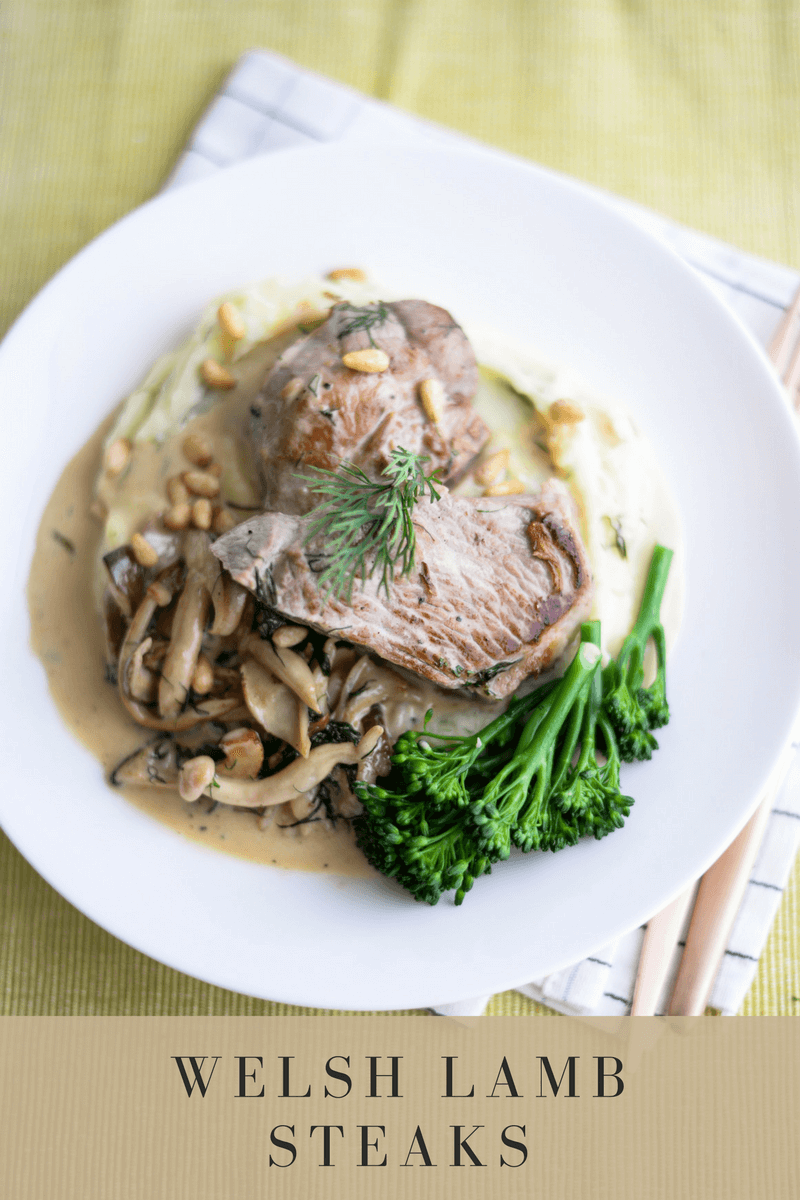
A comforting recipe for Eat Welsh Lamb and Welsh Beef

welsh-lamb-ren_-2

Print

Lamb Steaks with Wild Mushroom Sauce and Dill Mash

Prep 30 mins

Cook 15 mins

Total 45 mins

Author Ren Behan

Yield 4 servings

A creamy and comforting recipe using Welsh lamb steaks. 

Instructions

  1. Season the lamb steaks with sea salt and freshly ground black pepper, on both sides. Drizzle a little oil onto the steaks and rub the oil into the meat. Set to one side.
  2. Drain the peeled potatoes and put them into a pan of fresh cold water, cover, bring to the boil and cook for 15 minutes, or until the potatoes are tender. Drain into a colander and set to one side to dry.
  3. Place a dry frying pan onto a low heat. Throw in the pine nuts and allow them to toast until they turn golden – this will take around 30 seconds. Tip the pine nuts onto a plate and set to one side.
  4. Add a little oil to the same pan, turn up the heat to medium-high and add the lamb steak to the pan. Fry for 5 minutes on one side then flip them over. Add the mushrooms to the pan and a teaspoon of butter and continue to cook for 3-4 minutes. Remove the lamb steaks (which will be cooked rare-medium rare) and leave them to rest on a plate.
  5. Pour the stock into the pan, swirl the stock around and allow to bubble for a minute. Add the fresh dill and double cream, stir and and bring up to the boil. Then take the pan off the heat.
  6. Mash the cooked potatoes, or put them through a potato ricer. Add one tablespoon butter, double cream and the fresh dill. Season with salt and pepper. Using a wooden spoon, stir the butter, cream and dill into the mashed potatoes, until the potatoes are creamy and smooth.
  7. Divide the potatoes onto 4 plates. Slice each lamb steak in half and place on top of the mash. Spoon over over the creamy mushroom sauce. Sprinkle with the toasted pine nuts and serve straight away.

Courses Main

Cuisine British

You may also like:

Lamb Steaks with Mint Ajika Sauce (Olia Hercules for Marley Spoon)

One-Pot Cypriot Lamb with Orzo 

Make-Ahead Lamb and Potato Moussaka

Jamie Oliver’s Mothership Roast Lamb

This is a paid recipe commission for Eat Welsh Lamb and Welsh Beef. Find more Llambassador recipes here.


October 16, 2015

Quick-Fix Dark Chocolate Pudding (Individual)

Quick-Fix Dark Chocolate Pudding (Individual)

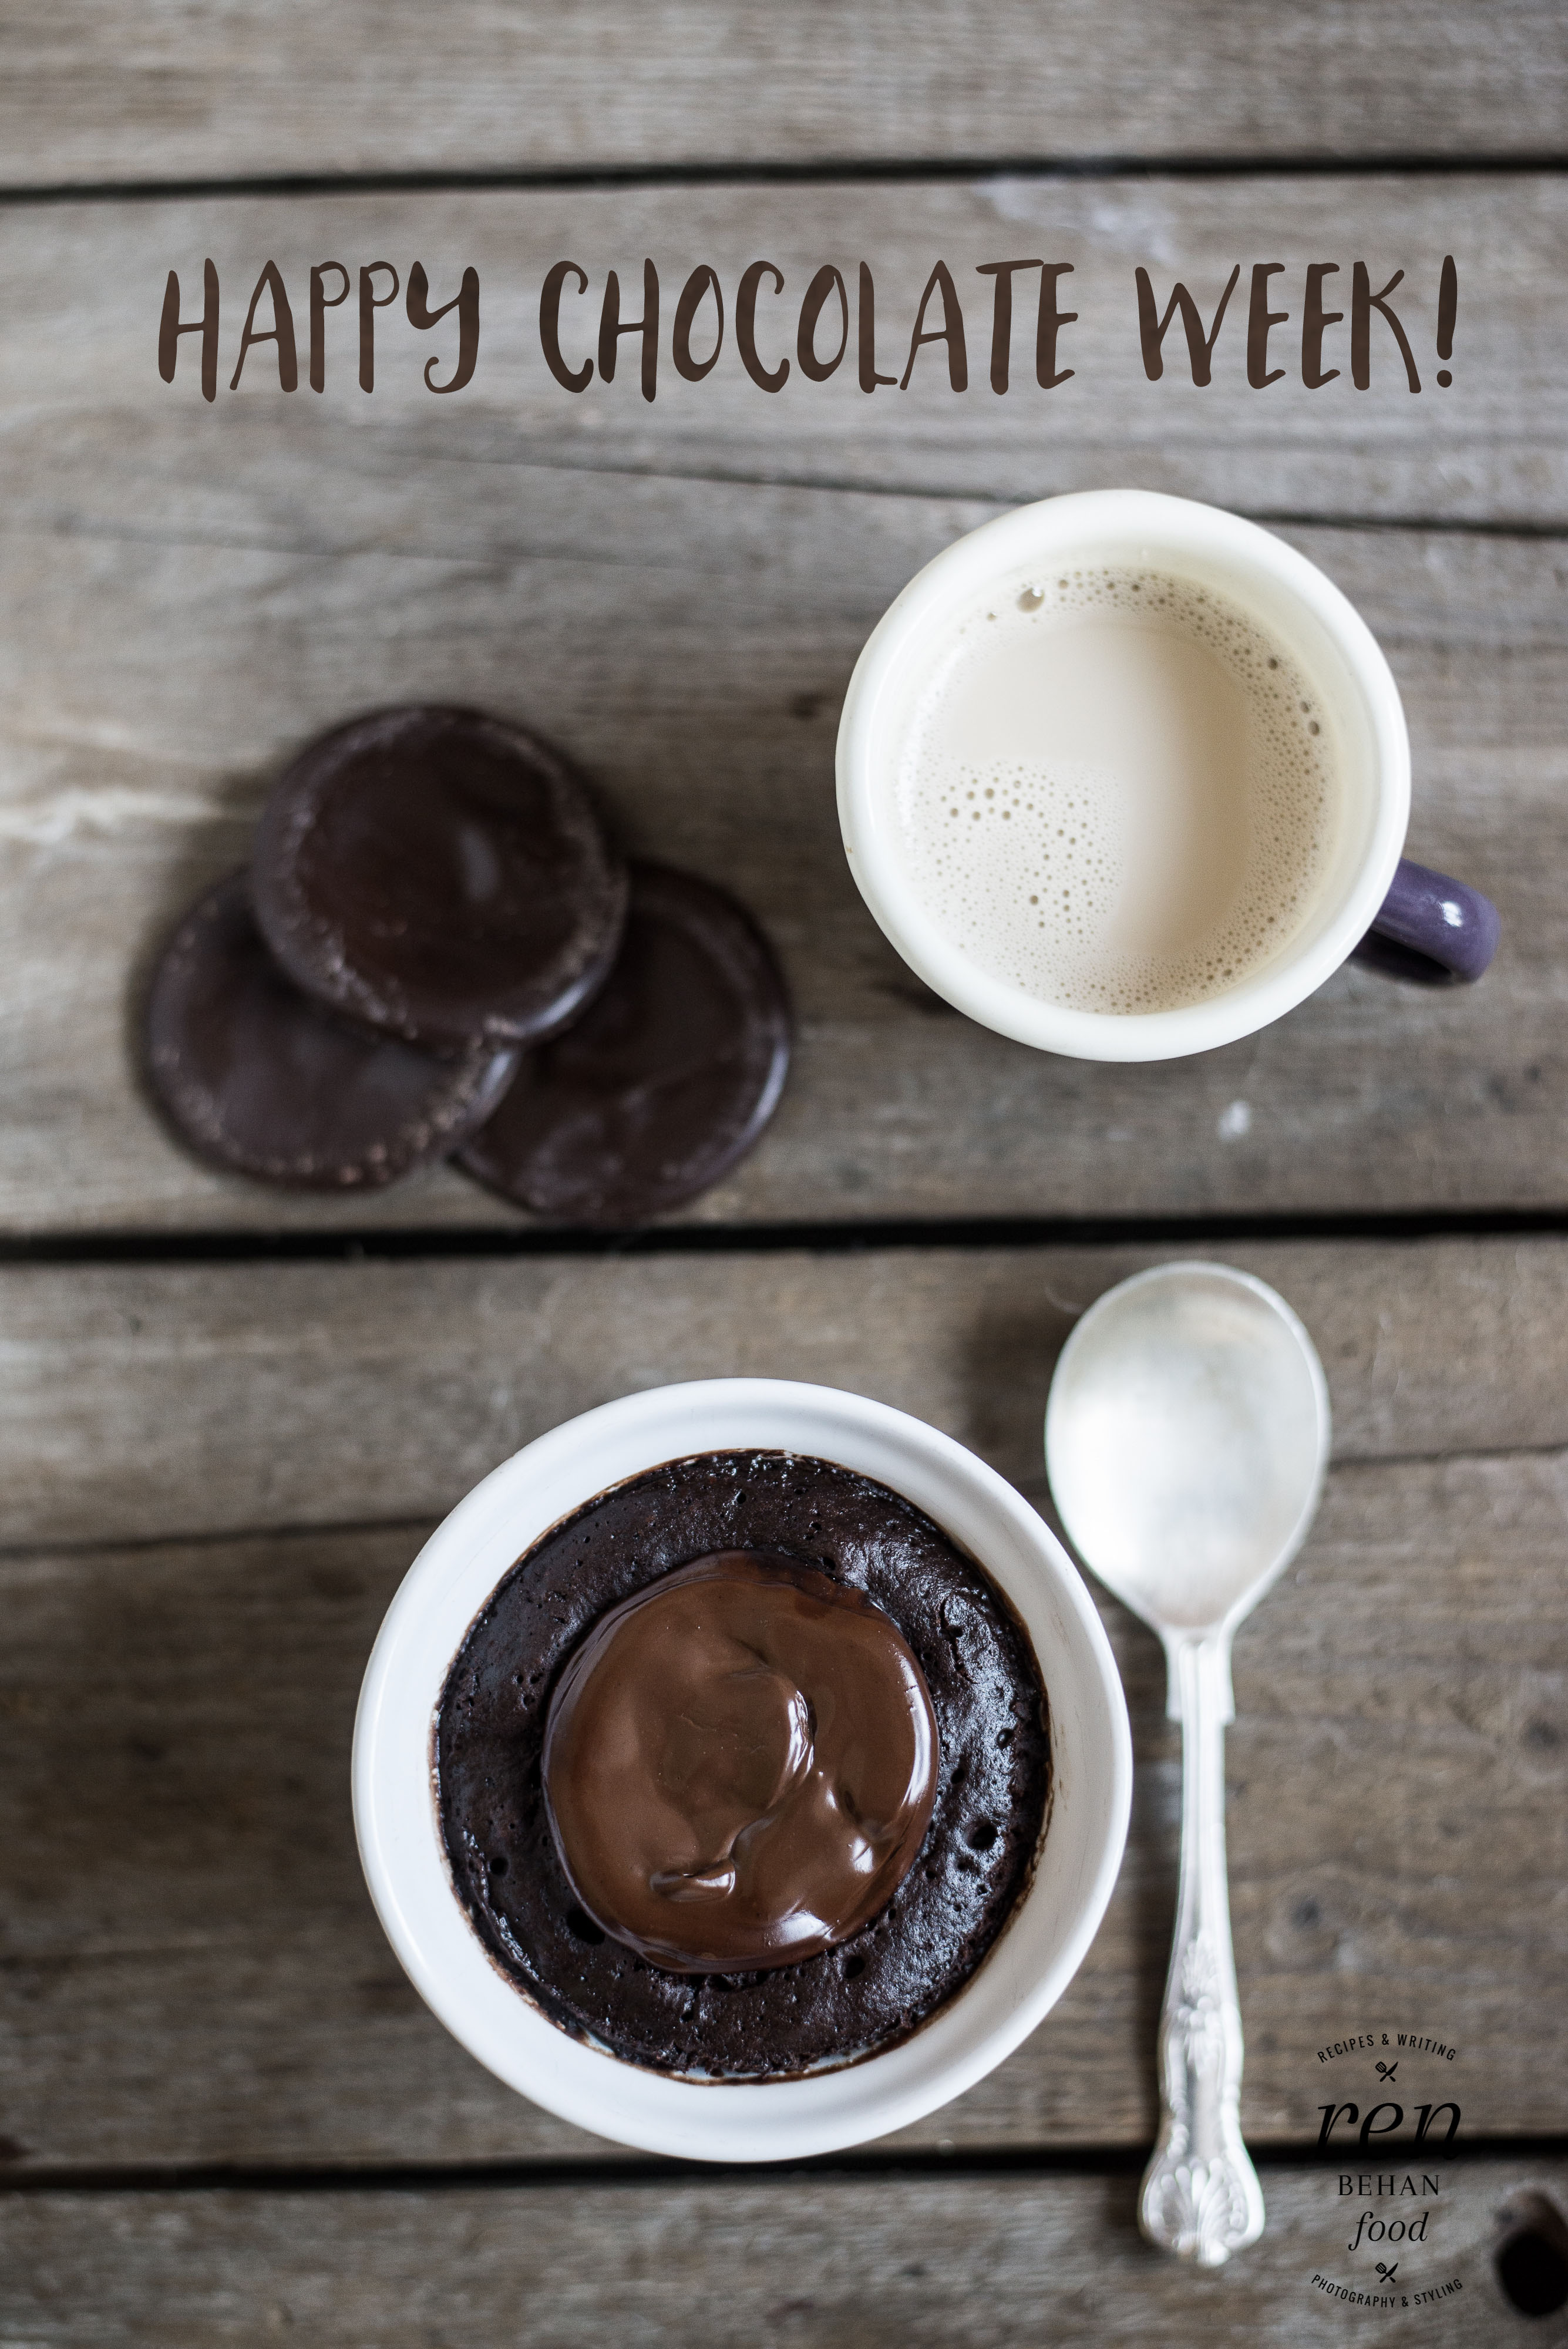
Chocolate week or not, sometimes, you need an immediate chocolate fix. This one works! I used lime and chilli chocolate thins, but you can use any flavoured chocolate buttons, or use 4 small squares (or 2 large squares) of good quality dark chocolate.

Quick Chocolate Cake

A chocolate cake in under a minute you say?!

Chocolate Pudding

1 vote

Print

Quick-Fix Dark Chocolate Pudding (Individual)

Prep 5 mins

Cook 1 min, 40 secs

Total 6 mins, 40 secs

Author Ren Behan

Yield 1

A super-quick (40-second) microwave pudding - note this makes one ramekin-sized cake. 

Ingredients

  • 1 teaspoon mild, light olive oil
  • 3 dark chocolate thins, giant buttons or 4 squares of dark chocolate
  • 1 tablespoon self-raising flour
  • 1 tablespoon cocoa powder 
  • 1 tablespoon light muscovado sugar
  • 4 tablespoons whole milk

Instructions

  1. Take a ramekin dish (or a coffee mug) and lightly grease the bottom and sides with a little olive oil. Place two chocolate thins, or 3 squares of dark chocolate into the bottom of the ramekin.
  2. In a small mixing bowl, whisk together the flour, cocoa powder, sugar and milk.
  3. Pour the mixture into the ramekin.
  4. Place a chocolate thin or one square of dark chocolate onto the top.
  5. Microwave for 20 seconds. Wait ten seconds. Microwave for a further 20 seconds.
  6. Eat right away!

Courses Dessert


You may also like:

No Bake Cheesecake 

3 No Bake Desserts 

Easy Chocolate Trifle 

September 10, 2015

Seattle-Style Cream Cheese Hot Dogs with a Quick Pickled Cabbage Salad

Seattle-Style Cream Cheese Hot Dogs with a Quick Pickled Cabbage Salad

It’s been a few years since my last visit to Seattle, where my sister lives, which means too long since my first taste of a Seattle Dog – cream cheese adorned hot dogs sold by street vendors around Seattle. A little stand in Pioneer Square called ‘Dog in the Park’ sold me my best-ever Seattle Dog…in case you are ever visiting. The Seattle Dog is often made with a Polish hot dog sausage (bonus) and is usually served with cream cheese, onions, sauerkraut or cabbage and fried potatoes, oh, and mayo or chilli sauce. The cream cheese, in case you are wondering, is spread onto the inside of the toasted hot dog bun. They are not the easiest things to eat (pick up an extra large stash of napkins) but my goodness, as street food goes, they are really good.

Seatle Cream Cheese Hot Dogs

A few little tips to make this recipe extra special: after boiling the hot dogs, split them and griddle them in a hot pan. Also, split the buns and griddle them, too to warm them up a little. You can make the Quick Pickled Cabbage Salad in advance – store in in a jar for up to three days in the fridge.

Sarsons Street Food Recipe

3 votes

Print

Cream Cheese Hot Dogs with Pickled Cabbage

Prep 10 mins

Cook 10 mins

Total 20 mins

Author Ren Behan

Yield 4

A Seattle-style hot dog, with cream cheese and onions. 

Ingredients

  • 4 good quality hot dogs – all-beef, or Polish sausage preferable
  • 4 hot dog buns
  • 4 tbsp cream cheese
  • 1 tbsp butter
  • 1 medium white onion
  • ½ head of white cabbage
  • 1 medium carrot
  • 1 tsp salt
  • 1 tbsp pickling vinegar, I used Sarsons 
  • 1 tsp mild olive oil
  • 2 tsp caster sugar

Instructions

  1. Bring a pan of water to the boil. Reduce the heat to a simmer, place the hot dogs into the water and cook for 5 minutes. Remove from the water, place on a plate and keep to one side.
  2. In the meantime, finely chop the onions. Melt the butter in a frying pan and add the onions to the pan. Cook for ten minutes on the heat, stirring occasionally, and cook until caramelised.
  3. Very finely shred the cabbage and grate the carrot and tip into a large bowl. Sprinkle over the salt and mix well. Set to one side.
  4. Heat a separate frying pan. Split the hot dogs in half lengthways and place them into the frying pan, flat-side down. Gently fry the pre-cooked hot dogs until they are a little browned. Split the hot dog buns in half and gently toast them in the griddle pan, split side down for a few seconds.
  5. Drain some of the liquid away from the salted cabbage and pour in the Sarsons malt vinegar, olive oil and sugar. Mix well.
  6. To assemble the dogs, spread the cream cheese onto the inside of the toasted hot dog bun. Add the griddled hot dogs, sprinkle over some of the caramelised onions and top with the quick pickled cabbage salad.

Cuisine American

What has been your best street food experience ever? I’d love to know!

With thanks to Sarsons for commissioning this recipe. Photo credit: Sarsons #ad

September 4, 2015

Pizza Pasta Soup

Pizza Pasta Soup

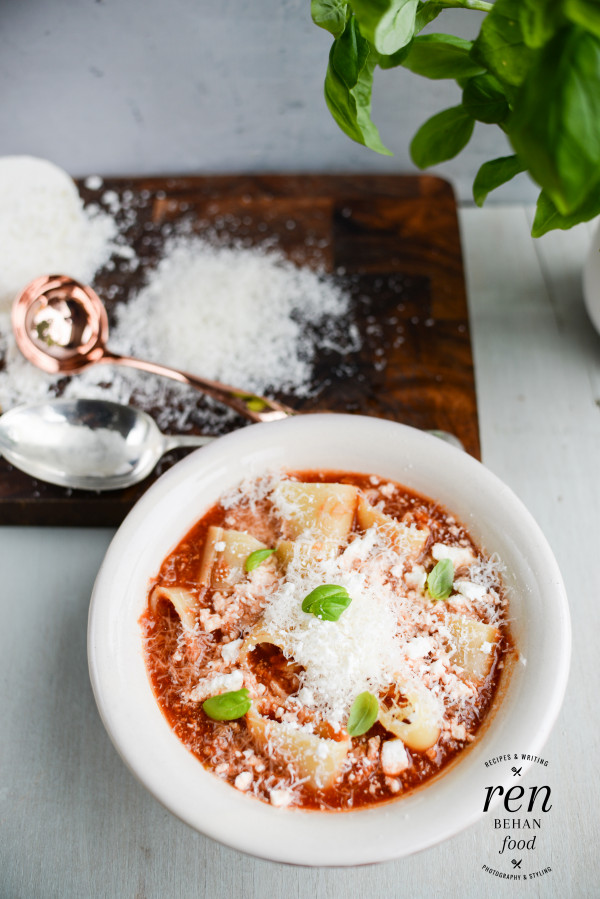
Think of this as a hearty soup, suitable for stretching a little leftover bolognese. You could also use a jar of tomato sauce – a good quality one and add the same amount of stock to achieve a soup consistency. On other occasions, I’ve thrown in chopped, fried pepperoni, mushrooms or shredded chicken. A good sprinkle of mozzarella is a must and a big heap of grated Parmesan cheese for the top. Fresh basil or oregano is lovely, too. Get creative!

Pizza Pasta Soup

5 votes

Print

Rainy Day Pizza Pasta Soup

Prep 10 mins

Cook 10 mins

Total 20 mins

Author Ren Behan

Yield 4

A great way to use up leftover tomato or Bolognese sauce. Simply add a handfull of pasta and some of your favourite 'toppings' such as chopped, fried pepperoni, mushrooms, or shredded chicken. Add grated mozzarella and a good handful of Parmesan cheese on the top.

Ingredients

  • 500g/two cups Bolognese or good quality tomato sauce (leftovers are ideal)
  • 250ml/one cup vegetable or chicken stock
  • 1 bay leaf
  • sea salt
  • black pepper
  • 280g/2 cups cooked pasta
  • 100g mozzarella, torn or grated
  • 100g fresh Parmesan cheese
  • 1 small bunch fresh basil, leaves and stalks separated
  • (optional - fried pepperoni, mushrooms or shredded chicken)

Instructions

  1. Pour the Bolognese or tomato sauce into a large pan. On a medium heat, bring to the boil. Add in the stock and stir well. Add in the bay leaf. Stir in half a teaspoon each of sea salt and black pepper.
  2. When hot, add in the cooked pasta and stir. Remove the bay leaf Add the optional extras, such as pepperoni, if using. Divide the soup between four bowls.
  3. Add the torn mozzarella, and top with grated Parmesan cheese and a few basil leaves per bowl.
  4. Serve straight away

Cuisine Italian-ish

Pizza Pasta Soup


Let me know if you make this by tagging me on Instagram or Twitter as @foodren

Or, add your recipes and ideas to our Pizza Love Pinterest board (338K followers)

Follow Ren Behan Food’s board Pizza Love! on Pinterest.

Primary Sidebar

Posts by email!

Subscribe now to get new posts direct to your email inbox

Search the site

Follow me on Instagram!

340,000+ Pinterest Followers – RenBehanFood

Visit Ren Behan Food's profile on Pinterest.

Archives

Footer

Copyright © 2023 Ren Behan · Custom Theme by Moonsteam Design