• Skip to primary navigation
  • Skip to content
  • Skip to primary sidebar
  • Skip to footer

Ren Behan - Author Wild Honey and Rye

Food Writer

Main navigation

  • Buy the Book (USA)
  • Media
  • Recipes
  • Lockdown
  • Buy the Book (UK)
  • About Ren
  • Blog
  • Widget Area for Top Menu

Healthy Eating

March 1, 2012

St David’s Day Recipe: Welsh Lamb and Rosemary Stuffed Leeks

St David’s Day Recipe: Welsh Lamb and Rosemary Stuffed Leeks

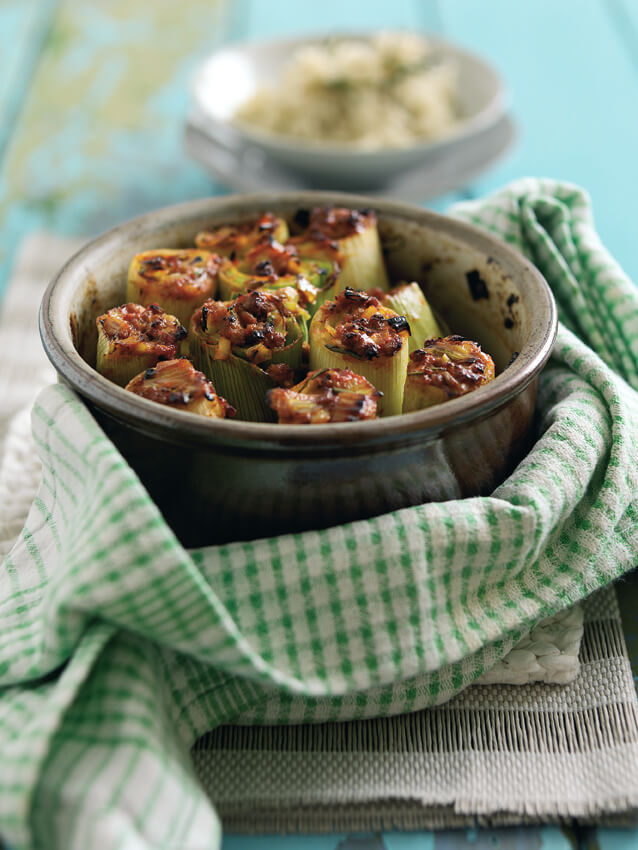
Happy St David’s Day! We love Wales. We go every year on holiday and I have done since a child. So, I have a real fondness for Welsh lamb and today I’m showing it a bit of love by sharing a Welsh lamb recipe.

Welsh Lamb and Rosemary Stuffed Leeks (photo www.eatwelshlamb.co.uk)

…

Read more

February 2, 2012

Fish is the Dish: Wild Scottish Haddock-Filled Corn Tortilla Wraps

Fish is the Dish: Wild Scottish Haddock-Filled Corn Tortilla Wraps

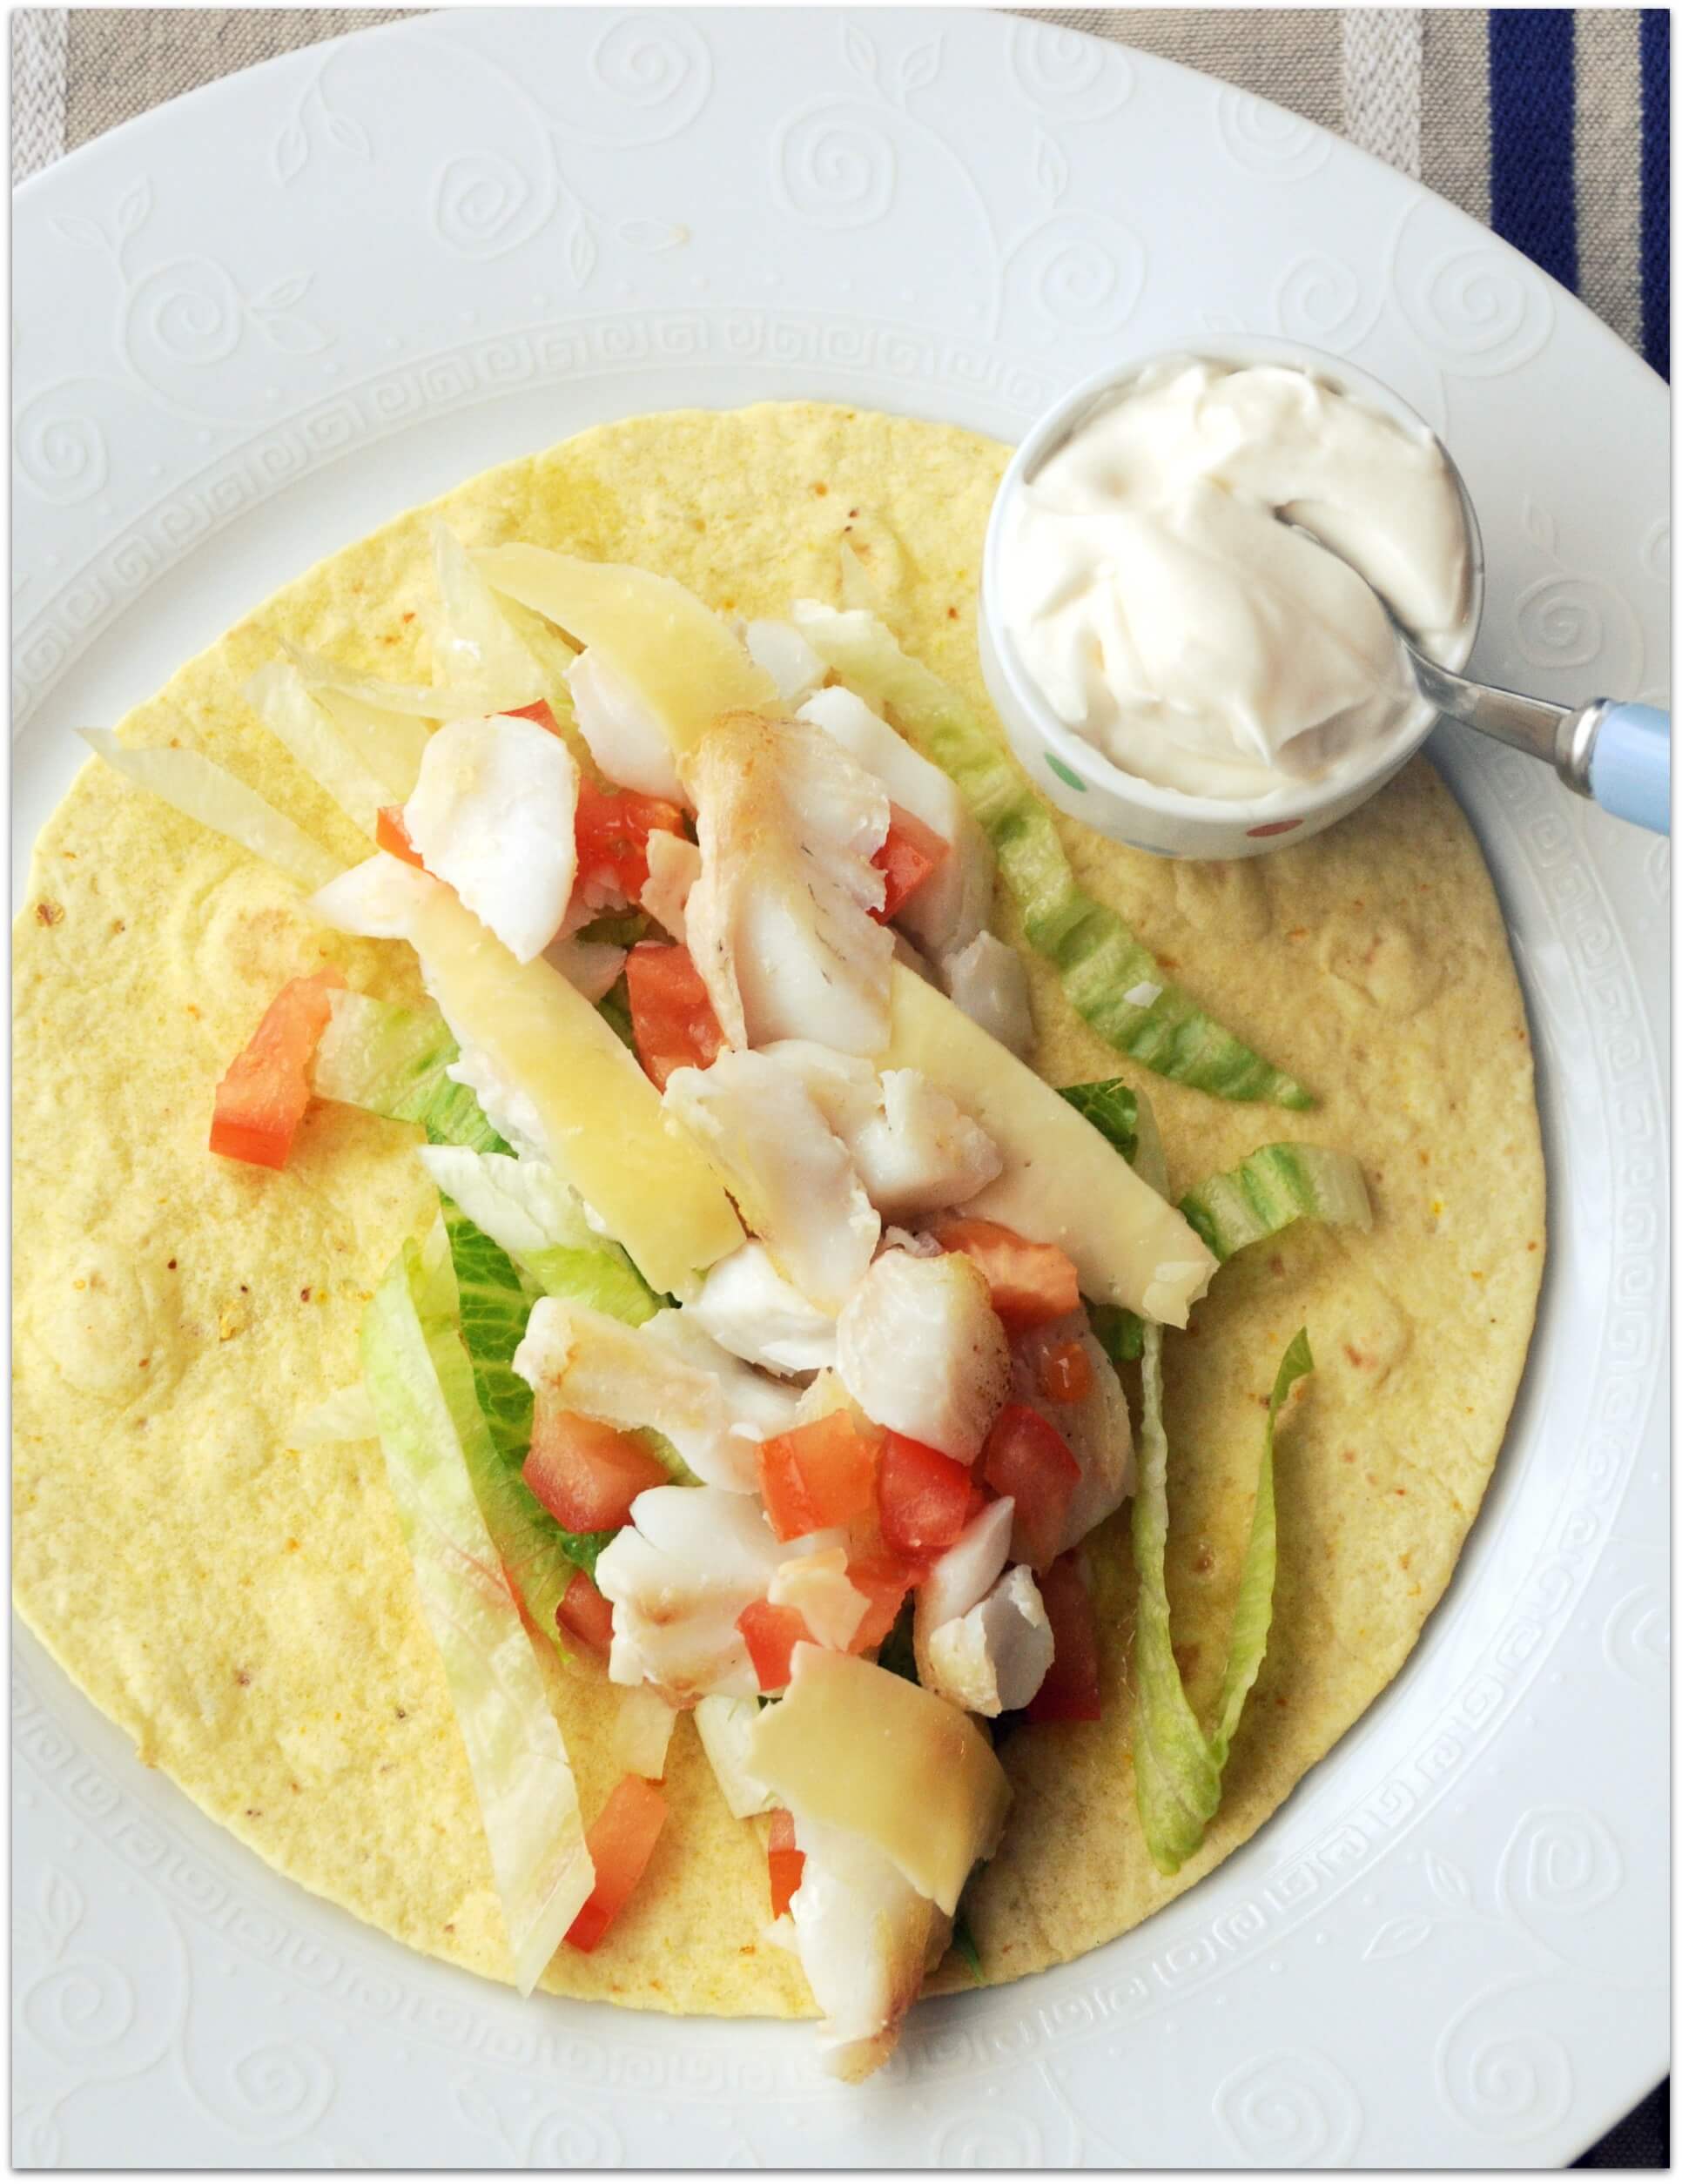
We’re on a roll and eating lots more fish! I’ve been so pleased to see the kids love trying fish in a new way, especially the Smoked Haddock Kedgeree and the Mussels with Linguine and Dill. I’m also really enjoying taking part in the Fish is the Dish campaign, particularly as I’ve found their website to be a great resource for fishy facts and information on how to select fish as well as how to cook it. This week we are trying some wild Scottish haddock fillets, sent to me by John Milne at Delish Fish, who are a fifth generation family business based in Scotland. 

…

Read more

January 29, 2012

Fish is the Dish: Young’s Easy Cook Salmon with Couscous, Crème Fraîche and Parmesan

Fish is the Dish: Young’s Easy Cook Salmon with Couscous, Crème Fraîche and Parmesan

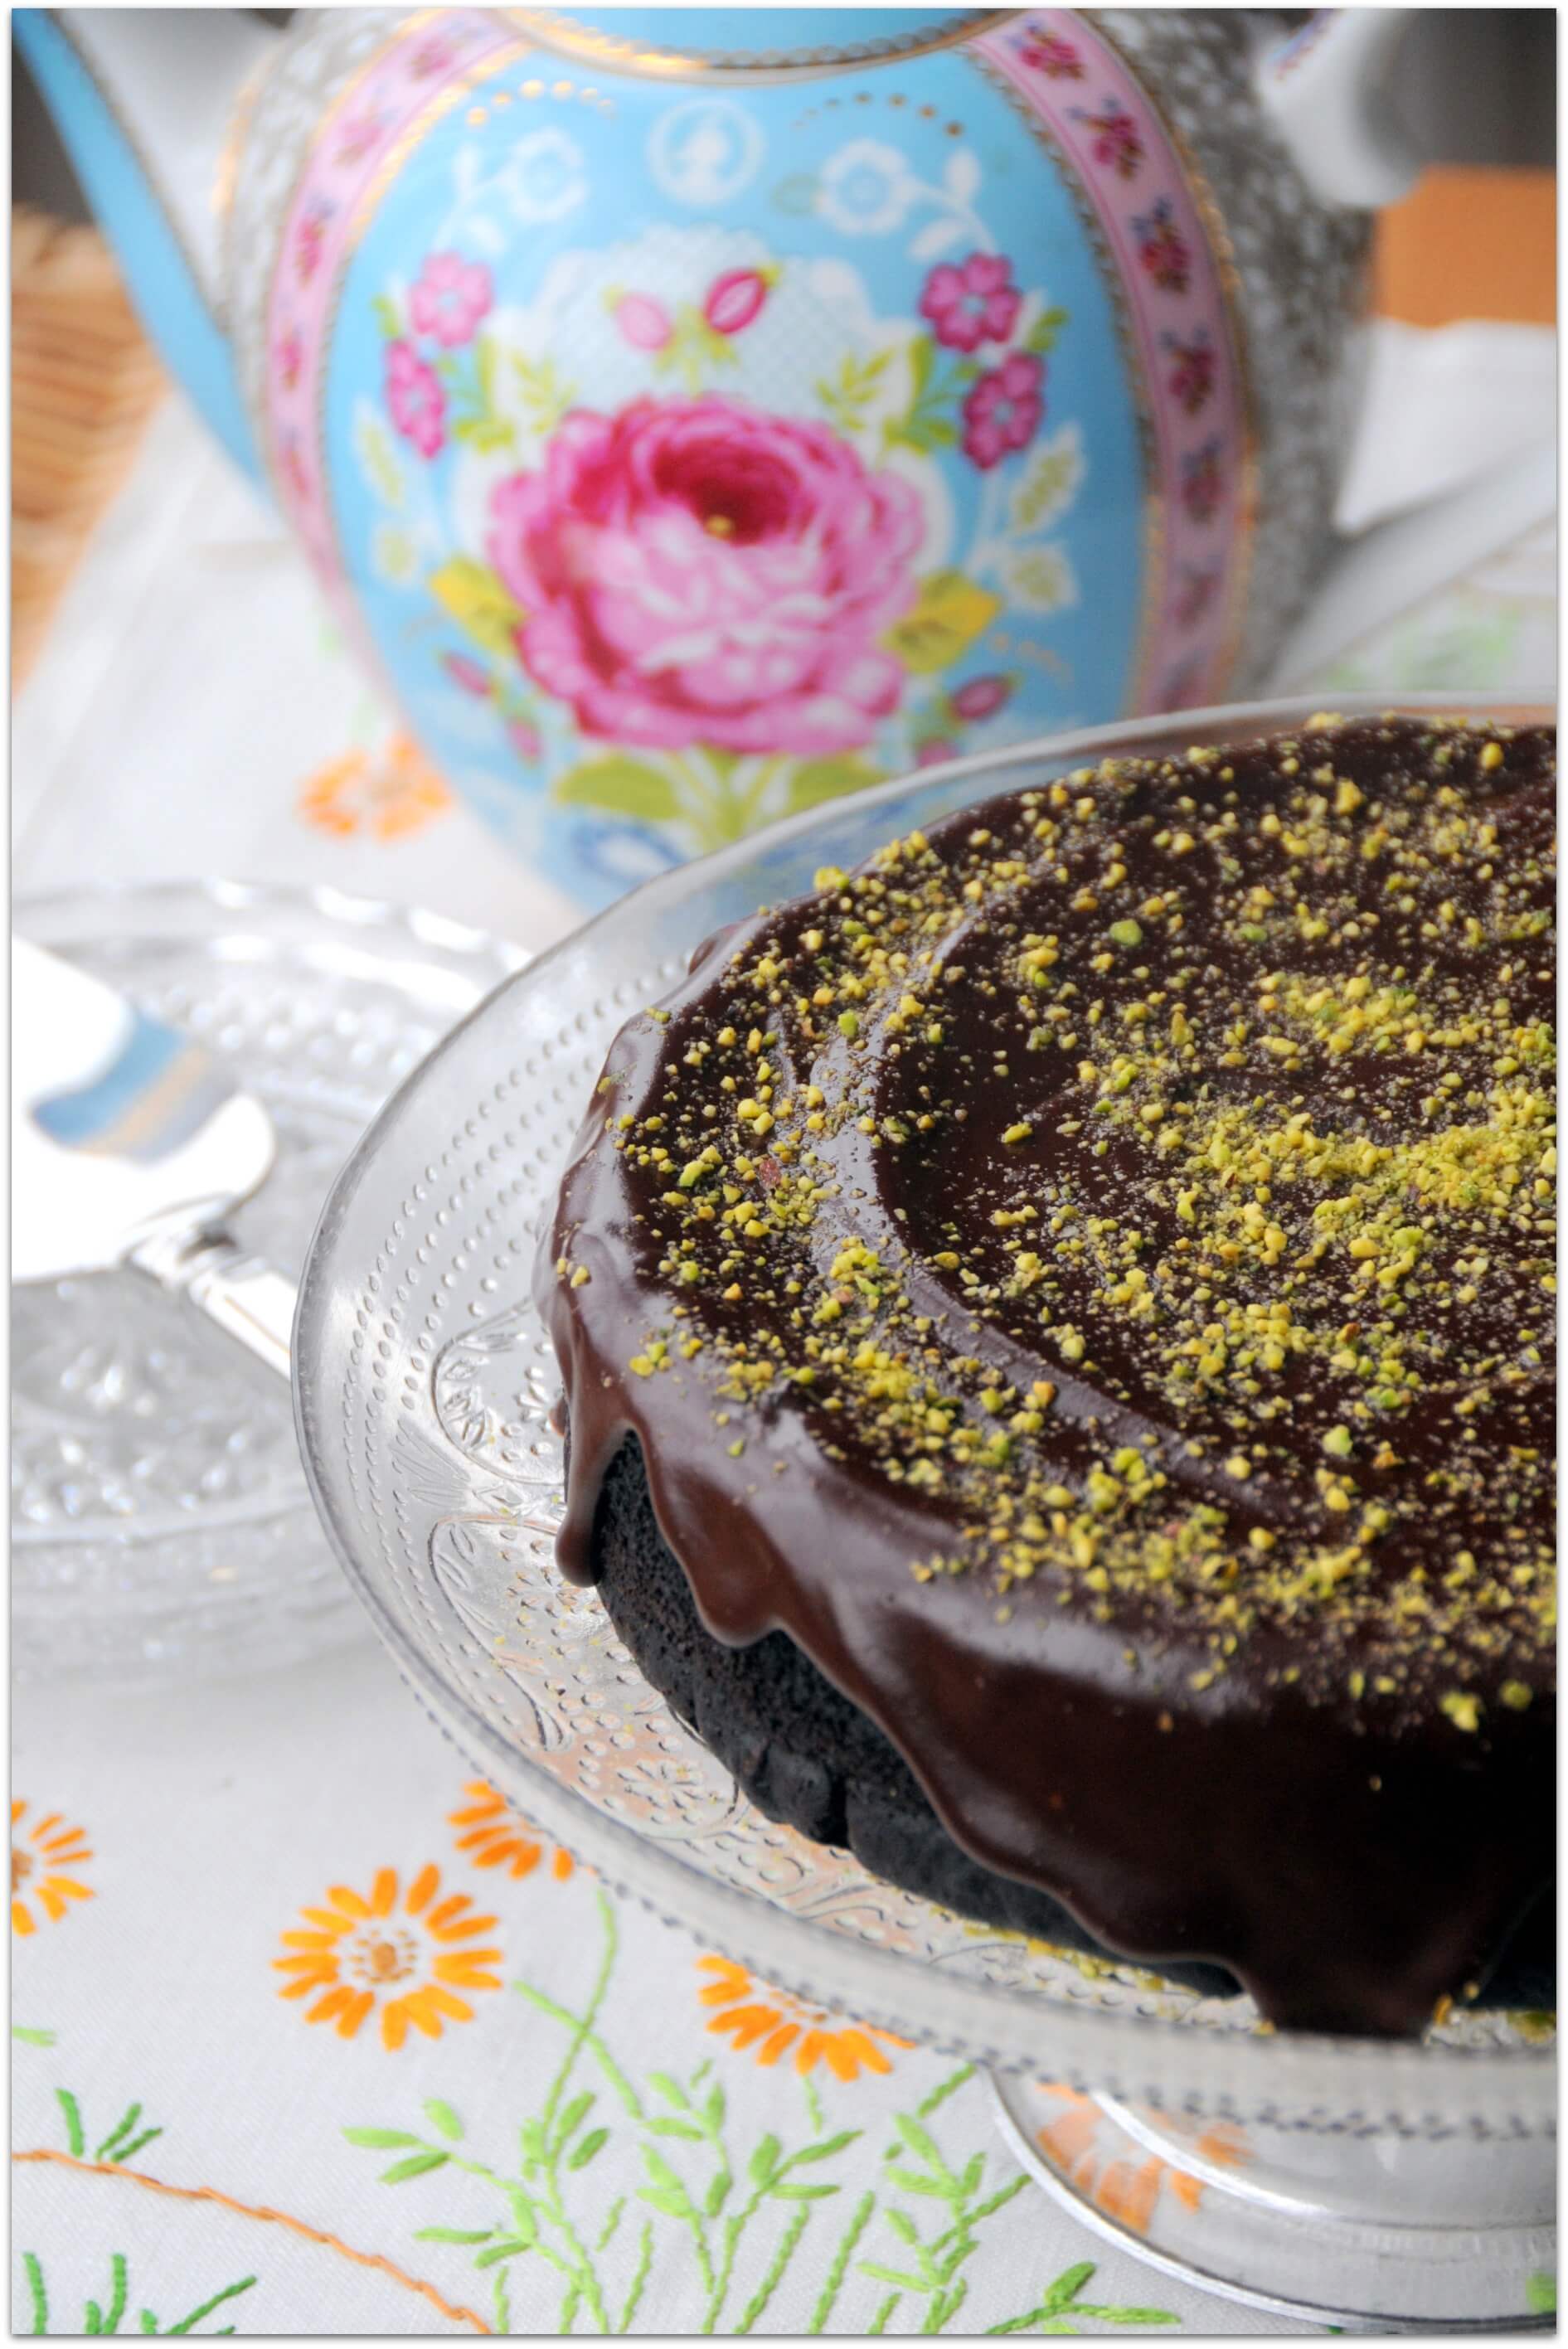
Balance was ever-so-slightly restored by the end of the week, after consuming rather too much deliciously-moist Vegan Chocolate Cake. Thanks to the Fish is the Dish campaign, we’ve been eating plenty more fish and this time, I turned to my well-stocked freezer for a very simple lunch of Young’s Easy Cook Salmon with Couscous, Crème Fraîche and Parmesan.

Oven-baking is my favourite way of cooking fish, it is so easy to throw some fish fillets or chunks into a baking dish with a few diced vegetables, such as red onions, courgettes, cherry tomatoes or when it’s in season, asparagus. Drizzle with some Rapeseed Oil for extra Omega 3 goodness, and if you like, a sprinkle of seeds, such as pumpkin or flax seeds for an even bigger boost!  

In less than half an hour you can have lunch or dinner on the table. I like to eat baked fish with couscous, with a dollop of crème fraîche, soured cream or Greek yoghurt and then sprinkled with Parmesan. Sounds like an odd combination, but somehow it works! 

[gmc_recipe 2355]

Young’s Seafood are probably best known, in my mind at least, for their ‘Chip Shop’ range, breaded or crispy, bubbly battered cod fillets, or cod/haddock fish fingers. However, they also have a large range of frozen fish fillets as well as an ‘Easy Cook’ range of skinless and boneless fillet chunks. I used the Pink Salmon Fillet Chunks for my lunch, but the pouches of cod and smoked haddock chunks are super for a quick fish pie. We are also a bit partial to Young’s Scampi…

Young’s have also teamed up with Jamie Oliver more recently, who is working with them to endorse a range of frozen fish meals, such as fish pies for children. We like the Yummy Pollock Fish Pie, which is lovely and creamy with a carrot and potato mash and the crispy fishcakes are surprisingly tasty and substantial.

Young’s are really big on sustainability, all their products show a Fish for Life logo, their flagship programme for fish sustainability, demonstrating that they guarantee sourcing fish from sustainable sources according to the objectives set by the Marine Stewardship Council.

 Fish is the Dish -Top fish tips for all the family

For more fishy facts, you can follow Young’s Seafood on Twitter or ‘Like’ Young’s Seafood on Facebook.

With many thanks to Young’s Seafood and Fish is the Dish for arranging some frozen fish for us to try.

I hope you like this recipe? Do you often turn to the freezer for fish or are you more likely to buy fresh?

January 25, 2012

Vegan Chocolate Cake with Pistachio Nuts

Vegan Chocolate Cake with Pistachio Nuts

I should have known when I made the Panettone and Nutella Bread Pudding, that the healthy eating plan would go downhill. But I have long had my eye on a very special vegan chocolate cake recipe from Leon Baking and Puddings Book Three, which I loved reviewing and have been cooking from lots. As this month’s We Should Cocoa challenge, hosted by Chele over at Chocolate Teapot,  was to make a ‘health-conscious’ chocolate recipe, I really couldn’t resist this one any longer. The recipe is called A Very Good Chocolate Cake. And it was, very good indeed!

So, where does the health-conscious angle come into to this chocolate cake? Well, for a start it’s vegan, so it has no animal products in it at all. Secondly, no sugar, instead it calls for agave syrup, which is produced from the Mexican agave plant and is much less likely to give you a sugar rush. Thirdly, eating a chocolate cake (especially one sprinkled with lovely green pistachio nuts)  is good for the soul, and therefore also, in my book counts as being health-conscious…

I have to say that when I looked at the required list of ingredients I was a little perplexed. There was no way, in my mind, that this unusual list of ingredients would come together to make a cake. I did my usual trick of embarking on a recipe before making sure I had everything to hand. I didn’t. So, in place of agave nectar I used a UK-produced Canadian Pure Maple syrup by Clarks that I had been sent to try. It worked perfectly. I used half-fat coconut milk, which was all I had, in place of full fat (healthier still) and I used vegetable oil and a squeeze of clementine juice in place of sunflower oil and lemon juice. Oh, and I flavoured the cake with orange essence instead of vanilla. You can see how I didn’t think it would work, particularly with all the messing around I did with the recipe, but it did!

No one would ever know that this is a vegan chocolate cake. It is moist, and it stays moist for a good few days in a tin as it’s made with oil. It smells divine and has a truffle cake texture with a perfect chocolate hit. It would be perfect for Valentine’s Day too.  Best of all, it is really easy to make. Simply mix the dry ingredients with the wet, pour into a tin and bake. The recipe in the book is decorated with pretty summer flowers, but as it is winter, a sprinkle of vibrant green pistachio nuts seemed to do the trick.

Here’s my amended version, the original, called A Very Good Chocolate Cake, is by the very talented Claire Ptak and Henry Dimbleby.

[gmc_recipe 2280]

Leon Baking and Puddings Book Three is full of little tricks to make recipes healthier, whether it is experimenting with different flours, such as spelt or gluten-free flour or substituting pure cane sugar with honey, maple syrup, agave nectar or stevia. The recipes are well tested and have a broad appeal – it’s well worth putting on your list!


As promised, I’m sending this over to the We Should Cocoa challenge. 

For more blog events to get involved in, check out The Food Blog Diary, which lists many different blog events and blog hops to try!

Have you had a chocolate week or a healthy week or a combination of both?

Have you tried any health-conscious chocolate recipes? 

November 25, 2011

Fish is the Dish: Kedgeree

Fish is the Dish: Kedgeree

I’m very excited to have been asked to become involved in a campaign called Fish is the Dish and have been sent my first parcel of fish by Delish Fish. There is a great section on the main Fish is the Dish website called Fish ‘n’ Tips, as well as many more great recipes for fish. The wider objective of the campaign is to provide advice to us all about preparing and eating seafood and to highlight its health benefits. I know it makes sense to eat more fish and I know that as a family we should eat more fish, so I’m looking forward to cooking up some recipes and sharing some advice and tips as I go along.

My fish parcel contained a little note to say that  the haddock had been provided for me by John Milne from Delish Fish and that the haddock was caught in the North Sea and has Marine Stewardship Council accreditation. There were also a few surprise packets of hot smoked salmon, mmnnn. It made me realise how wonderful it is to know exactly where the food I am serving my family has come from. I know that I’m not going to have a little note of provenance every time I cook fish, but there are some simple things to keep in mind:

…

Read more

October 28, 2011

Baked Aubergine (Yotam Ottolenghi Recipe)

Baked Aubergine (Yotam Ottolenghi Recipe)

I have to say that when I popped into my local Morrisons store this week, I did not expect to be met by such an amazing array of seasonal fruit and vegetables. I almost started taking photographs, but held back, in case someone thought I was mad. They did recently refurbish the store and so now it has a true ‘market’ feel but the produce was really far beyond anything I’ve ever seen at a supermarket in Britain before. Much of it was organic, there was also a section of locally grown produce as well as more unusual varieties of fruits and vegetables, such as the graffiti aubergines and the candy striped beetroot below, as well as fresh pomegranates. There must have been at least twenty different varieties of chili, fresh herbs and salad leaves kept watered and fresh, British heritage varieties of apples, pears as well as bang-in-season fresh spinach, artichokes, salsify, wild mushrooms, really everything you could imagine or look for. I am converted. It is so encouraging to see supermarkets really starting to support and push British seasonal produce and offer it at a reasonable cost.

Find the recipe here:

When I came home I immediately dived into one of my favourite cook books, Plenty, by Yotam Ottolenghi  to find a recipe for Aubergines with Buttermilk Sauce. I didn’t have lemon thyme, so I just used grated lemon zest and that seemed to work fine. Everything else was as Yotam suggests.

I will say without hesitation that this dish is simple to prepare – watch the lovely Yotam make it on You Tube here – (I could just keep this playing and listen to it all day!) When cooked, it looks visually beautiful (perfect for a dinner party) and tastes delicious. I was happy to be able to use some of my Steenbergs Za’atar  (Steenbergs make organic and Fairtrade herbs and spices) which was screaming to be used since being found inside my goodie bag from Food Blogger Connect over the summer. All in all, a fun and inspiring trip to the shops and a simple but tasty lunch!  I will be linking this up with Simple and in Season where already the entries are coming in thick and fast!


This week I also got to meet Karen from Lavender and Lovage for lunch. Karen is based in South West France and has immersed herself this year into food blogging, having been already made a career out of professional food writing, photography and food styling, writing features and columns for Country Kitchen magazine as well as other British publications. Karen and I easily spent almost three hours chatting about food, blogging and how much we both enjoy being part of such a friendly online community.  We both said how much we enjoyed finally meeting one another, it’s always lovely to be able to meet in person, in addition to enthusiastically tweeting and commenting on posts! Karen was very sweet to my children and bought me some lovely French chocolat au Citron Noir (delicious) and also these beautiful cabbage plants. In the time that we spent together I also became slightly addicted to the Oreo Cookie Hot Chocolate I was drinking ay the Secret Garden Cafe in St Albans! Thank you Karen for my gifts and for coming to meet us.

So that’s it for now, the end of another busy half-term week. A burst pipe in my kitchen is being fixed as I type, Halloween is looming, I have to work on my macaron making skills as I have been sent a lovely gift set to try by Lakeland and next week will mark my first year of blogging milestone! I’ve also been challenged to take part in a video blogging competition, which I’m very nervous about but will do my best! 

Later today I’ll also be announcing the winner of the Leon Baking & Puddings cook book giveaway which has been very popular. There’s still time to enter if you haven’t already. 

What are your plans for the weekend? Have you been inspired by any produce or cookbooks this week?


September 23, 2011

Baked Victoria Plums & My First ‘New Home’ Post!

Baked Victoria Plums & My First ‘New Home’ Post!

Well, this is both exciting and scary at the same time! Ta da  – Fabulicious Food! has made the very long cyber journey across from Blogger to WordPress!

I am totally overwhelmed by the help, expertise and professionalism of Liz of Violet Posy Design who has done an amazing job, with about a million technical issues thrown at her too.

It’s going to take me a little while to settle in and get used to the way things work, but hopefully not too long.

If you are experiencing any problems or issues, please do drop me a line.

If you previously subscribed to posts via the RSS feed I’m afraid it has changed and you’ll have to re-subscribe using the icon to the right.

On Monday I will also be hosting a really amazing giveaway so do stay tuned.

For now, I’m sharing this lovely autumnal plum recipe as there are tons of English plums around at the moment and they are my very favourite fruit.

Simple and in Season September is now open and working – anyone who left me a comment with a link should now find themselves on the current link-up page.

About to hit ‘publish’ so here goes!


 [gmc_recipe 382]


 Thank you for visiting and for all your lovely comments so far.

September 19, 2011

British Baby Leek and Mushroom Three Grain Risotto

British Baby Leek and Mushroom Three Grain Risotto

Having survived National Cupcake Week, my scales are pleased that we are now into British Food Fortnight. Whilst I could continue to bake cakes, I am moving instead, into savoury, autumnal cooking-mode.

I know, I know, I could have chosen a British dish to cook, but I was mainly inspired by the lovely British baby leeks that are in season at the moment and by some British mushrooms (not foraged, this time) and by coming across a ‘three grain’ risotto in the back of my cupboard.
 
I’ve been buying locally produced organic spelt flour for some time now (made at Redbournbury Mill) and often enjoy spelt bread, but I have never actually cooked with or eaten spelt as a whole grain. So, I was quite keen to try it. The three grains I used included long grain rice, pearl barley and pearl spelt and I cooked them in the same way that I would cook a normal risotto. 
 
The baby leeks and wild mushrooms give this risotto a lovely flavour and if you top it with some vegetarian cheese, it will also tick the Meat Free Monday box. Aren’t we all being so good? 


You shouldn’t have any trouble at all finding British produce to cook with if you are in the UK, particularly during British Food Fortnight, but I am finding that generally, shops are very keen to push British produce and the double-bonus is that fresh British produce will most likely be in season too.
 
As a random aside, if you are interested in hearing more about spelt, catch up with this week’s Nick Coffer’s Weekend Kitchen on iplayer. Nick’s guest was Edd Kimber, the winner of last year’s Great British Bake Off and about half an hour into the show you’ll also hear me talking about spelt flour in my ‘Ren Recommend’s’ slot! If you are into baking, you’ll find a factsheet on the same page with lots of free recipes on it too, including Edd’s Chewy Chocolate Chip Cookies and his Orange and Passion Fruit cake.
 
 
Over the next fortnight up until 2nd October, look out for ‘meet the producer’ style events, special promotions in the shops and in restaurants, healthy eating activities for kids (or, if like me, you overdosed on cupcakes, then for yourself) and generally for the “Buy British” message that the campaign is trying to push.
 
If you are a tweeter, you can follow @theBritFFGirls and add the hashtag #BritFF to your posts/tweets too.
 
You can also follow the campaign by ‘liking’ the Love British Food Facebook page.


British Baby Leek & Mushroom 3 Grain Risotto

Serves 4
 
Ingredients:
300g Three Grain Risotto (I used the Riso Gallo brand)
1 Tablespoon British Rapeseed Oil
1 Small Onion, finely chopped
220g British Baby Leeks, cleaned and finely chopped
150g British Oyster Mushrooms, chopped
50g British Chestnut Mushrooms, sliced
1 Litre Vegetable Stock
 
For the topping
110g British Baby Leeks, washed and finely chopped
15g Butter
A twist of pepper
A handful of freshly grated vegetarian-style Parmesan cheese
 
Method:
 
1. Boil the kettle and make up the vegetable stock to one litre in a separate sauce pan. Leave the pan on a low heat so that your stock is constantly simmering as you add it to your grains/rice.
 
2. Add the oil to a large heavy-based pan and gently fry the onions and leeks for around five minutes. Add the rice, stir it well until it is coated in the oil and mixed with the onions and leeks.
 
3. Add the mushrooms and risotto rice/grains, mix well until all the grains are coated. Over a medium heat, add a ladleful of stock to the rice and vegetables and simmer. As the stock bubbles in the pan and is absorbed, add another ladleful and again stir. If your rice/grains are in any way sticking to the pan, your heat is too high. Add more as necessary, until all the stock has been used up and the grains are cooked. The grains should take no more than 25 minutes to cook and should still have some bite to them, but should not be hard.
 
4. Using your (now empty) stock pan, add the butter and the extra baby leeks and gently fry for three minutes or so. Serve your risotto in bowls and top with the extra baby leeks, a twist of pepper and plenty of grated cheese.


I will be linking this recipe up with Simple and in Season – running up until 15th October.
 
Don’t forget to leave me comments too if you are writing about or eating British food over the next two weeks.
 
Thank you for all your help, comments and feedback about my blog name! I am sticking with Fabulicious Food! and the move is happening as I type.

September 5, 2011

Spiced Seasonal Vegetables with Puy Lentils

Spiced Seasonal Vegetables with Puy Lentils

September means change. The summer has flown by and a new term starts this week. It doesn’t feel as though summer should be over and it doesn’t feel as though autumn should be starting, but it’s windy here and there are showers and saying goodbye to the sunshine seems inevitable.

I feel like eating lentils. There is something wholesome and comforting about lentils. And I have lots of veggies left over from my organic veg box delivery, deep purple glistening aubergines, still earthy carrots, imperfect courgettes. Chopping up these veggies into very small pieces is strangely therapeutic. Minimal cooking, maximum flavour. The spices in my shiny new tin want to be used too, some cumin seeds, mustard seeds and coriander.  Nothing wild, just some extra warmth. I’m very happy to throw in ready-cooked lentils, I’m not in the slow cooking zone yet…
 
You can use any veggies that you have around for this recipe, red peppers would work well too, though I have an aversion so they never feature in my cooking. Tiny cubes of butternut squash would also be nice, if you have the patience to peel and want orange fingers.   


Spiced Seasonal Vegetables with Puy Lentils and Crème Fraiche
Serves 2
Ingredients
1 tablespoon oil
1 teaspoon cumin seeds
1/2 teaspoon mustard seeds
1 red onion, finely chopped
1 aubergine, cubed
5 baby carrots, peeled and cubed
2 courgettes, cubed
1/2 teaspoon ground coriander
100g chopped tomatoes
1 packet or tin of ready cooked puy lentils
2 tablespoons Crème fraiche or natural yoghurt
Baby herbs to garnish
Sea salt and freshly ground pepper
Method
1. Heat a tablespoon of oil in a pan big enough to fit in all your chopped veggies. Gently fry the cumin and mustard seeds for one minute.
2. Add the chopped onions to the pan and cook for five minutes until soft. Add the aubergines and carrots cook for another five minutes. Add the courgettes and stir them around to coat them, cook for two minutes.
3. Sprinkle over the ground coriander and add the chopped tomatoes.  Season with a pinch of sea salt and freshly ground black pepper. Cook on a gentle heat until the carrots are just soft.
4. At the end, add in the puy lentils and heat through. Serve with a few spoons of crème fraiche and baby herbs, such as coriander or Greek basil.

Look out for more changes to come in the coming weeks…a big switch over to Word Press for me.

Thank you also for all your entries into August’s Simple and in Season – a round-up will follow!
What are you eating now? Are you into autumnal comforts yet or are you staying faithful to summer?

August 22, 2011

Chicken Soup with Seasonal Vegetables

A really big thank you to everyone who entered the Forman and Field/Knorr Giveaway towards the end of last week here on Fabulicious Food! It was a fantastic response to a lovely prize and there were some really interesting ideas for what to do with the Oak Smoked Trout and the new Knorr Herb Infusion Stock Pots.

I’m pleased to announce that the winner of the Gourmet Hamper Box was Phil Simpson in Inverness – your box is on its way to you!
I was quite eager to get stuck in to the contents of my box, which included some lovely fresh seasonal vegetables, lamb neck fillet from Allens of Mayfair, as well as the smoked salmon and trout from Forman and Field.  I was also eager to try the new Knorr Herb Infusion Stock Pots. The stock pots should be available in the shops soon.
I decided to use up the vegetables first and give the Herb Infusion Stock Pots a go and came up with a recipe (below) for a Quick Chicken Soup with Seasonal Vegetables, using some leftover chicken. I have to say, since I made this soup in less than ten minutes, I was very impressed with the flavour so the stock pots were a definitely a hit! The kids really enjoyed it too.
My trick was to cook the vegetables in the Herb Infusion Stock Pot, adding a knob of butter and to gently pan-fry the (cooked) chicken breast pieces in a separate pan to give them a little colour before adding it all together. Using fresh seasonal vegetables (spring onion, carrots and fresh peas) and adding a touch of butter to the herby stock pot gave a lovely sweet tasting soup – nothing else at all was needed.
I’m yet to have a go at the Quick Lamb Stew recipe created by Marco Pierre White for Knorr and I will share that with you as soon as I’ve road-tested it along with a recipe using the salmon or trout from Forman and Field.
My favourite idea from among those suggested in the competition was to make a smoked trout pâté. My own idea would be to make a quick and easy Hollandaise sauce to go with the trout…so watch this space! 
Quick Chicken Soup with Seasonal Vegetables


Ingredients:

1 Knorr Herb Infusion Stock Pot (contains vegetable stock, bay, thyme and parsley)
500ml boiling water
25g butter
4 spring onions, washed and trimmed
8 baby carrots, peeled
250g fresh peas
2 tablespoons olive oil
2 Pre-cooked chicken breasts (sliced) or left-over roast chicken

Method:

1. Mix the Knorr Herb Infusion Stock Pot with 500ml of boiling water. Stir until dissolved and add it to a saucepan.
2. Bring the stock pot back the the boil and add in your spring onions, baby carrots, fresh peas and butter. Boil for 7 minutes.
3. In the meantime, while the vegetables are boiling, heat a separate frying pan and add in the olive oil. Gently fry the sliced chicken breast pieces until golden then flip over and fry on the other side.
4. Add the cooked chicken to the vegetables and stock.
5. Serve at once.

July 25, 2011

Honey Nut Toasted Oats with Ribena Berry Sauce

This is a quick breakfast post in response to Helen’s Breakfast Club challenge this month hosted by Helen herself over at Fuss Free Flavours.

The theme this month is cereal and we are asked to do something interesting with it. So, I made homemade ‘granola’ using rolled oats very lightly coated with honey, rapeseed oil and mixed nuts gently toasted in the oven.
Granola is very popular breakfast cereal in America, essentially it is a cereal made of oats that are baked until crisp and then dried fruits are added. Muesli (Swiss) is also a well-known breakfast cereal, but in muesli the oats are not baked. Granola is really easy to make, stores well in an airtight contained and best of all as you are making it yourself you can adjust the flavours, for example, to include more cinnamon. I used cinnamon sugar as I had it in my cupboard but if you don’t have that use brown sugar and add a teaspoon of cinnamon powder instead. This granola can also be sweetened with maple syrup too instead of honey before baking.
Once baked the granola is crisp and crunchy and can be eaten either with milk or yoghurt. You could also make it healthier by adding fresh fruit to your bowl. This weekend we had ours with little pots of homemade blackcurrant compote – calling it ‘Ribena Berry Sauce’ encouraged my kids to add some to make their cereal purple! I also slightly defeated the pursuit of crunchiness by pouring hot milk over mine – but that’s just because I am fan of having hot milk with all kinds of cereal.

Add your fruit, whether dried or fresh to the oats and nuts after baking. You are looking out for a gentle golden colour so be careful not to burn!


Honey Nut Toasted Oats with Ribena Berry Sauce
Oats inspired by a recipe for ‘Crunchy Granola’ by Michelle Stern
The Whole Family Cookbook

Ingredients

300g rolled oats (not quick cook)
50g pecan nuts, finely chopped
50g almonds, finely chopped
75g cinnamon sugar
A pinch of salt
60ml honey or maple syrup
60ml rapeseed or vegetable oil
1 teaspoon vanilla extract
50g raisins and/or chopped dates

For the Blackcurrant Compote/Ribena Berry Syrup

150g blackcurrants
2 tablespoons caster sugar
60ml water

Method

1. Pre-heat the oven to 180 degrees celcius

2. Put the oats, nuts and cinnamon sugar into a bowl and mix well.

3. Combine the honey, oil and vanilla in a separate bowl, mix and then pour over the oats and nuts. Stir well to combine – it won’t be greasy.

4. Pour the mix onto a baking tray lined with greaseproof or baking paper and spread into an even layer.

5. Bake for 20 minutes and stir after 10 minutes to ensure the top bits don’t get too toasty.

6. While this is baking, put the blackcurrants, sugar and water into a small pan. Heat until the mixture begins to bubble, stir and cook for five minutes. (Check your oats in the oven!!) If you want the blackcurrant sauce to be thicker, cook for a further few minutes on a low heat. Take off the heat and leave it to one side.

6. Take the oats of the oven and leave to cool. Add the raisins and/or chopped dates.

7. Serve with cold or hot milk or yoghurt. Store the rest in an airtight container.


Blackcurrants are in season in the UK at the moment – they are a wonderful summer fruit – so I will link this up to Simple and in Season too.

July 20, 2011

Spatchcocked Chicken with Aubergine

You may remember that a little while ago I was invited to attend a Knorr event to meet and watch a cookery demonstration by Marco Pierre White. The day was a great success, with my expectations definitely being exceeded. It was a fantastic opportunity to meet Marco and to find that he was such a friendly chap keen to share his knowledge. 

Since meeting Marco I have definitely taken on board many of his tips, particularly when it comes to using Knorr stock cubes to make a paste, as per Marco’s Steak Challenge.
A few weeks ago, we were sent a huge chest containing and some lovely organic seasonal vegetables from Rod and Ben’s and lots of really tasty organic meat from The Well Hung Meat Company (both of whom offer delivery boxes) along with some obligatory Knorr products.
I’m pleased to say that I was very able to easily flatten (spatchcock) a chicken following Marco’s online instruction and re-create a recipe for Spatchcocked Poussins with Aubergine that Marco had sent us as an exclusive preview, ooh err. If I had got round to blogging about it sooner, it would have been exclusive to you too! As it happens, this recipe and lots of other seasonal treats by Marco are now available on the Knorr website.
I had previously bought pre-prepared flattened chicken in the supermarket, but had never tried it myself. On my first attempt I think I actually managed to de-bone the whole chicken and on my second attempt I just took out the backbone – which was much better!
I think it’s good to challenge yourself from time-to-time and this is a really great trick to have up your sleeve. It works particularly well if you are cooking food on the bar-be-que.
Anyhow, as mentioned in my earlier post, I also managed to re-create a fresh beetroot salad that had been served at Marco’s restaurant at Stamford Bridge which went really well with my spatchcocked and griddled chicken. The result was a lovely summery meal, and though I had cooked the chicken and aubergine on a griddle pan, it did have a lovely charred flavour and made me want to fire up the bar-be-que for next time.
Spatchcocked Poussins with Aubergine
Recipe by Marco Pierre White, posted with permission.
Serves 2
Blanching the poussins before you cook them on the griddle or barbecue helps speed up the cooking process so you end up with poussins that are tasty, with nice crispy skin.
Ingredients
2 Poussins spatchcocked (ask the butcher to do this for you if you can’t)

1 lemon
1 Knorr Chicken Stock Cube
1–2tbsp olive oil
1tsp chopped thyme
1 aubergine, cut into 4 thick slices lengthways

Method
1. First, bring a large pan of water to the boil. Add in one of the spatchcocked poussins and blanch it in the boiling water for 5 minutes; remove and drain in a colander.
2. Repeat the process with the remaining poussin. This blanching process helps you cook the poussins through properly.
3. Set two heavy griddle pans to pre-heat. The pans should be nice and hot before you add the poussins.
4. Make the seasoning paste by taking the lemon and finely grating its zest. Mix together the lemon zest, a crumbled Knorr Chicken Stock Cube and the thyme in the olive oil until the stock cube has dissolved.
5. Spread half the paste over the skin side of the spatchcocked poussins. The great thing about using a paste like this for seasoning is that it sticks to the meat as it cooks.
6. Place the spatchcocked poussins seasoned side-down on the pre-heated griddle pans. Spread the remaining seasoning paste evenly over the unseasoned side of each poussin.
7. Cook the poussins on the griddle pan over a medium heat for 10 minutes, drizzle over a little olive oil, then turn over. Cook for a further 5 minutes.
8. Rub a little olive oil over the aubergine slices and add to the griddle pans, so they cook alongside the poussins. After 5 minutes, turn the aubergine slices over.
9. Check the poussins are cooked through with a sharp knife and, if needed, place in a pre-heated oven at 180°C/350F/Gas Mark 4 and cook for a further 10 minutes or until thoroughly cooked.
10. Place the griddled aubergine slices on a warm serving platter. Top each slice with one of the cooked spatchcocked poussins. Cut the zested lemon in half and squeeze over the juice from both halves. Drizzle over a little more olive oil to taste. Garnish with the sprigs of herbs and serve.

Thank you to Knorr, Rod and Ben’s and The Well Hung Meat Company for putting together my box of goodies.

July 14, 2011

Beetroot, Feta and Walnut Salad

Beetroot, Feta and Walnut Salad

I was having a chat on Twitter earlier on with Jacqueline from Tinned Tomatoes about the lovely sunny weather today, which made us both feel like eating salad. Totally the opposite to yesterday’s weather, which actually saw me making a huge Cottage Pie!

Jacqueline mentioned her love of a ‘Caprese’ salad, with tomatoes and mozzarella adding fresh avocado too. I also love the simplicity of such a salad, especially with a few basil leaves thrown over the top from the garden and even a sprinkle of puy lentils and balsamic vinegar. 
 
Today, however, I fancied a Beetroot, Feta and Walnut Salad which really couldn’t be simpler. I first had this salad at Marco Pierre White’s restaurant when I went along to a cookery demonstration there. I came home, immediately re-created it and have been making it ever since. 
Print

Beetroot, Feta and Walnut Salad

Author Ren Behan

A light salad using seasonal beetroot, paired with feta cheese and walnuts

Ingredients

  • 250g Beetroot, drained (*See note below for fresh beetroot)
  • 150g Feta Cheese or Goat's Cheese
  • 8-10 Walnuts
  • 1 Tablespoon rapeseed or olive oil
  • 1/2 Teaspoon freshly ground black pepper
  • A scattering of fresh herbs (baby basil or baby coriander)

Instructions

  1. Thinly slice the beetroot (I use a knife but you could use a mandolin) and scatter it over a large plate.
  2. Chop up some walnuts or lightly toasted pine nuts and sprinkle over.
  3. Crumble over some feta cheese, as much or as little as you like. Goat's cheese would be fine too or even Lancashire cheese.
  4. Drizzle with rapeseed or olive oil and season with the pepper. Add a few basil or micro leaves to dress.

Notes

If using fresh seasonal beetroot, remove any stalks or leaves but leave the beetroot whole and leave the skin on to prevent it from bleeding. Boil in a large pan of water for 1-1/2 hours until tender. Wear plastic gloves and peel the skin off by hand. Alternatively, microwave the beetroot (again, skin on) for 8-10 minutes.

 
I hope you get to try this simple, seasonal salad.

May 27, 2011

Fresh Pasta with Asparagus, Goat’s Cheese and Lemon

Fresh Pasta with Asparagus, Goat’s Cheese and Lemon

I was challenged by the lovely Giulia of Juls’ Kitchen to make fresh pasta for this month’s Monthly Mingle. This was such an exciting challenge for me, since I recently took a pasta class with Katie Caldesi to learn exactly how to make it although since taking the class I hadn’t put my new found skills to the test. So, the question for me was whether I had actually retained any information from that day?! My first stop was a visit to Buongiorno Italia, an award-winning local Italian food store close to my home. With Giulia as our judge, I was determined to do this the Italian way!

Established over 30 years ago, Buongiorno Italia is exactly the type of food store you want to have on your doorstep. Tony, the owner, goes to Covent Garden Market to bring back the best seasonal produce every week as well as stocking a huge array of authentic Italian food, including cheese, cured meats, olives, pasta, cakes, wine and lots more (including a small selection of Polish food which I was also pleased to spot!) Tony was lovely to chat to and he showed me his plans for expanding the store so that by the summer he will have some outdoor seating and an authentic cappuccino bar.

I was immediately inspired by the fresh produce on offer, finding some lovely bundles of British asparagus, new season’s garlic (the best I’ve ever seen) and even more exciting some goat’s cheese made on a local farm called Childwickbury by Liz and David Harris, nestled alongside the Italian cheeses. I think it is really nice to see local produce being showcased as well as Italian produce and of course, I couldn’t resist buying some Polish pasta, pierogi since they were there.

This is exactly what I love about local food shopping – you don’t always find the obvious, but in many cases you stumble across some real treats. I also picked up some ’00’ grade Italian pasta flour, some fresh, large free range eggs and a very fragrant tub of fresh basil.

      
I have no idea whether Italians would put asparagus, garlic and goat’s cheese together but I do know that Italians are very keen to use local produce and that they let the flavours of fresh food do the talking, so why not? I also had some lemon-infused olive oil at home, though regular olive oil would have been fine, perhaps just with a grating of fresh lemon zest at the end. As it’s National Vegetarian Week it was also nice to create a meal without using meat.

Back at home, the next challenge to overcome was the fact that I had not managed to find a  pasta machine. A quick phone call to a friend out in town revealed only one machine which was £60 in a cook shop. It may have been the crème de la crème of pasta machines, but I think it is a lot of money to spend especially if it is not something you will use every day. Though we had been taught how to make pasta using a machine in the class, a quick flick through ‘The Italian Cookery Course’ by Katie Caldesi (which I very much enjoyed reviewing recently for The Foodie Bugle) suggested that I could make and cut fresh pasta entirely by hand so I decided to give it a go without the machine.

I’m relieved to say that it worked just fine, though I will look into buying a pasta machine in the long run as I think you are able to get your pasta slightly thinner (it should be almost see-through) – although not having one shouldn’t deter you as my hand-rolled, hand-cut pasta actually tasted delicious. Next time I will try experimenting with beetroot to make lovely purple beetroot pasta.

To roll and cut by hand, you go through the basic stages of making a pasta dough and then you roll it on a floured surface until it is as thin as you can get it. You then roll up the two edges until they meet in the middle and using a sharp knife cut the pasta into the width you want it. You can then slide your knife beneath the pasta and as you lift the pasta up the rolls unfold.

I also found a handy step-by-step guide by Jamie Oliver – How to make fresh pasta 

I used one egg to 100g of flour and that made enough for about two portions. If you make more, you would have to split the dough into smaller portions (and keep it covered) to have enough room to roll it all out.

The pasta making was fun and I ended up with a really delicious meal – definitely superior to any shop-bought pasta though of course, you could make this recipe by using any type of pasta you fancy. I’m so pleased I did give this a go myself at home and that I had remembered everything that Katie had taught me!
Pasta with Asparagus, Goat’s Cheese & Lemon

Serves 4

Ingredients:
 
Fresh pasta (use 6 eggs and 600g of flour for four people)
OR – the best pasta you can buy if not fresh
2 bundles (500g) fresh Asparagus
4 cloves garlic
A drizzle of lemon-infused olive oil
OR plain olive oil plus a tablespoon of fresh lemon zest
140g Goat’s Cheese
A handful of  fresh basil leaves
Sea salt and freshly ground black pepper
 
Method:
1. Pre-heat your oven to 200 degrees Celsius

2. If you are making fresh pasta it would be better to do this first as the pasta should be left to rest for around thirty minutes.

3. Chop your asparagus into bite sized/2cm pieces and put them in a baking tin along with the cloves of garlic (no need to peel), a sprinkling of sea salt, fresh pepper and a drizzle of lemon  or plain olive oil. Roast in the oven for 20 minutes.
 
4. Boil a large pan of water, add a tablespoon of salt and cook your pasta according to the instructions (fresh pasta doesn’t need long at all so keep testing it to see if it is cooked.)
 
5. Drain the pasta, saving about two tablespoons of the pasta water.
 
6. Take your tray of asparagus from the oven and pick out the garlic cloves from the roasting tin (they will have infused the oil enough) and tumble the pasta into the tin with the roasted asparagus. Drizzle with more olive oil so that all the pasta is coated.
 
7. Crumble over the goat’s cheese, sprinkle with fresh lemon zest and a handful of basil leaves. Serve!
 
 
“Buon Appetito!” – I am looking forward to seeing how every one else got on with this month’s slightly more challenging mingle!
 
Thank you Giulia for setting this challenge – it was exactly what I needed and has definitely encouraged me to experiment more and continue to make fresh pasta at home.
 

May 26, 2011

Chive Scrambled Eggs on Rye with Local Goat’s Cheese

I don’t often share breakfast posts, usually because we are in too much of a hurry in the mornings, but very often breakfast is my favourite meal of the day. When I was young, whenever my dad made breakfast, he would always make scrambled eggs with chopped chives, in Polish ‘szczypiorek‘ – try saying that before 8am! The Poles are also very fond of grains and rye bread is quite typical, so this morning I served mine on rye sourdough. I also couldn’t resist crumbling over some of the most delicious locally produced Goat’s Cheese from Childwickbury Farm, found in a local deli yesterday.


You could add chopped Polish ham too, but as it’s National Vegetarian Week (the goat’s cheese is made using vegetarian rennet) I have left it out.
 
Chive Scrambled Eggs (with Goat’s Cheese)
(Serves 2)
Ingredients:
2 teaspoons butter
1 tablespoon fresh garden chives, chopped
2 organic, free range eggs, lightly whisked
2 slices bread (I used rye sourdough)
1 tablespoon crumbly goat’s cheese – optional
Method:
1. Toast and butter your bread
2. Melt a teaspoon of butter in a frying pan gently – take care not to burn it
3. Add in the chopped chives and coat in the butter
4. Mix in the lightly whisked eggs, allow to cook for 30 seconds and then begin stirring the eggs until they scramble.
5. Once cooked, serve the scrambled eggs on toast, sprinkle with goat’s cheese and a few fresh chives. 
 

May 11, 2011

Lentil & Walnut Salad with Feta Roasted Salmon (Nigella)

The theme for Forever Nigella #5 has been announced by Dom at Belleau Kitchen and it is to be “Salad Days.” As we roll into some warmer weather I am told food becomes less “heavy and stodgy.” Personally, I would just carry on eating the stodge as I’m not much of a salad girl myself, but I have to say, I am always inspired by Nigella’s salads. I think its probably because Nigella does a great job of padding things out and making her meals substantial, even though they may be ‘light.’

I was after something really quick and easy to make for supper so I turned to ‘Nigella Express,’ which has lots of ideas for speedy meals. I did have two salmon fillets to use, so I baked them in the oven, drizzled with olive oil, dotted with a teeny amount of butter, seasoned with salt and pepper and scattered with some feta and lemon zest and a bit of parsley. I confess to not having much else around, so my attention was drawn to the very back of the book to a section entitled “Storecupboard SOS.” I found a lovely sounding ‘Lentil and Walnut Salad’ and though I had most of the ingredients to hand, namely a packet of lentils, some walnuts and walnut oil, I did have to substitute chives for a bit of rocket and sherry vinegar for white balsamic vinegar. You can leave the walnuts chunkier or chop them finer for more texture and I doubled the vinegar and oil quantities as I wanted the dressing to soak into the lentils as well as coat the rocket leaves.
The whole thing worked very well and since I was unusually cooking for one, there was even enough for left for a lunch box for today. Nigella suggests serving this salad with her Golden Goat’s Cheese, which I will definitely try next time. Grilled Halloumi would be great too for a vegetarian alternative, but the salmon topped with feta went so well with the crunchy walnuts and sweet but sharp white balsamic. This would also make a great supper for friends.

So, that’s me converted to salad then. Can’t wait to see the round up for some more lovely ideas.

Nigella’s Lentil & Walnut Salad
with Feta Roasted Salmon
(Lentil & Walnut Salad adapted from Nigella Express)

Ingredients
For the salmon –
2 fillets of salmon
Olive Oil
Salt and Pepper
30g cubed or crumbled Feta cheese
A teaspoon of greated lemon zest
A sprinkle of herbs – parsley or mint

For the Lentil & Walnut Salad
400g can organic Puy lentils (ready cooked)
A handful of rocket leaves
50g walnut pieces (finely chopped)
1/4 teaspoon salt
8 teaspoons walnut oil
4 teaspoons white balsamic vinegar

Method

1. Preheat your oven to 180 degrees celcius. Place salmon on a baking try on a piece of lightly oiled baking paper
2. Season the salmon fillets with salt and pepper, drizzle with olive oil and sprinkle over the cumbled Feta cheese and the lemon zest. Bake in the oven for fifteen minutes or until cooked through
3. Drain and rinse the lentils and put them in a bowl with the finely chopped walnuts and rocket salad leaves
4. Whisk together the walnut oil and vinegar, season with salt and pepper and stir together well
5. Once the salmon is cooked, pile on a plate and eat!
Serves 2 or 1 plus lunch the next day

April 4, 2011

Sausage and Courgette Risotto

Last week I caught up on the phone with my sister over in Italy who (during an amazing conversation about Italian food) said that she had seen a really delicious looking sausage and courgette risotto that she didn’t eat, but immediately felt compelled to try herself at home. I did the same and the result was really good.

I love making risotto, there is something so therapeutic about gently stirring as the rice slowly cooks and releases a wonderful creaminess.  This has now become my new favourite risotto recipe, replacing a classic porcini and wild mushroom risotto that my husband claims is his favourite meal.
It was also the perfect opportunity to test out my new ‘Spon’ – not a spelling error – kindly sent to me by Neil Robertson of The Spon Co. The Spon is Neil’s clever invention and he went on to win the World Porridge Making Championship using it! 
One day, as Neil was stirring his cake mix, he realised he had to keep stopping to scrape the cake mix from the ‘bowl’ of the spoon and so he decided to invent a spoon with two convex sides – basically there is no ‘dip’, just two backs with extra weight to increase beating power.
When making a cake mix, creaming or beating by hand, you end up with no lumps and a more aerated mix. As demonstrated by Neil, it also makes great porridge!  I found that the Spon was also absolutely perfect for stirring the risotto and will always use it for that from now on.  Since you get two Spons in a packet, I found that the baby Spon was great for scrambled eggs or stirring a roux.  
You can buy them online for the very reasonable price of £5.00 (plus postage) for a pair of carved beech spons. Mine also came with a recipe for The Spon Sponge, which I will try next.
I hope you enjoy making the risotto (recipe below). I used some pancetta and parmesan pork sausages, though really any high-quality sausages would work well. Take care not to overmix. I always have a separate pan of gently boiling stock next to my risotto pan, so that the stock is almost boiling as you add each ladleful of stock to the rice.  
Let me know what your favourite risotto flavours are!
Sausage & Courgette Risotto
Recipe from my sister in Italy

Ingredients

2 tablespoons of olive oil
1 large onion, finely chopped
1 stick celery, finely chopped
2 carrots, peeled and finely chopped
6 high-quality pork sausages (taken out of casing)
350g Arborio risotto rice
1 glass white wine
1.5 litres of chicken stock (or vegetable stock)
3 courgettes, cubed
A knob of butter
50 g grated parmesan cheese
Method
1. Prepare all of the vegetables and remove the sausages from their casing.
2. Heat the olive oil in a heavy-based pan on a medium heat, add the onion, celery and carrot and cook for about 5 minutes until soft.
3. Add the sausage to the pan and break it up with a spoon so that it crumbles and starts to resemble mince. Again, cook for about 5 mintes until it takes on some colour.
3. Add the risotto rice to the pan and mix well so that all the rice is coated with the olive oil. Make sure the heat is not too high, so that the rice doesn’t stick to the pan.
4. Add the wine, stir well and allow it to bubble until it has evaporated.
5. One ladleful at a time, add the stock, stir a little and simmer until the rice absorbs most of the stock before adding in the next ladleful. (I keep a sperate pan of gently boiling stock next to the risotto pan so that the stock always goes in hot). You will start to see that you rice goes quite creamy. In total, you should keep adding your stock, simmering and stirring for around 10 minutes.
6. Towards the end of the cooking time, add the courgettes – these really don’t need any time at all and you are aiming for them to stay quite firm and crunchy. The rice also needs to stay quite firm – it should have a bite to it (I overcooked mine as the kids prefer it to be a bit sloppy!)
7. At the very end, stir in the knob of butter and add the parmesan cheese. I usualluy serve it with a pile of cheese on top too!
In total, the risotto takes around 15 minutes of cooking time – unless you have bought ‘risotto pronto’ or quick cook risotto which will take much less.
Loved this recipe! Thanks sis!
Thank you also to Neil for kindly sending me the Spons.

March 10, 2011

Hellmann’s Mayonnaise Chocolate Brownies

This week I was invited to attend an event by Hellmann’s who want to inspire us with simple recipes using Hellmann’s Mayonnaise as an ingredient in cooking.

When I think of Hellmann’s, my immediate thought is that of a large dollop (or two) served with some lovely chips. I am also slightly in love with mayonnaise with pizza (am I strange?!)  However, Hellmann’s are keen to demonstrate that their mayonnaise is not just a condiment – it is a versatile ingredient to cook with too…even in chocolate brownies!

Posh Brownies – Photo Hellmann’s

But surely loads of mayo can’t be healthy?! Well actually, Hellmann’s are also keen to point out that since their ‘Real’ mayonnaise is made with free range eggs, vinegar and rapeseed oil (which naturally contains Omega 3 and mono and polyunsaturated fats) if you use Hellmann’s in place of butter you can reduce the saturated fat content of a recipe.

For example, thinking of the family favourite ‘mash potato’, you can cut up to 85% of the saturated fat if you swap any butter you would have added with a dollop of Hellmann’s.  Interestingly, using the mayo in brownies (also in place of butter) reduces their saturated fat by 55%. Bonus.

So, to inspire people to get creative with their mayo, Hellmann’s have devised some easy-to-make recipes for you to try, which are all available at http://www.hellmanns.co.uk/ along with all the nutritional values and information.

On the night in question, the recipes were prepared by food stylist and cook Genevieve Taylor.  We tried the Lemon and Garlic Roasted Salmon with Colcannon Mash and the Smoked Haddock Cakes with Mustard Mayo.  I really enjoyed both the savoury dishes, the topping on the salmon was yummy and my kids would love the haddock fish cakes. I will definitely be trying all the recipes at home (see below).

Lemon & Garlic Roasted Salmon with Roasted Tomatoes – photo Hellmann’s

“Loved Up” Mash – Colcannon – photo Hellmann’s

Smoked Haddock Cakes with Mustard Mayo – Photo Hellmann’s

Hellmann’s also gave us a huge pink mixing bowl full of all the ingredients for their ‘Posh Brownies’ so I gave them a go at home to see how they turned out (well, it would have been rude not too since I had all the ingredients to hand!)  They were, indeed, simple and quick to make and I can’t say that swapping the butter for Hellmann’s was bad at all!  They were crispy on top and gooey on the inside.  My only tweak, since I am partial to extra-gooey brownies, was to add two (quite black) mashed bananas – so you could try that too.

My gooey brownies made with Hellmann’s Mayo!

On a roll, I also came up with my own quick pasta recipe, perfect for a low-hassle kids’ tea – using Hellmann’s as a stir through sauce just at the end – Tuna Fish Pasta & Peas with Hellmann’s Mayo – see below for recipe.  If you happen to shop at Sainsbury’s, Hellmann’s is on special offer and they are donating some of the profits from sales to Comic Relief.

Ren’s Tuna Fish Pasta & Peas with Hellmann’s Mayo (own recipe)

For more recipes and inspiration visit http://www.hellmanns.co.uk/ and if you try of the recipes yourself, don’t forget to let me know how you got on by leaving me a comment in the box below!

Hellmann’s Recipes (printed with permission)


Lemon & Garlic Roasted Salmon with Roasted Tomatoes
Serves 4


Ingredients
1 tsp lemon juice
4 dollops* of Hellmann’s Light Mayonnaise
1 tsp crushed garlic
4 salmon fillets
250g cherry tomatoes
*A dollop is one level tablespoon of Hellmann’s mayonnaise (15ml)
Method
Mix together the lemon juice, mayonnaise and garlic.
Drizzle over the salmon fillets and tomatoes.
Bake at 170°C for 15 minutes.

‘Loved Up’ Colcannon Mash
Serves 4-6

Ingredients
500g cooked potatoes
25ml milk (semi skimmed)
4 dollops* of Hellmann’s Real Mayonnaise
1 large white onion, finely sliced
150g cabbage, shredded
1.5 tbsp olive oil
*A dollop is one level tablespoon of Hellmann’s mayonnaise (15ml)

Method

Peel potatoes and boil in unsalted water until soft.
Mash with milk and mayonnaise.
While potatoes are boiling, blanch the cabbage.
Fry the onions in oil until caramelised, then add the par-boiled cabbage.
Fry together over a medium heat for 4-5 minutes.
Add to the mash and serve.

Posh Brownies “For an occasional treat”
Makes 16

Ingredients
40g plain flour
1 tsp baking powder
25g cocoa powder
140g plain chocolate, broken into small pieces
3 medium eggs
225g caster sugar
1 tsp vanilla essence
8 dollops of Hellmann’s Real Mayonnaise (110g)
55g walnuts, finely chopped

Method
Lightly grease a 23cm square cake tin and line with baking paper.
Sift the flour with the baking powder and cocoa.
Put the chocolate into a heat proof bowl over a saucepan of hot water and leave until melted (alternatively, microwave on medium power, stirring occasionally, until just melted).
In a large bowl, whisk the eggs with the sugar and vanilla until slightly thickened.
Whisk in the chocolate mixture.
Fold in the flour mixture, mayonnaise and walnuts.
Pour into the prepared tin and bake in a preheated oven at 160°C for about 30-35 minutes or until a skewer inserted in the centre comes out clean.
Leave to cool in the tin before cutting into squares

For nutritional information see http://www.hellmanns.co.uk/

Ren’s Tuna Fish Pasta and Peas with Hellmann’s Mayo
Serves 4

Ingredients
250g uncooked pasta
200 g frozen peas
1.5 tbsp olive oil or rapeseed oil
1 onion, finely sliced
200g mushrooms (about 10) sliced
1 tin tuna
3 dollops* of Hellmann’s Real Mayonnaise
*A dollop is one level tablespoon of Hellmann’s mayonnaise (15ml)

Method
Cook the pasta according to the packet instructions. With three minutes to go, add the frozen peas and cook together.
In a frying pan, gently fry the onions and mushrooms until soft.
Drain the pasta and peas, drain the tuna.
Add the tuna, onion and mushrooms to the pasta and add your Hellmann’s mayonnaise.
Stir well and serve or eat when cold for lunch!

It was also lovely to meet some fellow bloggers at the event, including Sarah from Maison Cupcake and Helen from Fuss Free Flavours, as well as Genevieve Taylor and Alan Rosenthal who I had to nick-name ‘Mr & Mrs Stew’ since they have both very recently had cook books published entirely on the subject of Stew! 

Alan author of Stewed! and Genevieve author of Stew!
Thank you to Frank PR and Hellmann’s for hosting this fun event at La Cucina Caldesi.

January 10, 2011

Lovely Lentils & Homemade Labneh

So, we are a week into the new diet ‘Healthy Eating Plan’ following the Christmas and New Year binge and things are going well.  To keep myself focused, I’ve been experimenting in the kitchen, rather than taking part in the usual daily snack-athon.

This week, I’ve made a healthy Middle Eastern dish called Lebneh, which is a soft cheese made from yoghurt. I made mine with some of the fat-free natural pro-biotic yoghurt sitting in my fridge. Much too sour (for my taste) to eat on its own.  However, straining it (which removes the whey) turns into a lovely and much more indulgent cream cheese, which can then be used as a dip (for crudites or wholemeal pitta) or can be used as a topping (see second recipe below.)

To make it, mix 500g natural yoghurt with one teaspoon of salt. Place the yoghurt over a paper towel or cloth in a sieve over a bowl. Leave in the fridge overnight, loosely covered with a lid or clingfilm. Some recipes suggest forming a tight bundle with the cloth and tying it with string.


The next day, the liquid should have separated from the cheese into the bowl.  Remove the cheese from the sieve, discard the liquid and place in a clean bowl. Stir in a tablespoon of olive oil if you like and flavour with nuts, herbs or spices. I used lemon olive oil and a sprinkle of parsley. Chopped cucumber, pistachios, pine nuts all work well too.

Next, I turned my hand to lentils and made a Butternut, Lentil and Chickpea Stew (which we had with brown rice). This was a really hearty meal, so much so, that I didn’t miss the meat at all.  It actually made me think about eating less meat, and in doing so, I stumbled across a few campaigns suggesting that if we ate less meat, even just one day per week, we would be helping the climate, saving money, reducing environmental impact and be healthier – all in one easy go!

I’m sure there are plenty of authentic recipes for chickpea curries or for Dhal which you could try, but here is what I threw together in my pressure cooker (times for stove top are included too).


Butternut, Lentil & Chickpea Stew


Ingredients


1 tablespoon olive oil

1 onion (white or red, finely chopped)

2 cm piece fresh ginger (minced)

2 cloves garlic (finely chopped)

300 g red lentils (dry, uncooked)

1 tsp black mustard seeds

1 tsp cumin seeds or powder

1 tsp ground tumeric

1 tsp garam masala

1 butternut squash (peeled, de-seeded, cubed)

2 carrots (grated)


1 tin tomatoes

600 ml vegetable stock


Optional (add ten minutes before the end)


1 can chickpeas (drained and rinsed)

1 can green lentils (drained and rinsed)

1 bag fresh spinach (washed)


Method


Prepare the onion, carrots and butternut squash as above.  Mince the ginger, finely chop the garlic.


Add one tablespoon olive oil to a large pan. Gently fry the onion for a few minutes then add the ginger and garlic to the pan. Coat well with the olive oil, make sure the heat is not too hot.


Add the mustard seeds, cumin seeds or powder, tumeric and garam masala to the pan. Mix well.


Add the butternut squash and grated carrot and stir around.


Add a coupe of handfuls of red lentils, stir again and pour in the tinned tomatoes and vegetable stock over the top. All of the ingredients should be covered, if not, add some water.


Cover and simmer for around 45 minutes (15 minutes in a pressure cooker)


The butternut squash should be really soft, almost blending into the liquid.  The lentils should be cooked through.


Next, add in your tin of chickpeas and any other tinned lentils/beans you like.  Cook for another ten minutes.


Finally, add the spinach and mix into the stew until wilted.


Check the seasoning and serve.

For more information on being ‘meat free’ and for some lovely recipes ideas, see Meat Free Monday (Paul McCartney’s campaign) or Meat Free Mondays another site dedicated to helping us have at least one day a week totally free of meat.

  • « Previous Page
  • Page 1
  • Page 2
  • Where to buy clarithromycin 500mg in kingston
  • Where to buy allopurinol in columbia online
  • Windsor zithromax 1000mg shipping
  • Generic dabigatran 110mg from oregon
  • Buy zocor 20mg online from windsor
  • Where to buy zithromax 500mg in winnipeg online
  • Buy rizatriptan 10mg from honolulu
  • What is better generic or brand caverta 100mg
  • Buy bystolic 2.5mg from saskatchewan
  • Buy allopurinol from indianapolis

Primary Sidebar

Posts by email!

Subscribe now to get new posts direct to your email inbox

Search the site

Follow me on Instagram!

340,000+ Pinterest Followers – RenBehanFood

Visit Ren Behan Food's profile on Pinterest.

Archives

Footer

Copyright © 2023 Ren Behan · Custom Theme by Moonsteam Design